#01 – Introduction
Hey gang & welcome to your very first HTML & CSS tutorial. Throughout this crash course series I’ll take you from total beginner to create great-looking sites with HTML & CSS. In this video, we’ll cover what HTML & CSS are, as well as setting up our dev environment.
HTML & CSS
- No prior HTML or CSS knowledge is required
- Set up a local development environment
- Use newer, modern HTML5 features & specification
- Learn about responsive & mobile design
- Create a web page project from scratch using HTML & CSS
Course Links:
What is HTML?
Hypertext Markup Language (超文本標記語言)
- Used to structure content on a web page (images, text, forms etc)
- We structure content using HTML tags
<p> content </p>
<a> link </a>
<img>
What is CSS?
Cascading Style Sheets (階層式樣式表)
- Works alongside HTML
- Used to style web pages to make them look better
- Change colours, position, effects, font sizes etc
程式編輯器
- VS Code download
- Sublime Text
- Atom
- Notepad++
網頁瀏覽器
打開資料夾
- 點擊 Open Folder 選擇要開啟的資料夾
新增檔案方式
- 右鍵 New File
- 左鍵點擊 New File 圖示
檔案命名為 index.html。
// index.html

<!DOCTYPE html>
<html>
  <head>
    <title>Learning HTML</title>
  </head>
  <body>

    <p>hello, world</p>
    <p>my first web page!</p>

  </body>
</html>
Extensioins
- 安裝 Live Server
- 在 index.html 檔案中右鍵 Open with Live Server
在瀏覽器檢視程式碼
- 在網頁畫面中點擊右鍵檢查(Inspect)
Summary
- HTML is markup language to structure content
- CSS is the language used to style web pages
- How to create HTML file using VS Code as our editor
- Seen what HTML tags are and how we use them
- Know that the visible part of a web page goes in the <body> tag
- Seen how to preview the HTML page in a browser
#02 – HTML Basics
In this HTML tutorial I’ll show you the basics of HTML syntaxt and how to construct HTML tags & documents.
HTML Tags
- <strong>
- <em>
- <small>
- <h1>~ <h6>
- <ul>、<li>
- <ol>、<li>
- <div>
- <span>
- <br>
- <hr>
- <img>
- <a>
- <blockquote>
- <!–>
快捷鍵
- Emmet abbreviation:HTML Tags + tab
- 註釋:Ctrl + /
// index.html

<!DOCTYPE html>
<html>
  <head>
    <title>Learning HTML</title>
  </head>
  <body>

    <div>
      <p>hello, <strong>world</strong></p>
      <p>my <small>first</small> web <em>page!</em></p>
      <a href="https://www.thenetninja.co.uk">the net ninja website</a>
      <a href="about.html">about page</a>
    </div>

    <div>
      <h1>heading 1</h1>
      <h2>heading 2</h2>
      <h3>heading 3</h3>
      <h4>heading 4</h4>
    </div>

    <div>
      <ul>
        <li>yoshi</li>
        <li>luigi</li>
        <li>toad</li>
      </ul>
    </div>

    <div>
      <ol>
        <li>yoshi</li>
        <li>luigi</li>
        <li>toad</li>
      </ol>
    </div>

    <!-- span tag below -->
    <span>I am a <br>span tag</span>

    <hr>

    <img src="img/ninja.png" alt="a picture of a ninja">

    <blockquote cite="http://www.oscarwildesite.com">
      we are all in the gutter, but some of us are looking at the stars
    </blockquote>

    <p style="color: orange;">style me :)</p>

  </body>
</html>
// about.html
<!DOCTYPE html>
<html>
<head>
<title>Learning HTML</title>
</head>
<body>
<h1>about us</h1>
</body>
</html>Summary
- Learnt some of the most common HTML tags in web pages
- p, ul, li, div, a, img, etc
- Talked about attributes (src, href, cite ,alt etc)
- How to create comments in an HTML file
#03 – HTML Forms
In this HTML tutorial I’ll explain how to create forms in HTML, (using some newer HTML 5 input fields too). We’ll look at email fields, text fields, password fields and more.
// index.html

<!DOCTYPE html>
<html>
  <head>
    <title>HTML Forms</title>
  </head>
  <body>

    <h1>HTML Forms</h1>

    <form action="">
      <label for="username">enter username:</label>
      <input type="text" id="username" name="username" placeholder="username" required>
      <br><br>
      <label for="email">enter email:</label>
      <input type="email" id="email" name="email" placeholder="your email" required>
      <br><br>
      <label for="password">password:</label>
      <input type="password" id="password" name="password" placeholder="choose a password" required>

      <p>Select your age:</p>

      <input type="radio" name="age" value="0-25" id="option-1">
      <label for="option-1">0-25</label>
      <input type="radio" name="age" value="26-50" id="option-2">
      <label for="option-2">26-50</label>
      <input type="radio" name="age" value="51+" id="option-3">
      <label for="option-3">51+</label>

      <br><br>

      <label for="question">Security question:</label>
      <select name="question" id="question">
        <option value="q1">What colour are your favourite pair of socks?</option>
        <option value="q2">If you could be a vegetable, what it be?</option>
        <option value="q3">What is your best ever security question?</option>
      </select>

      <br><br>

      <label for="answer">Security question answer:</label>
      <input type="text" id="answer" name="answer">

      <br><br>

      <label for="bio">Your bio:</label><br>
      <textarea name="bio" id="bio" cols="30" rows="10" placeholder="about your..."></textarea>

      <br><br>

      <input type="submit" value="submit the form">

    </form>

  </body>
</html>
快捷鍵
- 多處程式碼一次輸入:alt + 滑鼠左鍵
補充文件
Summary
- How to create a web form and what the ‘action’ attribute is for
- Seen a lot of the most common input types
- text, email, password, radio, select, textarea
- How to use labels, the id attribute & the name attribute
- How forms are submitted and validated
#04 – CSS Basics
In this CSS tutorial for beginners we’ll have a look at the basic syntax of CSS and how we can use it to make our web pages look better.
CSS (Style Sheets)
style sheet – a list of CSS rules / rule sets
// 範例程式碼
div {
  color: red;
  margin: 20px;
}

p {
  font-weight: bold;
}
selectors (選擇器)
- div
- p
declarations (宣告)
- color: red;
- margin: 20px;
- font-weight: bold;
// index.html - 1

<!DOCTYPE html>
<html>
  <head>
    <title>CSS Basics</title>
  </head>
  <body>

    <h1>CSS Basics</h1>

    <p>Lorem ipsum dolor, sit amet consectetur adipisicing elit. Suscipit aliquid obcaecati neque sunt beatae quis saepe asperiores ea nobis dolorem. Unde quis nobis facere iure, veritatis placeat iusto ratione facilis!</p>

    <div>
      <h2>Ninja available for hire</h2>
      <p>Lorem ipsum dolor sit amet consectetur, adipisicing elit. Suscipit id labore, similique quod hic reprehenderit delectus quaerat reiciendis maiores pariatur, nam cum harum non aliquam, vel cumque quae! Quisquam, architecto.</p>
      <ul>
        <li>Ninja Yoshi</li>
        <li>Ninja Mario</li>
        <li>Ninja Shaun</li>
      </ul>
    </div>

  </body>
</html>
// about.html - 1
<!DOCTYPE html>
<html>
<head>
<title>CSS Basics</title>
</head>
<body>
<h1>About me</h1>
<p>Lorem ipsum dolor sit amet consectetur adipisicing elit. Sed necessitatibus fugit ducimus hic qui eligendi repellat debitis rem molestias reiciendis, quos commodi possimus voluptatum provident natus, ipsam veritatis tenetur doloribus.</p>
</body>
</html>// index.html - 2
<!DOCTYPE html>
<html>
<head>
<style>
h1 {
color: orange;
}
p {
color: slategray;
}
</style>
<title>CSS Basics</title>
</head>
<body>
<h1>CSS Basics</h1>
<p>Lorem ipsum dolor, sit amet consectetur adipisicing elit. Suscipit aliquid obcaecati neque sunt beatae quis saepe asperiores ea nobis dolorem. Unde quis nobis facere iure, veritatis placeat iusto ratione facilis!</p>
<div>
<h2>Ninja available for hire</h2>
<p>Lorem ipsum dolor sit amet consectetur, adipisicing elit. Suscipit id labore, similique quod hic reprehenderit delectus quaerat reiciendis maiores pariatur, nam cum harum non aliquam, vel cumque quae! Quisquam, architecto.</p>
<ul>
<li>Ninja Yoshi</li>
<li>Ninja Mario</li>
<li>Ninja Shaun</li>
</ul>
</div>
</body>
</html>// about.html - 2
<!DOCTYPE html>
<html>
<head>
<style>
h1{
color: orange;
}
p{
color: slategray;
}
</style>
<title>CSS Basics</title>
</head>
<body>
<h1>About me</h1>
<p>Lorem ipsum dolor sit amet consectetur adipisicing elit. Sed necessitatibus fugit ducimus hic qui eligendi repellat debitis rem molestias reiciendis, quos commodi possimus voluptatum provident natus, ipsam veritatis tenetur doloribus.</p>
</body>
</html>// index.html - 3
<!DOCTYPE html>
<html>
<head>
<link rel="stylesheet" href="style.css">
<title>CSS Basics</title>
</head>
<body>
<h1>CSS Basics</h1>
<p>Lorem ipsum dolor, sit amet consectetur adipisicing elit. Suscipit aliquid obcaecati neque sunt beatae quis saepe asperiores ea nobis dolorem. Unde quis nobis facere iure, veritatis placeat iusto ratione facilis!</p>
<div>
<h2>Ninja available for hire</h2>
<p>Lorem ipsum dolor sit amet consectetur, adipisicing elit. Suscipit id labore, similique quod hic reprehenderit delectus quaerat reiciendis maiores pariatur, nam cum harum non aliquam, vel cumque quae! Quisquam, architecto.</p>
<ul>
<li>Ninja Yoshi</li>
<li>Ninja Mario</li>
<li>Ninja Shaun</li>
</ul>
</div>
</body>
</html>// style.css - 3
h1 {
color: orange;
background-color: slategray;
font-size: 20px;
text-decoration: underline;
font-family: arial;
text-align: center;
}
p {
color: slategray;
}// about.html - 3
<!DOCTYPE html>
<html>
<head>
<link rel="stylesheet" href="style.css">
<title>CSS Basics</title>
</head>
<body>
<h1>About me</h1>
<p>Lorem ipsum dolor sit amet consectetur adipisicing elit. Sed necessitatibus fugit ducimus hic qui eligendi repellat debitis rem molestias reiciendis, quos commodi possimus voluptatum provident natus, ipsam veritatis tenetur doloribus.</p>
</body>
</html>text-decoration
- line-through
- underline
- none
CSS Web Safe Fonts
text-align
- left
- right
- center
light-height
- 30px
letter-spacing
- 3px
column-count
- 3
column-gap
- 60px
border
- border-width: 4px;
- border-style: solid;
- border-color: crimson;
- border: 4px solid crimson;
- border-left
- border-top
- border-right
- border-bottom
- solid
- dashed
- dotted
comment
- /* */
list-style-type
- disc
- square
- none
text-shadow
- 2px 2px lightgray;
// style.css - 4

h1 {
  color: orange;
  background-color: slategray;
  font-size: 20px;
  text-decoration: underline;
  font-family: arial;
  text-align: center;
}
p {
  color: slategray;
  text-align: right;
  line-height: 30px;
  letter-spacing: 3px;
  column-count: 3;
  column-gap: 60px;
}
ul {
  /* border-width: 4px;
  border-style: solid;
  border-color: crimson; */
  /* border: 4px solid crimson; */
  border-bottom: 4px solid crimson;
  border-left: 8px dashed crimson;
}
li {
  list-style-type: disc;
  text-shadow: 2px 2px lightgray;
}
Colours / Hex Codes
- white、black、yellow、green
- #42f4f1、#ab55ef
#42f4f1
- 42 – R
- f4 – G
- f1 – B
// style.css - 5

h1 {
  color: orange;
  background-color: slategray;
  font-size: 20px;
  text-decoration: underline;
  font-family: arial;
  text-align: center;
}
p {
  color: slategray;
  text-align: right;
  line-height: 30px;
  letter-spacing: 3px;
  column-count: 3;
  column-gap: 60px;
}
ul {
  /* border-width: 4px;
  border-style: solid;
  border-color: crimson; */
  /* border: 4px solid crimson; */
  border-bottom: 4px solid crimson;
  border-left: 8px dashed #25bb2d;
}
li {
  list-style-type: disc;
  /* text-shadow: 2px 2px lightgray; */
  text-shadow: 2px 2px #e9e9e9;
}
Inline Elements
- Don’t take up any more room than their content needs
- span, img, strong, em, a and more…
Block-level Elements
- Take up the whole width of a page regardless of content
- p, div, h1, h2, h3, ul, li and more…
// index.html

<!DOCTYPE html>
<html>
  <head>
    <link rel="stylesheet" href="style.css">
    <title>CSS Basics</title>
  </head>
  <body>

    <h2>Inline elements</h2>

    <span>span tag</span>
    <em>em tag</em>
    <a href="">anchor tag</a>
    <span>span tag</span>

    <h2>Block-level elements</h2>

    <div>div tag</div>
    <div>another div tag</div>
    <h3>h3 tag</h3>
    <p>paragraph tag</p>
    <ul>
      <li>li tag</li>
      <li>another li tag</li>
    </ul>

  </body>
</html>
Inline、Block-level elements 區分
- 使用 Google Elements 查看元素
- 透過 Google Styles 查看是否有 display: block;
// index.html

<!DOCTYPE html>
<html>
  <head>
    <link rel="stylesheet" href="style.css">
    <title>CSS Basics</title>
  </head>
  <body>

    <h2>Inline elements</h2>

    <span>span tag</span>
    <em>em tag</em>
    <a href="">anchor tag</a>
    <span>span tag</span>

    <h2>Block-level elements</h2>

    <div>div tag</div>
    <div>another div tag</div>
    <h3>h3 tag</h3>
    <p>paragraph tag</p>
    <ul>
      <li>li tag</li>
      <li>another li tag</li>
    </ul>

  </body>
</html>
// style.css - Inline、Block-level elements 修改
span {
display: block;
}
div {
display: inline;
}Margin & Padding
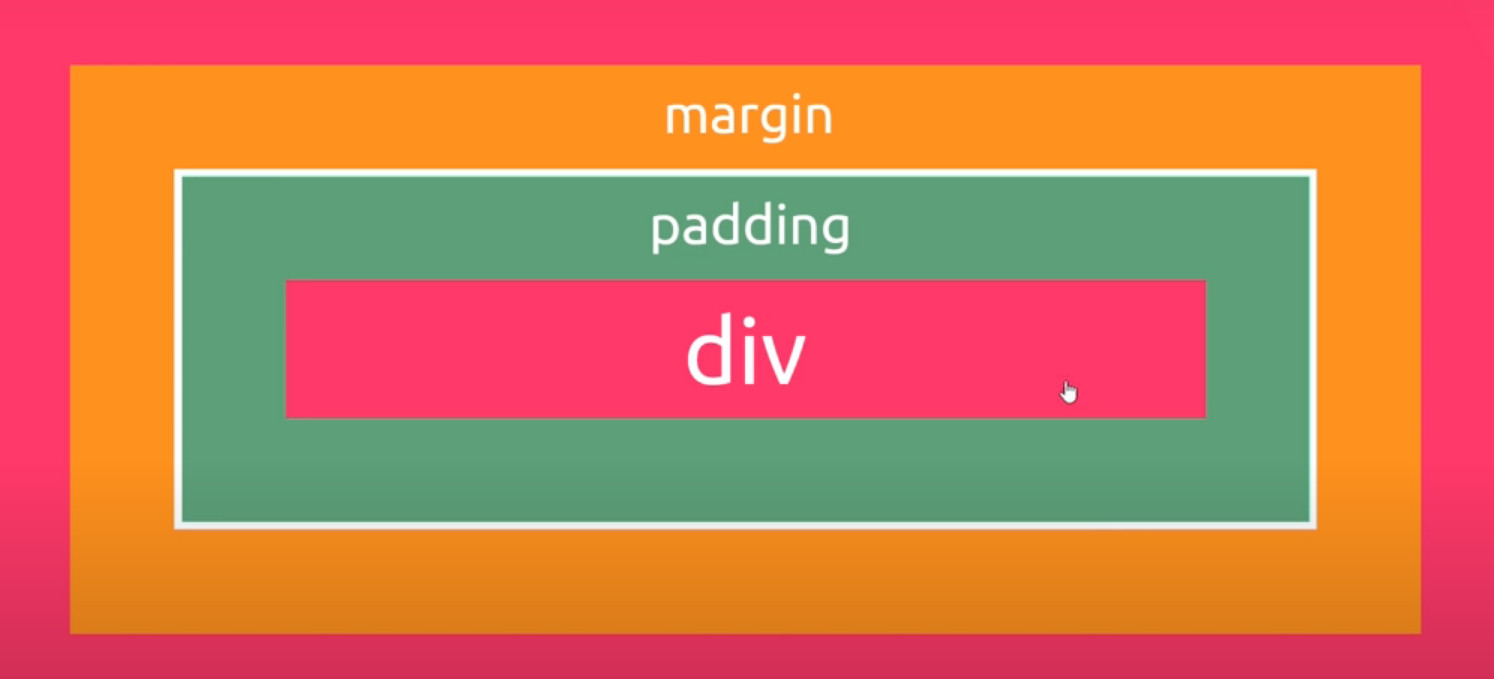
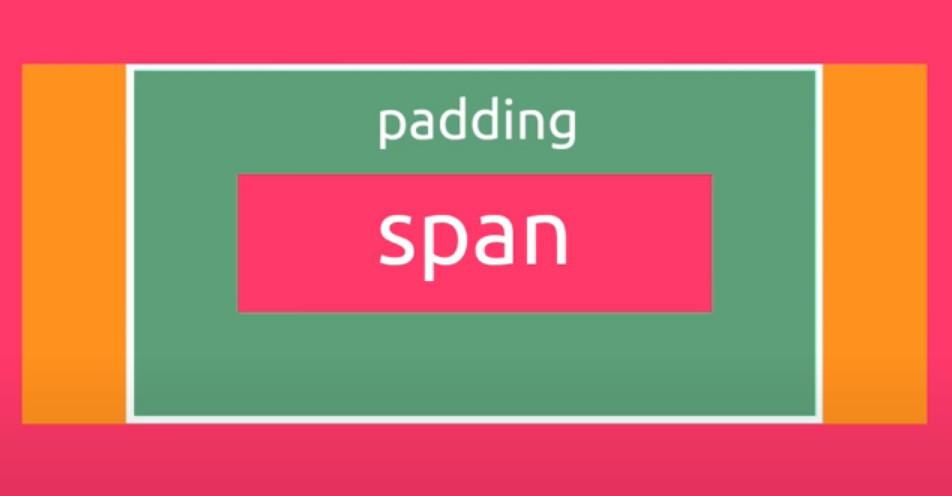
- span – margin 只能左右增加空間。
- margin collapse – 邊界重疊
// index.html

<!DOCTYPE html>
<html>
  <head>
    <link rel="stylesheet" href="style.css">
    <title>CSS Basics</title>
  </head>
  <body>

    <h2>Inline elements</h2>

    <span>span tag</span>
    <em>em tag</em>
    <a href="">anchor tag</a>
    <span>span tag</span>

    <h2>Block-level elements</h2>

    <div>div tag</div>
    <div>another div tag</div>
    <h3>h3 tag</h3>
    <p>paragraph tag</p>
    <ul>
      <li>li tag</li>
      <li>another li tag</li>
    </ul>

  </body>
</html>
// style.css - 1
span {
/* display: block; */
margin: 20px;
padding: 20px;
}
div {
/* display: inline; */
border: 2px solid crimson;
margin: 20px;
padding: 20px;
}// style.css - 2
span {
display: block;
margin: 20px;
padding: 20px;
}
div {
/* display: inline; */
border: 2px solid crimson;
margin: 20px;
padding: 20px;
}Default Browser Styles (瀏覽器預設樣式)
Summary
- What CSS is and how to add it to a webpage
- Basic selectors and some different declarations / properties
- Hex codes and the VS Code colour picker
- Inline and Block-level elements (and inline-block)
- Margin & Padding
- Default browser styles
#05 – CSS Classes & Selectors
ID
- 一個頁面每個 id 名稱只能有一個
- 絕大部分我們只會使用在 JavaScript
a[href]
- a[href=”https://www.google.com”]
- a[href*=”google”]
- a[href$=”.com”]
// index.html

<!DOCTYPE html>
<html>
  <head>
    <link rel="stylesheet" href="style.css">
    <title>CSS Basics</title>
  </head>
  <body>

    <div id="content">

      <p>Lorem ipsum dolor sit amet, consectetur adipisicing elit. Optio quae eos quaerat a assumenda nesciunt dolorum necessitatibus ea tenetur accusantium vel aspernatur maxime ipsa, rem, reprehenderit excepturi, veritatis eligendi laudantium.</p>

      <p class="error">Lorem ipsum dolor sit amet consectetur adipisicing elit. Numquam, eius ullam corrupti nam modi nemo, necessitatibus officia laboriosam quaerat explicabo provident, temporibus nobis aperiam ipsam sequi accusamus iusto? Ut, exercitationem.</p>

      <p class="success">Lorem ipsum dolor sit amet consectetur, adipisicing elit. Dignissimos non culpa tempore. Voluptatum maxime, et doloribus repellat cupiditate ipsum, consectetur qui iure quod obcaecati, inventore voluptatem fuga! Tempora, similique velit?</p>

      <p class="success feedback">Lorem ipsum dolor sit amet consectetur adipisicing elit. Enim cum harum et, vitae reprehenderit iure error, amet eius facere ullam odio porro! In deleniti expedita nisi tempora temporibus illum rerum.</p>

    </div>

    <p>Lorem ipsum dolor sit, amet consectetur adipisicing elit. Voluptas, voluptatum nemo, quae molestias expedita saepe dicta velit iste esse temporibus, ex labore perferendis ratione eos. Et blanditiis eius fugiat suscipit.</p>

    <div class="error">I am an error</div>

    <a href="https://www.thenetninja.co.uk">the best site on the web</a>
    <a href="https://www.google.com">Google Website</a>
    <a href="https://www.thenetninja.co.uk">the best site on the web</a>

  </body>
</html>
// style.css
/* p.error {
color: red;
}
p.success {
color: #4fdb4f;
}
p.success.feedback {
border: 1px dashed #4fdb4f;
}
#content {
background-color: #ebebeb;
padding: 20px;
} */
/* div .error{
color: red;
} */
a[href*="thenetninja"]{
background-color: #3dd13d;
color: white;
text-decoration: none;
font-weight: bold;
text-transform: uppercase;
}
a[href$=".com"]{
color: white;
background: red;
border: 2px solid blue;
}The Cascade
Inheritance(繼承)
- HTML elements can inherit CSS properties that are applied to their parents
// index.html

<!DOCTYPE html>
<html>
  <head>
    <link rel="stylesheet" href="style.css">
    <title>CSS Basics</title>
  </head>
  <body>

    <div id="content">
      ninja
      <p>Lorem ipsum dolor sit amet, consectetur adipisicing elit. Optio quae eos quaerat a assumenda nesciunt dolorum necessitatibus ea tenetur accusantium vel aspernatur maxime ipsa, rem, reprehenderit excepturi, veritatis eligendi laudantium.</p>

      <p class="error">Lorem ipsum dolor sit amet consectetur adipisicing elit. Numquam, eius ullam corrupti nam modi nemo, necessitatibus officia laboriosam quaerat explicabo provident, temporibus nobis aperiam ipsam sequi accusamus iusto? Ut, exercitationem.</p>

      <p class="success">Lorem ipsum dolor sit amet consectetur, adipisicing elit. Dignissimos non culpa tempore. Voluptatum maxime, et doloribus repellat cupiditate ipsum, consectetur qui iure quod obcaecati, inventore voluptatem fuga! Tempora, similique velit?</p>

      <p class="success feedback">Lorem ipsum dolor sit amet consectetur adipisicing elit. Enim cum harum et, vitae reprehenderit iure error, amet eius facere ullam odio porro! In deleniti expedita nisi tempora temporibus illum rerum.</p>

    </div>

    <p>Lorem ipsum dolor sit, amet consectetur adipisicing elit. Voluptas, voluptatum nemo, quae molestias expedita saepe dicta velit iste esse temporibus, ex labore perferendis ratione eos. Et blanditiis eius fugiat suscipit.</p>

    <div class="error">I am an error</div>

    <a href="https://www.thenetninja.co.uk">the best site on the web</a>
    <a href="https://www.google.com">Google Website</a>
    <a href="https://www.thenetninja.co.uk">the best site on the web</a>

  </body>
</html>
// style.css
/* p.error {
color: red;
}
p.success {
color: #4fdb4f;
}
p.success.feedback {
border: 1px dashed #4fdb4f;
}
#content {
background-color: #ebebeb;
padding: 20px;
} */
/* div .error{
color: red;
} */
/* a[href*="thenetninja"]{
background-color: #3dd13d;
color: white;
text-decoration: none;
font-weight: bold;
text-transform: uppercase;
}
a[href$=".com"]{
color: white;
background: red;
border: 2px solid blue;
} */
div{
color: lightcoral;
border: 1px solid gray;
margin: 40px;
font-weight: bold;
}
div p{
border: inherit;
margin: inherit;
color: crimson;
}
p{
color: orange;
}#06 – HTML 5 Semantics
In this HTML & CSS tutorial for beginners we’ll take a look at some of the newer HTML semantic tags, like section, article, header, nav and aside.
HTML5 Semantic Tags
<article>
  <p>some content</p>
  <p>some more content</p>
</article>- <main>
For the main content of a webpage, unique to that page - <section>
Defines a certain section of a webpage (e.g. blog list, contact info) - <article>
Defines a bit of content which makes up an article (e.g. a blog post) - <aside>
Defines some content related to something else (e.g. similar blogs) - <header>
For the header of a website – contains the nav, title etc - <footer>
For the footer of a website
// index.html

<!DOCTYPE html>
<html>
<head>
  <link rel="stylesheet" href="style.css">
  <title>Marioclub</title>
</head>
<body>

  <header>
    <h1>Marioclub</h1>
  </header>
  <section class="banner">
    <img src="img/banner.png" alt="marioclub welcome banner">
    <div class="welcome">
      <h2>Welcome to <br><span>Marioclub</span></h2>
    </div>
  </section>
  <nav class="main-nav">
    <ul>
      <li><a href="/join.html" class="join">Join the club</a></li>
      <li><a href="/news.html">Latest news</a></li>
      <li><a href="/games.html">New games</a></li>
      <li><a href="/contact.html">Contact</a></li>
    </ul>
  </nav>
  <main>
    <article>
      <h2>It's a me, Mario</h2>
      <p>Lorem ipsum dolor sit amet consectetur adipisicing elit. Provident modi vitae voluptatibus nulla fugiat nihil ut! Natus, repellendus asperiores veritatis non assumenda hic veniam aperiam vitae doloribus eius fugit magni?Lorem ipsum dolor sit amet, consectetur adipisicing elit. Fugiat sunt voluptates ullam, neque vitae aperiam! Corporis odio exercitationem iure fugiat cum. A obcaecati molestias officiis aperiam ad velit dolor non?Lorem ipsum dolor sit amet, consectetur adipisicing elit. Cum modi quas iste accusantium dolorem a! Sit tenetur, assumenda illo facilis culpa dolore dolores molestiae amet possimus autem nobis quasi recusandae.</p>
    </article>
    <ul class="images">
      <li><img src="img/thumb-1.png" alt="mario thumb 1"></li>
      <li><img src="img/thumb-2.png" alt="mario thumb 2"></li>
    </ul>
  </main>
  <section class="join">
    <h2>Join Today!</h2>
    <p>Lorem ipsum dolor sit amet consectetur, adipisicing elit. Assumenda itaque deleniti maxime nesciunt quod recusandae dolorem, aperiam quis enim</p>
    <form>
      <input type="email" name="email" placeholder="Type email & hit enter" required>
    </form>
  </section>
  <footer>
    <p class="copyright">Copyright 2019 Marioclub</p>
  </footer>

</body>
</html>
#07 – Chrome Dev Tools
In this HTML & CSS tutorial for beginners I’ll go through what Google Chrome dev tools are – and how they can help us when creating websites. We’ll look at inspecting elements, getting CSS selectors, editing attributes & CSS rules on the fly and also importing project folders into Chrome for live coding.
打開 Chrome Dev Tools
- 滑鼠右鍵、檢查
- 直接按 F12
講解 Chrome Dev Tools 功能
- Chrome Elements
- Elements
- Copy → Copy Selector
- Edit as HTML
- Scroll into view
- Hide element
- Delete element
- Add attribute
- Styles
- Select an element in the page to inspect it
- Chrome Sources
- Page
- Filesystem
- Chrome Console
- Toggle device toolbar
#08 – CSS Layout & Position
In this HTML & CSS Tutorial we’ll look at how to layout our content on the page. We’ll do this by using a mixture of display types (block, inline & inline-block) as well as looking in detail at the ‘position’ property.
Position & Layout
- Static
- Relative
- Fixed
- Absolute
- Sticky
- … A mixture of ‘static’ and ‘fixed’
// Relative

{
  position: relative;
  left: 20px;
  bottom: 20px;
}
// Fiexed
{
position: fixed;
left: 0px;
top: 0px;
}// Absolute
{
position: absolute;
left: 20px;
bottom: 20px;
}專案範例 – Marioclub
// index.html

<!DOCTYPE html>
<html>
<head>
  <link rel="stylesheet" href="style.css">
  <title>Marioclub</title>
</head>
<body>

  <header>
    <h1>Marioclub</h1>
  </header>
  <section class="banner">
    <img src="img/banner.png" alt="marioclub welcome banner">
    <div class="welcome">
      <h2>Welcome to <br><span>Marioclub</span></h2>
    </div>
  </section>
  <nav class="main-nav">
    <ul>
      <li><a href="/join.html" class="join">Join the club</a></li>
      <li><a href="/news.html">Latest news</a></li>
      <li><a href="/games.html">New games</a></li>
      <li><a href="/contact.html">Contact</a></li>
    </ul>
  </nav>
  <main>
    <article>
      <h2>It's a me, Mario</h2>
      <p>Lorem ipsum dolor sit amet consectetur adipisicing elit. Provident modi vitae voluptatibus nulla fugiat nihil ut! Natus, repellendus asperiores veritatis non assumenda hic veniam aperiam vitae doloribus eius fugit magni?Lorem ipsum dolor sit amet, consectetur adipisicing elit. Fugiat sunt voluptates ullam, neque vitae aperiam! Corporis odio exercitationem iure fugiat cum. A obcaecati molestias officiis aperiam ad velit dolor non?Lorem ipsum dolor sit amet, consectetur adipisicing elit. Cum modi quas iste accusantium dolorem a! Sit tenetur, assumenda illo facilis culpa dolore dolores molestiae amet possimus autem nobis quasi recusandae.</p>
    </article>
    <ul class="images">
      <li><img src="img/thumb-1.png" alt="mario thumb 1"></li>
      <li><img src="img/thumb-2.png" alt="mario thumb 2"></li>
    </ul>
  </main>
  <section class="join">
    <h2>Join Today!</h2>
    <p>Lorem ipsum dolor sit amet consectetur, adipisicing elit. Assumenda itaque deleniti maxime nesciunt quod recusandae dolorem, aperiam quis enim</p>
    <form>
      <input type="email" name="email" placeholder="Type email & hit enter" required>
    </form>
  </section>
  <footer>
    <p class="copyright">Copyright 2019 Marioclub</p>
  </footer>

</body>
</html>
// style.css
body, ul, li, h1, h2, a{
margin: 0;
padding: 0;
font-family: arial;
}
header{
background-color: #F63232;
padding: 20px;
text-align: center;
position: fixed;
width: 100%;
z-index: 1;
top: 0;
left: 0;
}
header h1{
color: white;
border: 8px solid white;
padding: 6px 12px;
display: inline-block;
border-radius: 36px;
}
.banner{
position: relative;
}
.banner img{
max-width: 100%;
}
.banner .welcome{
background-color: #FEB614;
color: white;
padding: 30px;
position: absolute;
left: 0;
/* 設定 % 可自適應延伸 */
top: 30%;
}
.banner h2{
font-size: 74px;
}
.banner h2 span{
font-size: 1.3em;
}
nav{
background-color: #F4F4F4;
padding: 20px;
position: sticky;
/* top: 148px; */
/* top: 147px; */
/* top: 106px; */
top: 104px;
}
nav ul{
white-space: nowrap;
max-width: 1200px;
margin: 0 auto;
}
nav li{
width: 25%;
display: inline-block;
font-size: 24px;
}
nav li a{
text-decoration: none;
color: #4B4B4B;
}
nav li a.join{
color: #F63232;
}
main{
max-width: 100%;
width: 1200px;
margin: 80px auto;
padding: 0 40px;
box-sizing: border-box;
}
article h2{
color: #F63232;
font-size: 48px;
}
article p{
line-height: 2em;
color: #4B4B4B;
}
.images{
text-align: center;
margin: 80px 0;
white-space: nowrap;
}
.images li{
display: inline-block;
width: 40%;
margin: 20px 5%;
}
.images li img{
max-width: 100%;
}
section.join{
background: #F4F4F4;
text-align: center;
padding: 60px 20px;
color: #4B4B4B;
}
.join h2{
font-size: 36px;
}
form input{
margin: 20px 0;
padding: 10px 20px;
font-size: 24px;
border-radius: 28px;
border: 4px solid white;
}
footer{
background: #F63232;
color: white;
padding: 10px;
text-align: center;
}#09 – Pseudo Classes & Elements (虛擬類別、偽類別 & 虛擬元素、偽元素)
In this HTML & CSS tutorial for beginners we’ll talk about pseudo classes and pseudo elements. These two things allow us to create more powerful & flexible selectors in our CSS as well as target elements in a particular state (e.g. hover state, active state or focus state).
Pseudo Classes
- Style elements when they’re in a particular state
- hover, focus, first child of a parent
- :hover
- :focus
- :first-child
// index.html

<!DOCTYPE html>
<html>
<head>
  <link rel="stylesheet" href="style.css">
  <title>Marioclub</title>
</head>
<body>

  <header>
    <h1>Marioclub</h1>
  </header>
  <section class="banner">
    <img src="img/banner.png" alt="marioclub welcome banner">
    <div class="welcome">
      <h2>Welcome to <br><span>Marioclub</span></h2>
    </div>
  </section>
  <nav class="main-nav">
    <ul>
      <li><a href="/join.html" class="join">Join the club</a></li>
      <li><a href="/news.html">Latest news</a></li>
      <li><a href="/games.html">New games</a></li>
      <li><a href="/contact.html">Contact</a></li>
    </ul>
  </nav>
  <main>
    <article>
      <h2>It's a me, Mario</h2>
      <p>Lorem ipsum dolor sit amet consectetur adipisicing elit. Provident modi vitae voluptatibus nulla fugiat nihil ut! Natus, repellendus asperiores veritatis non assumenda hic veniam aperiam vitae doloribus eius fugit magni?Lorem ipsum dolor sit amet, consectetur adipisicing elit. Fugiat sunt voluptates ullam, neque vitae aperiam! Corporis odio exercitationem iure fugiat cum. A obcaecati molestias officiis aperiam ad velit dolor non?Lorem ipsum dolor sit amet, consectetur adipisicing elit. Cum modi quas iste accusantium dolorem a! Sit tenetur, assumenda illo facilis culpa dolore dolores molestiae amet possimus autem nobis quasi recusandae.</p>
    </article>
    <ul class="images">
      <li><img src="img/thumb-1.png" alt="mario thumb 1"></li>
      <li><img src="img/thumb-2.png" alt="mario thumb 2"></li>
    </ul>
  </main>
  <section class="join">
    <h2>Join Today!</h2>
    <p>Lorem ipsum dolor sit amet consectetur, adipisicing elit. Assumenda itaque deleniti maxime nesciunt quod recusandae dolorem, aperiam quis enim</p>
    <form>
      <input type="email" name="email" placeholder="Type email & hit enter" required>
    </form>
  </section>
  <footer>
    <p class="copyright">Copyright 2019 Marioclub</p>
  </footer>

</body>
</html>
// style.css
body, ul, li, h1, h2, a{
margin: 0;
padding: 0;
font-family: arial;
}
header{
background-color: #F63232;
padding: 20px;
text-align: center;
position: fixed;
width: 100%;
z-index: 1;
top: 0;
left: 0;
}
header h1{
color: white;
border: 8px solid white;
padding: 6px 12px;
display: inline-block;
border-radius: 36px;
}
.banner{
position: relative;
}
.banner img{
max-width: 100%;
}
.banner .welcome{
background-color: #FEB614;
color: white;
padding: 30px;
position: absolute;
left: 0;
/* 設定 % 可自適應延伸 */
top: 30%;
}
.banner h2{
font-size: 74px;
}
.banner h2 span{
font-size: 1.3em;
}
nav{
background-color: #F4F4F4;
padding: 20px;
position: sticky;
/* top: 148px; */
/* top: 147px; */
/* top: 106px; */
top: 104px;
}
nav ul{
white-space: nowrap;
max-width: 1200px;
margin: 0 auto;
}
nav li{
width: 25%;
display: inline-block;
font-size: 24px;
}
nav li a{
text-decoration: none;
color: #4B4B4B;
}
nav li a.join{
color: #F63232;
}
main{
max-width: 100%;
width: 1200px;
margin: 80px auto;
padding: 0 40px;
box-sizing: border-box;
}
article h2{
color: #F63232;
font-size: 48px;
}
article p{
line-height: 2em;
color: #4B4B4B;
}
.images{
text-align: center;
margin: 80px 0;
white-space: nowrap;
}
.images li{
display: inline-block;
width: 40%;
margin: 20px 5%;
}
.images li img{
max-width: 100%;
}
section.join{
background: #F4F4F4;
text-align: center;
padding: 60px 20px;
color: #4B4B4B;
}
.join h2{
font-size: 36px;
}
form input{
margin: 20px 0;
padding: 10px 20px;
font-size: 24px;
border-radius: 28px;
border: 4px solid white;
}
footer{
background: #F63232;
color: white;
padding: 10px;
text-align: center;
}
/* pseudo classes */
nav li a:hover{
text-decoration: underline;
}
.images li:hover{
position: relative;
top: -4px;
}
form input:focus{
border: 4px dashed #4B4B4B;
outline: none;
}
form input:valid{
border: 4px solid #71D300;
}
/* 說明講解 :first-child */
/* nav li:first-child{
border: 3px solid #F63232;
} */
article p::first-line{
font-weight: bold;
font-size: 1.2em;
}
section.join p::first-letter{
font-size: 1.5em;
}
p::selection{
background-color: #F63232;
color: white;
}
p::after{
content: '...';
}偽元素
- ::after
- ::before
- ::first-line
- ::first-letter
- ::selection
#10 – Intro to Media Queries
In this CSS tutorial I’ll give you a quick introduction to the concept of responsive design and media queries. We’ll use those to make our Mario web page look nice on mobile devices.
Responsive Design (響應式設計)
Media Queries
Tell the browser how to style an element at particular viewport dimensions
Viewport meta tag
Tells the browser what width the viewport should be
Responsive images
Only load smaller images for mobile devices
關於 Responsive Web Design 介紹
// index.html

<!DOCTYPE html>
<html>
<head>
  <meta name="viewport" content="width=device-width, initial-scale=1.0">
  <link rel="stylesheet" href="style.css">
  <title>Marioclub</title>
</head>
<body>

  <header>
    <h1>Marioclub</h1>
  </header>
  <section class="banner">
    <img src="img/banner.png" alt="marioclub welcome banner">
    <div class="welcome">
      <h2>Welcome to <br><span>Marioclub</span></h2>
    </div>
  </section>
  <nav class="main-nav">
    <ul>
      <li><a href="/join.html" class="join">Join the club</a></li>
      <li><a href="/news.html">Latest news</a></li>
      <li><a href="/games.html">New games</a></li>
      <li><a href="/contact.html">Contact</a></li>
    </ul>
  </nav>
  <main>
    <article>
      <h2>It's a me, Mario</h2>
      <p>Lorem ipsum dolor sit amet consectetur adipisicing elit. Provident modi vitae voluptatibus nulla fugiat nihil ut! Natus, repellendus asperiores veritatis non assumenda hic veniam aperiam vitae doloribus eius fugit magni?Lorem ipsum dolor sit amet, consectetur adipisicing elit. Fugiat sunt voluptates ullam, neque vitae aperiam! Corporis odio exercitationem iure fugiat cum. A obcaecati molestias officiis aperiam ad velit dolor non?Lorem ipsum dolor sit amet, consectetur adipisicing elit. Cum modi quas iste accusantium dolorem a! Sit tenetur, assumenda illo facilis culpa dolore dolores molestiae amet possimus autem nobis quasi recusandae.</p>
    </article>
    <ul class="images">
      <li><img src="img/thumb-1.png" alt="mario thumb 1"></li>
      <li><img src="img/thumb-2.png" alt="mario thumb 2"></li>
    </ul>
  </main>
  <section class="join">
    <h2>Join Today!</h2>
    <p>Lorem ipsum dolor sit amet consectetur, adipisicing elit. Assumenda itaque deleniti maxime nesciunt quod recusandae dolorem, aperiam quis enim</p>
    <form>
      <input type="email" name="email" placeholder="Type email & hit enter" required>
    </form>
  </section>
  <footer>
    <p class="copyright">Copyright 2019 Marioclub</p>
  </footer>

</body>
</html>
// style.css
body, ul, li, h1, h2, a{
margin: 0;
padding: 0;
font-family: arial;
}
header{
background-color: #F63232;
padding: 20px;
text-align: center;
position: fixed;
width: 100%;
z-index: 1;
top: 0;
left: 0;
}
header h1{
color: white;
border: 8px solid white;
padding: 6px 12px;
display: inline-block;
border-radius: 36px;
}
.banner{
position: relative;
}
.banner img{
max-width: 100%;
}
.banner .welcome{
background-color: #FEB614;
color: white;
padding: 30px;
position: absolute;
left: 0;
/* 設定 % 可自適應延伸 */
top: 30%;
}
.banner h2{
font-size: 74px;
}
.banner h2 span{
font-size: 1.3em;
}
nav{
background-color: #F4F4F4;
padding: 20px;
position: sticky;
/* top: 148px; */
/* top: 147px; */
/* top: 106px; */
top: 104px;
}
nav ul{
white-space: nowrap;
max-width: 1200px;
margin: 0 auto;
}
nav li{
width: 25%;
display: inline-block;
font-size: 24px;
}
nav li a{
text-decoration: none;
color: #4B4B4B;
}
nav li a.join{
color: #F63232;
}
main{
max-width: 100%;
width: 1200px;
margin: 80px auto;
padding: 0 40px;
box-sizing: border-box;
}
article h2{
color: #F63232;
font-size: 48px;
}
article p{
line-height: 2em;
color: #4B4B4B;
}
.images{
text-align: center;
margin: 80px 0;
white-space: nowrap;
}
.images li{
display: inline-block;
width: 40%;
margin: 20px 5%;
}
.images li img{
max-width: 100%;
}
section.join{
background: #F4F4F4;
text-align: center;
padding: 60px 20px;
color: #4B4B4B;
}
.join h2{
font-size: 36px;
}
form input{
margin: 20px 0;
padding: 10px 20px;
font-size: 24px;
border-radius: 28px;
border: 4px solid white;
}
footer{
background: #F63232;
color: white;
padding: 10px;
text-align: center;
}
/* pseudo classes */
nav li a:hover{
text-decoration: underline;
}
.images li:hover{
position: relative;
top: -4px;
}
form input:focus{
border: 4px dashed #4B4B4B;
outline: none;
}
form input:valid{
border: 4px solid #71D300;
}
/* 說明講解 :first-child */
/* nav li:first-child{
border: 3px solid #F63232;
} */
article p::first-line{
font-weight: bold;
font-size: 1.2em;
}
section.join p::first-letter{
font-size: 1.5em;
}
p::selection{
background-color: #F63232;
color: white;
}
p::after{
content: '...';
}
/* responsive styles */
@media screen and (max-width: 1400px){
.banner .welcome h2{
font-size: 60px;
}
nav li{
font-size: 18px;
}
}
@media screen and (max-width: 960px){
.banner .welcome h2{
font-size: 40px;
}
}
@media screen and (max-width: 700px){
.banner .welcome{
position: relative;
text-align: center;
padding: 10px;
}
.banner .welcome br{
display: none;
}
.banner .welcome h2{
font-size: 25px;
}
.banner .welcome span{
font-size: 1em;
}
.images li{
width: 100%;
margin: 20px auto;
display: block;
}
}
@media screen and (max-width: 560px){
nav li{
font-size: 20px;
display: block;
width: 100%;
margin: 12px 0;
}
header{
position: relative;
}
nav{
top: 0;
}
}#11 – Next Steps
In this final video I’ll offer you some tips on what to study next, including other playlists from my YouTube channel, and my novice-to-ninja Udemy course about JavaScript: