jQuery 入門
JavaScript 與 jQuery
- jQuery 如何在瀏覽器上運行
- 瀏覽器可以解析所撰寫的 HTML、CSS 的能力
- JS 偵測瀏覽器的各種行為,JS 兼容各種瀏覽器是一件比較麻煩事情
- jQuery 底層還是JS,已經寫好兼容瀏覽器的 JS、動畫效果
總結,jQuery 還是 JS 去做撰寫的,但是 jQuery 把程式碼包裝的非常漂亮。
初探 jQuery 強大之處(練習流程)
用瀏覽器練習時,請用 chrome 的無痕式視窗來進行練習
初探 jQuery 強大之處
使用 Google Console
// 隱藏 a 連結
$('a').hide();
// 顯示 a 連結
$('a').show();
// 連結到其他網站
$("a").attr('href','https://www.yahoo.com.tw');
// slideUp 動畫效果
$('a').slideUp();
// 設定秒數
$('a').slideUp(5500);
// slideDown 動畫效果
$('a').slideDown();
// 淡出的動畫效果
$('a').fadeOut();
// 淡入的動畫效果
$('a').fadeIn();
下載jQuery檔案,介紹1.x與2.x的差別
差別在於瀏覽器版本支援。
種類
- compressed, production jQuery
- uncompressed, development jQuery
設定 jQuery 環境
HTML
<!DOCTYPE html>
<html lang="en">
<head>
    <meta charset="UTF-8">
    <meta name="viewport" content="width=device-width, initial-scale=1.0">
    <title>jQuery 練習</title>
    <script src="js/jquery-3.5.1.js"></script>
    <script src="js/all.js"></script>
</head>
<body>

    <h1>1234</h1>

</body>
</html>
JS
$(document).ready(function () {
    $('h1').hide();
});
jQuery 環境建置範例程式碼
$(document).ready(function() {
  $('h1').hide();
});
使用 Sublime 插件提升寫 jQuery 效率
插件: jQuery
- Ctrl + Shift + p
- Package Control: Install Package
- 輸入 jQuery 安裝
ready 快速鍵
HTML
<!DOCTYPE html>
<html lang="en">
<head>
    <meta charset="UTF-8">
    <meta name="viewport" content="width=device-width, initial-scale=1.0">
    <title>jQuery 練習</title>
    <script src="js/jquery-3.5.1.js"></script>
    <script src="js/all.js"></script>
</head>
<body>

    <input type="button" class="button" value="隱藏標題">
    <p>段落內容</p>
    <h1 id="box" class="title">1234</h1>

</body>
</html>
JS
$(document).ready(function () {

    $(".button").click(function(){
        $("h1").hide();
    });

});
Visual Studio Code 安裝插件提升效率 – jQuery Code Snippets
使用時前面要加 jq 前贅詞。
選擇器與事件:開始讓你的網頁具有互動性吧!
選擇器:設定 CSS 般指定要操控的網頁元素
HTML
<!DOCTYPE html>
<html lang="en">
<head>
    <meta charset="UTF-8">
    <meta name="viewport" content="width=device-width, initial-scale=1.0">
    <title>jQuery 練習</title>
    <script src="js/jquery-3.5.1.js"></script>
    <script src="js/all.js"></script>
</head>
<body>

    <div class="header">
        <h1 class="title">1234</h1>
    </div>

</body>
</html>
JS
$(document).ready(function () {
    $(".header h1").hide();
});
選擇器範例程式碼
HTML 標籤選擇
$('h1').hide();Class 選擇
$('.header').hide();ID 選擇
$('#box').hide();輕鬆撰寫第一個網頁設計互動效果
HTML
<!DOCTYPE html>
<html lang="en">
<head>
    <meta charset="UTF-8">
    <meta name="viewport" content="width=device-width, initial-scale=1.0">
    <title>jQuery 練習</title>
    <script src="js/jquery-3.5.1.js"></script>
    <script src="js/all.js"></script>
</head>
<body>

    <input type="button" class="button" value="隱藏標題">
    <h1 id="box" class="title">1234</h1>

</body>
</html>
JS
$(document).ready(function () {

    $(".button").click(function(){
        $("h1").hide();
    });

});
點擊事件範例程式碼
$(document).ready(function() {
  $('.button').click(function(event) {
    $('h1').hide();
  });
});
使用 toggle 切換開啟或隱藏效果
HTML
<!DOCTYPE html>
<html lang="en">
<head>
    <meta charset="UTF-8">
    <meta name="viewport" content="width=device-width, initial-scale=1.0">
    <title>jQuery 練習</title>
    <script src="js/jquery-3.5.1.js"></script>
    <script src="js/all.js"></script>
</head>
<body>

    <input type="button" class="button" value="切換開啟/關閉標題">
    <h1 id="box" class="title">1234</h1>
    <h1 id="box" class="title" style="display: none;">5678</h1>

</body>
</html>
JS
$(document).ready(function () {

    $(".button").click(function(){
        $("h1").toggle();
    });

});
教你如何除錯 jQuery
Google Chrome – Console
可以在 JS 文字註解,以方便管理、除錯 JS 程式碼
// 這是 JS 文字註解教你如何除錯 jQuery – 課程補充
「課程說明」
同學可能對於 event 很疑惑,在這邊 event 全名叫做「event handlers」也就是事件處理器,而它會記錄使用者的所有行為,因此同學只需要先知道它會紀錄你點擊這個事件時的動作,例如在哪裡點,點了什麼元素等。
jQuery 辭典 – 輕鬆查詢功能一把抓
看看還有哪些動畫效果可以使用
使用 Slide 設計滑動效果
HTML
<!DOCTYPE html>
<html lang="en">
<head>
    <meta charset="UTF-8">
    <meta name="viewport" content="width=device-width, initial-scale=1.0">
    <title>jQuery 練習</title>
    <link rel="stylesheet" href="css/style.css">
    <script src="js/jquery-3.5.1.js"></script>
    <script src="js/all.js"></script>
</head>
<body>

    <input type="button" class="button" value="留言">

    <div class="text">
        <textarea name="" id="" cols="30" rows="10"></textarea>
        <input type="submit" value="送出">
    </div>

</body>
</html>
CSS
.text{
    display: none;
}
JS
$(document).ready(function () {
    $('.button').click(function(event){
        $('.text').slideDown(6000);
    });
});
Slide 滑動效果
- slideDown();
- slideUp();
- slideToggle();
使用 Fade 設計淡入淡出效果
淡入淡出效果
- fadeIn();
- fadeOut();
- fadeToggle();
// fadeIn 預設隱藏的東西給打開
// fadeOut 預設開啟的東西給關閉
都不喜歡?那使用 toggleClass、搭配 CSS3 Transition 自訂 CSS 效果吧!
HTML
<!DOCTYPE html>
<html lang="en">
<head>
    <meta charset="UTF-8">
    <meta name="viewport" content="width=device-width, initial-scale=1.0">
    <title>jQuery 練習</title>
    <link rel="stylesheet" href="css/style.css">
    <script src="js/jquery-3.5.1.js"></script>
    <script src="js/all.js"></script>
</head>
<body>

    <input type="button" class="button" value="留言">

    <div class="text">
        <textarea name="" id="" cols="30" rows="10"></textarea>
        <input type="submit" value="送出">
    </div>

</body>
</html>
CSS
.text{
  opacity: 0;
  transition: all 3s;
}
.text.active{
  opacity: 1;
}
JS
$(document).ready(function () {
    $('.button').click(function(event){
        $('.text').toggleClass('active');
        // $('.text).addClass('active');
        // $('.text).removeClass('active');
    });
});
設計 CSS 動畫小密技:overflow、CSS3 transition
HTML
<!DOCTYPE html>
<html lang="en">
<head>
    <meta charset="UTF-8">
    <meta name="viewport" content="width=device-width, initial-scale=1.0">
    <title>jQuery 練習</title>
    <link rel="stylesheet" href="css/style.css">
    <script src="js/jquery-3.5.1.js"></script>
    <script src="js/all.js"></script>
</head>
<body>

    <div class="box">
        <img src="img/jquery.jpg" alt="">
        <div class="title">產品標題</div>
    </div>

</body>
</html>
CSS
.box{
    width: 480px;
    height: 300px;
    border: 1px solid blue;
    position: relative;
    overflow: hidden;
}
.box:hover .title{
    bottom: 0;
}
.title{
    transition: all 1s;
    background: #000;
    color: #fff;
    text-align: center;
    padding: 5px 0;
    width: 100%;
    position: absolute;
    bottom: -30px;
}
jQuery 鏈式寫法
HTML
<!DOCTYPE html>
<html lang="en">
<head>
    <meta charset="UTF-8">
    <meta name="viewport" content="width=device-width, initial-scale=1.0">
    <title>jQuery 練習</title>
    <link rel="stylesheet" href="css/style.css">
    <script src="js/jquery-3.5.1.js"></script>
    <script src="js/all.js"></script>
</head>
<body>

<input type="button" value="啟動" class="start">
<div class="box"></div>

</body>
</html>
CSS
.box{
    height: 300px;
    width: 300px;
    background: #000;
}
JS
$(document).ready(function () {
    $('.start').click(function(){
        /* Act on the event */
        $('.box').slideUp(3000).slideDown(1000);
    });
});
不是單純只能寫一個效果而已,後面可以鏈接多個效果。
善用 chrome 內建開發工具,提升撰寫 jQuery 效率
- Console
- Sources
教你如何搭配 CSS + jQuery 各式各樣的動畫效果
使用 preventDefault() 取消默認行為
HTML
<!DOCTYPE html>
<html lang="en">
<head>
    <meta charset="UTF-8">
    <meta name="viewport" content="width=device-width, initial-scale=1.0">
    <title>jQuery 練習</title>
    <link rel="stylesheet" href="css/style.css">
    <script src="js/jquery-3.5.1.js"></script>
    <script src="js/all.js"></script>
</head>
<body>

    <a class="close" href="#">連結</a>
    <div class="box"></div>

</body>
</html>
CSS
.box{
    height: 500px;
    background: #000;
}
JS
$(document).ready(function () {
    $('.close').click(function(event){
        /* Act on the event */
        event.preventDefault();
        $('.box').slideUp();
    });
});
有些動畫效果會用很多a連結來去做一些觸發的行為。
preventDefault 程式碼範例
$(document).ready(function() {
 $('.close').click(function(event) {
   event.preventDefault();
   $('.box').slideUp();
 });
});
css() – 教你如何動態載入 CSS style 設定
HTML
<!DOCTYPE html>
<html lang="en">
<head>
    <meta charset="UTF-8">
    <meta name="viewport" content="width=device-width, initial-scale=1.0">
    <title>jQuery 練習</title>
    <link rel="stylesheet" href="css/style.css">
    <script src="js/jquery-3.5.1.js"></script>
    <script src="js/all.js"></script>
</head>
<body>

    <div class="box"></div>

</body>
</html>
CSS
.box{
    width: 300px;
    height: 300px;
    background: #000;
}
JS
$(document).ready(function () {
    $('.box').css('width','500px');
});
設定下拉式收闔選單
下拉式滑動效果 – 範例
HTML
<!DOCTYPE html>
<html lang="en zh-hant">
<head>
    <meta charset="UTF-8">
    <meta name="viewport" content="width=device-width, initial-scale=1.0">
    <title>jQuery 練習</title>
    <link rel="stylesheet" href="css/style.css">
    <script src="js/jquery-3.5.1.js"></script>
    <script src="js/all.js"></script>
</head>
<body>

    <div class="wrap">
        <div class="header">
            <ul class="menu">
                <li><a href="#">首頁</a></li>
                <li><a href="#">產品專區</a></li>
                <li>
                    <a href="#">訂單查詢</a>
                    <ul>
                        <li><a href="#">出貨進度</a></li>
                        <li><a href="#">退貨申請</a></li>
                        <li><a href="#">退換申請</a></li>
                    </ul>
                </li>
            </ul>
        </div>
    </div>

</body>
</html>
CSS
/* CSS RESET */
/* CSS STYLES */
.wrap{
    width: 500px;
    margin: 0 auto;
}
.header{
    height: 80px;
    background: pink;
}
.menu{
    float: right;
}
.menu a{
    text-decoration: none;
    padding: .5em 0;
    background: #fff;
    border: 1px solid gray;
    display: block;
    text-align: center;
    transition: all .3s;
}
.menu a:hover{
    background: blue;
    color: #fff;
}
.menu > li{
    float: left;
    width: 100px;
}
/* 關鍵語法 */
.menu ul{
    display: none;
}
/* 滑動下拉選單 */
.menu li:hover ul{
    display: block;
}
下拉式收闔選單 – 範例
HTML
<!DOCTYPE html>
<html lang="en zh-hant">
<head>
    <meta charset="UTF-8">
    <meta name="viewport" content="width=device-width, initial-scale=1.0">
    <title>jQuery 練習</title>
    <link rel="stylesheet" href="css/style.css">
    <script src="js/jquery-3.5.1.js"></script>
    <script src="js/all.js"></script>
</head>
<body>

    <div class="wrap">
        <div class="header">
            <ul class="menu">
                <li><a href="#">首頁</a></li>
                <li><a href="#">產品專區</a></li>
                <li>
                    <a href="#" class="dropdown">訂單查詢</a>
                    <ul class="dropdown-open">
                        <li><a href="#">出貨進度</a></li>
                        <li><a href="#">退貨申請</a></li>
                        <li><a href="#">退換申請</a></li>
                    </ul>
                </li>
            </ul>
        </div>
    </div>

</body>
</html>
CSS
/* CSS RESET */
/* CSS STYLES */
.wrap{
    width: 500px;
    margin: 0 auto;
}
.header{
    height: 80px;
    background: pink;
}
.menu{
    float: right;
}
.menu a{
    text-decoration: none;
    padding: .5em 0;
    background: #fff;
    border: 1px solid gray;
    display: block;
    text-align: center;
    transition: all .3s;
}
.menu a:hover, .menu a.active{
    background: blue;
    color: #fff;
}
.menu > li{
    float: left;
    width: 100px;
}
.menu ul{
    display: none;
}
JS
$(document).ready(function () {
    $('.dropdown').click(function(event){
        /* Act on the event */
        event.preventDefault();
        $('.dropdown').toggleClass('active');
        $('.dropdown-open').slideToggle();
    });
});
自我練習 – 滑動下拉選單
HTML
<!DOCTYPE html>
<html lang="en zh-hant">
<head>
    <meta charset="UTF-8">
    <meta name="viewport" content="width=device-width, initial-scale=1.0">
    <title>menu-hover</title>
    <link rel="stylesheet" href="css/style.css">
    <script src="js/jquery-3.5.1.js"></script>
    <script src="js/all.js"></script>
</head>
<body>

    <div class="wrap">
        <div class="header">
            <div class="logo">
            </div>
            <ul class="menu">
                <li><a href="#">首頁</a></li>
                <li>
                    <a href="#">產品專區</a>
                    <ul>
                        <li><a href="#">炸物</a></li>
                        <li><a href="#">甜點</a></li>
                        <li><a href="#">飲料</a></li>
                    </ul>
                </li>
                <li>
                    <a href="#">訂單查詢</a>
                    <ul>
                        <li><a href="#">出貨進度</a></li>
                        <li><a href="#">退貨申請</a></li>
                        <li><a href="#">退換申請</a></li>
                    </ul>
                </li>
            </ul>
            <a href="#" class="showmenu">Menu</a>
        </div>
    </div>

</body>
</html>
CSS
/* CSS RESET */
/* CSS STYLES */
/* img reset */
img{
    max-width: 100%;
    height: auto;
}

/* box-sizing */
*,*:before,*:after{
    box-sizing: border-box;
}

.wrap{
    max-width: 960px;
    margin: 0 auto;
}
.header{
    background: pink;
    display: flex;
    justify-content: space-between;
    align-items: center;
    padding: 10px;
}
.logo{
    width: 150px;
    height: 36px;
    background: orangered;
}
.menu{
    display: flex;
}
.menu > li{
    position: relative;
    padding-right: 8px;
}
.menu > li a{
    display: block;
    width: 120px;
    text-decoration: none;
    text-align: center;
    color: slateblue;
    background: #222;
    padding-top: 10px;
    padding-bottom: 10px;
}
.menu > li a:hover{
    color: #222;
    background: slateblue;
}
/* 下拉式收闔選單 */
.menu ul{
    display: none;
    position: absolute;
}

.menu > li:hover ul{
    display: block;
}

@media (max-width: 767px){
    .menu > li{
        width: 100%;
    }
    .menu > li a{
        background: slateblue;
        color: #222;
        width: 100%;
    }
    .menu ul{
        width: 100%;
        z-index: 2;
    }
}

/* 在PC上隱藏漢堡選單 */
.showmenu{
    display: none;
}
@media (max-width: 767px){
    .menu{
        /* 隱藏選單開始 */
        max-height: 0px;
        overflow: hidden;
        transition: max-height 2.3s;
        position: absolute;
        z-index: 100;
        top: 72px;
        left: 0;
        right: 0;
        background: slateblue;
        flex-wrap: wrap;
    }
    .menu > li{
        width: 100%;
        padding: 0;
    }
    .menu > li a{
        transition: all .3s;
        padding-top: 15px;
        padding-bottom: 15px;
        font-size: 24px;
        border-bottom: 1px solid #222;
    }
    .menu > li a:hover{
        background: #222;
        color: slateblue;
    }
    /* Menu icon */
    .showmenu{
        display: flex;
        margin: 10px;
        text-decoration: none;
        font-size: 32px;
        color: slateblue;
    }
    /* jQuery 點擊後動態在 body 加上 class */
    .menu-show .menu{
        max-height: 500px;
    }
    .menu-show .menu:hover{
        overflow: visible;
    }
}

@media (max-width: 767px){
    .menu > li:hover ul li a{
        background: steelblue;
        color: #fff
    }
    .menu > li:hover ul li a:hover{
        background: crimson;
    }
}
JS
// 漢堡選單
$(document).ready(function () {
    $('.showmenu').on('click',function(event){
        event.preventDefault();
        $('body').toggleClass('menu-show');
    });
});
自我練習 – 下拉式收闔選單
HTML
<!DOCTYPE html>
<html lang="en zh-hant">
<head>
    <meta charset="UTF-8">
    <meta name="viewport" content="width=device-width, initial-scale=1.0">
    <title>jQuery 練習</title>
    <link rel="stylesheet" href="css/style.css">
    <script src="js/jquery-3.5.1.js"></script>
    <script src="js/all.js"></script>
</head>
<body>

    <div class="wrap">
        <div class="header">
            <div class="logo">
            </div>
            <ul class="menu">
                <li><a href="#">首頁</a></li>
                <li>
                    <a href="#">產品專區</a>
                    <ul>
                        <li><a href="#">炸物</a></li>
                        <li><a href="#">甜點</a></li>
                        <li><a href="#">飲料</a></li>
                    </ul>
                </li>
                <li>
                    <a href="#" class="dropdown">訂單查詢</a>
                    <ul class="dropdown-open">
                        <li><a href="#">出貨進度</a></li>
                        <li><a href="#">退貨申請</a></li>
                        <li><a href="#">退換申請</a></li>
                    </ul>
                </li>
            </ul>
            <a href="#" class="showmenu">Menu</a>
        </div>
    </div>

</body>
</html>
CSS
/* CSS RESET */
/* CSS STYLES */
/* img reset */
img{
    max-width: 100%;
    height: auto;
}

/* box-sizing */
*,*:before,*:after{
    box-sizing: border-box;
}

.wrap{
    max-width: 960px;
    margin: 0 auto;
}
.header{
    background: pink;
    display: flex;
    justify-content: space-between;
    align-items: center;
    padding: 10px;
}
.logo{
    width: 150px;
    height: 36px;
    background: orangered;
}
.menu{
    display: flex;
}
.menu > li{
    position: relative;
    padding-right: 8px;
}
.menu > li a{
    display: block;
    width: 120px;
    text-decoration: none;
    text-align: center;
    color: slateblue;
    background: #222;
    padding-top: 10px;
    padding-bottom: 10px;
}
.menu > li a:hover, .menu > li a.active{
    color: #222;
    background: slateblue;
}
/* 下拉式收闔選單 */
.menu ul{
    display: none;
    position: absolute;
}

@media (max-width: 767px){
    .menu > li{
        width: 100%;
    }
    .menu > li a{
        background: slateblue;
        color: #222;
        width: 100%;
    }
    .menu ul{
        width: 100%;
        z-index: 2;
    }
}

/* 在PC上隱藏漢堡選單 */
.showmenu{
    display: none;
}
@media (max-width: 767px){
    .menu{
        /* 隱藏選單開始 */
        max-height: 0px;
        overflow: hidden;
        transition: max-height 2.3s;
        position: absolute;
        z-index: 100;
        top: 72px;
        left: 0;
        right: 0;
        background: slateblue;
        flex-wrap: wrap;
    }
    .menu > li{
        width: 100%;
        padding: 0;
    }
    .menu > li a{
        transition: all .3s;
        padding-top: 15px;
        padding-bottom: 15px;
        font-size: 24px;
        border-bottom: 1px solid #222;
    }
    .menu > li a:hover, .menu > li a.active{
        background: #222;
        color: slateblue;
    }
    /* Menu icon */
    .showmenu{
        display: flex;
        margin: 10px;
        text-decoration: none;
        font-size: 32px;
        color: slateblue;
    }
    /* jQuery 點擊後動態在 body 加上 class */
    .menu-show .menu{
        max-height: 500px;
        overflow: visible;
    }
}

@media (max-width: 767px){
    .menu > li:hover ul li a{
        background: steelblue;
        color: #fff
    }
    .menu > li:hover ul li a:hover{
        background: crimson;
    }
}
JS
// 漢堡選單
$(document).ready(function () {
    $('.showmenu').on('click',function(e){
        e.preventDefault();
        $('body').toggleClass('menu-show');
    });
});

// 下拉式收闔選單
$(document).ready(function () {
    $('.dropdown').click(function(event){
        /* Act on the event */
        event.preventDefault();
        $('.dropdown').toggleClass('active');
        $('.dropdown-open').slideToggle();
    });
});
delay() – 延遲動畫效果的好用語法
HTML
<!DOCTYPE html>
<html lang="en zh-hant">
<head>
    <meta charset="UTF-8">
    <meta name="viewport" content="width=device-width, initial-scale=1.0">
    <title>jQuery 練習</title>
    <link rel="stylesheet" href="css/style.css">
    <script src="js/jquery-3.5.1.js"></script>
    <script src="js/all.js"></script>
</head>
<body>
    <input type="button" class="open" value="開始動畫效果">
    <div class="box1"></div>
    <div class="box2"></div>
    <div class="box3"></div>

</body>
</html>
CSS
/* CSS RESET */
/* CSS STYLES */
.box1, .box2, .box3{
    width: 100px;
    height: 100px;
    display: none;
}
.box1{
    background: #000;
}
.box2{
    background: orange;
}
.box3{
    background: pink;
}
JS
$(document).ready(function () {
    $('.open').click(function(event){
        /* Act on the event */
        $('.box1').delay(0).fadeIn();
        $('.box2').delay(1000).slideDown();
        $('.box3').delay(2000).show(0);
    })
});
slideDown()、fadeIn() 本身就有動畫時間,show() 本身沒有動畫時間,因此需要寫數字 0或1 毫秒。
即時放大縮小字型好簡單
HTML
<!DOCTYPE html>
<html lang="en zh-hant">
<head>
    <meta charset="UTF-8">
    <meta name="viewport" content="width=device-width, initial-scale=1.0">
    <title>jQuery 練習</title>
    <link rel="stylesheet" href="css/style.css">
    <script src="js/jquery-3.5.1.js"></script>
    <script src="js/all.js"></script>
</head>
<body>

    <div class="wrap">
        <div class="header">
            <div class="menu">
                <li><a href="#" class="font-b">大</a></li>
                <li><a href="#" class="font-m">中</a></li>
                <li><a href="#" class="font-s">小</a></li>
            </div>
        </div>
        <div class="content">
            <p>文字段落</p>
            <p>文字段落</p>
        </div>
    </div>

</body>
</html>
CSS
/* CSS RESET */
/* CSS STYLES */
.wrap{
	width: 500px;
	margin: 0 auto;
}
.header{
	height: 80px;
	background: pink;
}
.menu{
	float: right;
	list-style: none;
}
.menu li{
	float: left;
}
.menu a{
	width: 30px;
	font-size: 16px;
	background: #000;
	color: #fff;
	display: block;
	text-decoration: none;
	text-align: center;
	padding: 0.5em;
}
.menu a:hover{
	background: blue;
	color: #fff;
}
.content p{
	line-height: 1.5;
	font-size: 16px;
	margin-bottom: 2em;
}
JS
$(document).ready(function () {
    // 字體放大
    $('.font-b').click(function (event) {
        /* Act on the event */
        event.preventDefault();
        $('.content p').css('font-size', '20px');
    })
    // 字體放中
    $('.font-m').click(function (event) {
        /* Act on the event */
        event.preventDefault();
        $('.content p').css('font-size', '16px');
    })
    // 字體放小
    $('.font-s').click(function (event) {
        /* Act on the event */
        event.preventDefault();
        $('.content p').css('font-size', '13px');
    });
});
fixed 固定網頁內容
HTML
<!DOCTYPE html>
<html lang="en zh-hant">
<head>
    <meta charset="UTF-8">
    <meta name="viewport" content="width=device-width, initial-scale=1.0">
    <title>jQuery 練習</title>
    <link rel="stylesheet" href="css/style.css">
    <script src="js/jquery-3.5.1.js"></script>
    <script src="js/all.js"></script>
</head>
<body>

    <div class="wrap">
        <div class="header">
            <div class="menu">
                <li><a href="#" class="font-b">大</a></li>
                <li><a href="#" class="font-m">中</a></li>
                <li><a href="#" class="font-s">小</a></li>
            </div>
        </div>
        <div class="content">
            <p>文字段落</p>
            <p>文字段落</p>
            <p>文字段落</p>
            <p>文字段落</p>
            <p>文字段落</p>
            <p>文字段落</p>
            <p>文字段落</p>
            <p>文字段落</p>
            <p>文字段落</p>
            <p>文字段落</p>
            <p>文字段落</p>
            <p>文字段落</p>
        </div>
    </div>
    <div class="ad">
        <p>
            如果喜歡我們的網站, <br>
            歡迎把我們加到書籤
        </p>
        <a href="#" class="ad-close">關閉</a>
    </div>

</body>
</html>
CSS
/* CSS RESET */
/* CSS STYLES */
.wrap{
	width: 500px;
	margin: 0 auto;
}
.header{
	height: 80px;
	background: pink;
}
.menu{
	float: right;
	list-style: none;
}
.menu li{
	float: left;
}
.menu a{
	width: 30px;
	font-size: 16px;
	background: #000;
	color: #fff;
	display: block;
	text-decoration: none;
	text-align: center;
	padding: 0.5em;
}
.menu a:hover{
	background: blue;
	color: #fff;
}
.content p{
	line-height: 1.5;
	font-size: 16px;
	margin-bottom: 2em;
}
.ad{
	position: fixed;
	bottom: 0;
	left: 0;
	width: 250px;
	height: 100px;
	background: #000;
	color: #fff;
}
.ad p{
	padding: 30px;
}
.ad .ad-close{
	position: absolute;
	top: 0;
	right: 0;
	text-decoration: none;
	background: red;
	color: #fff;
	padding: .5em;
}
.ad .ad-close:hover{
	background: blue;
}
JS
$(document).ready(function () {
    // 字體放大
    $('.font-b').click(function (event) {
        /* Act on the event */
        event.preventDefault();
        $('.content p').css('font-size', '20px');
    })
    // 字體放中
    $('.font-m').click(function (event) {
        /* Act on the event */
        event.preventDefault();
        $('.content p').css('font-size', '16px');
    })
    // 字體放小
    $('.font-s').click(function (event) {
        /* Act on the event */
        event.preventDefault();
        $('.content p').css('font-size', '13px');
    });

    // close效果
    $('.ad-close').click(function(event){
        /* Act on the event */
        event.preventDefault();
        $(".ad").fadeOut();
    });
});
使用 stop() 讓你的動畫效果更滑順
stop() 可以中斷動畫效果
HTML
<!DOCTYPE html>
<html lang="en zh-hant">
<head>
    <meta charset="UTF-8">
    <meta name="viewport" content="width=device-width, initial-scale=1.0">
    <title>jQuery 練習</title>
    <link rel="stylesheet" href="css/style.css">
    <script src="js/jquery-3.5.1.js"></script>
    <script src="js/all.js"></script>
</head>
<body>

    <input type="button" value="啟動" class="start">
    <div class="box"></div>

</body>
</html>
CSS
/* CSS RESET */
/* CSS STYLES */
.box{
	height: 300px;
	width: 300px;
	background: #000;
}
JS
$(document).ready(function () {
    $('.start').click(function(event){
        /* Act on the event */
        $('.box').stop().slideToggle(3000);
    })
});
設定 offcanvas 左右選單切換
程式碼範例
HTML
<!DOCTYPE html>
<html lang="en zh-hant">
<head>
    <meta charset="UTF-8">
    <meta name="viewport" content="width=device-width, initial-scale=1.0">
    <title>jQuery 練習</title>
    <link rel="stylesheet" href="css/style.css">
    <script src="js/jquery-3.5.1.js"></script>
    <script src="js/all.js"></script>
</head>
<body>

    <div class="container">
        <div class="aside"></div>
        <div class="main">
            <div class="header"></div>
        </div>
    </div>

</body>
</html>
CSS
/* CSS RESET */
/* CSS STYLES */
.container{
	position: relative;
}
.main{
	width: 100%;
	height: 300px;
	background: #000;
	float: right;
	transition: 0.3s ease;
}
.header{
	height: 50px;
	background: red;
}
.aside{
	position: absolute;
	top: 0;
	bottom: 0;
	width: 270px;
	height: 300px;
	background: yellow;
	overflow: hidden;
	transform: translateX(-270px);
        transition: 0.3s ease;
}
.open .main{
	transform: translateX(270px);
}
.open .aside{
	transform: translateX(0px);
}
JS
$(document).ready(function () {
    $('.header').click(function(event){
        /* Act on the event */
        $('body').toggleClass('open');
    });
});
Animate.css 更新說明
2020/06/02 更新
下一章節即將進入 Animate.css 教學章節
因應 Animate.css 改版,class 有些許調整,因此增加此章節做為說明:
原本寫在 GitHub 的說明都已經改至 Animate 官方網站左側,同學只需要點旁邊就可以看到效果囉
class 變更舉例:
改版前:$(‘.text’).addClass(‘animated bounce’);
改版後:$(‘.text’).addClass(‘animate__animated animate__bounce’);
HTML
<link rel="stylesheet" href="https://cdnjs.cloudflare.com/ajax/libs/animate.css/4.1.0/animate.min.css">
<button id="add">Add Animate</button>
<p class="text">Animate</p>

<script src="https://cdnjs.cloudflare.com/ajax/libs/jquery/3.5.1/jquery.min.js"></script>
CSS
.text {
  text-align: center;
  font-size: 60px;
}
JS
$('#add').click(function() {
  $('.text').addClass('animate__animated animate__bounce');
});
$('.text').on('animationend', function() { // 監聽當動畫結束後移除 class
  $(this).removeClass('animate__animated animate__bounce');
});
Animate.css – 載入第三方插件 – 增添網頁動畫豐富度
載入 CDN 或者下載載入網頁中
程式碼範例一
HTML
<!DOCTYPE html>
<html lang="en zh-hant">
<head>
    <meta charset="UTF-8">
    <meta name="viewport" content="width=device-width, initial-scale=1.0">
    <title>jQuery 練習</title>
    <link rel="stylesheet" href="css/style.css">
    <link rel="stylesheet" href="https://cdnjs.cloudflare.com/ajax/libs/animate.css/4.0.0/animate.min.css">
    <script src="js/jquery-3.5.1.js"></script>
    <script src="js/all.js"></script>
</head>
<body>

    <input type="button" class="open" value="開啟動畫效果">
    <div class="box animate__animated"></div>

</body>
</html>
CSS
/* CSS RESET */
/* CSS STYLES */
.box{
	background: #000;
	color: #fff;
	width: 300px;
	height: 300px;
}
JS
$(document).ready(function () {
    $('.open').click(function(event){
        /* Act on the event */
        $('.box').addClass('animate__shakeX');
    });
});
程式碼範例二
HTML
<button class="btn">按鈕</button>
<div id="box"></div>
CSS
/* CSS RESET */
/* CSS STYLES */
#box {
  width: 100px;
  height: 100px;
  background-color: #000;
}
JS
$(".btn").click(function() {
  $('#box').removeClass().addClass('tada animated').one('webkitAnimationEnd mozAnimationEnd MSAnimationEnd oanimationend animationend', function(){
      $(this).removeClass();
    });
});
教你如何操控網頁元素
this – 教你如何操作本身元素
什麼是 this?
簡報
- 呼叫 #Martin
- 自己 微笑
- 自己 說 ‘Hello’
jQuery 小訣竅
在 jQuery 中 $(this) 就代表自己,如果事件觸發了,需要對自己操作可使用 $(this)。
程式碼範例
HTML
<!DOCTYPE html>
<html lang="en zh-hant">
<head>
    <meta charset="UTF-8">
    <meta name="viewport" content="width=device-width, initial-scale=1.0">
    <title>jQuery 練習</title>
    <link rel="stylesheet" href="css/style.css">
    <script src="js/jquery-3.5.1.js"></script>
    <script src="js/all.js"></script>
</head>
<body>

    <ul class="menu">
        <li>選單1</li>
        <li>選單2</li>
        <li>選單3</li>
        <li>選單4</li>
        <li>選單5</li>
        <li>選單6</li>
    </ul>

</body>
</html>
CSS
/* CSS RESET */
/* CSS STYLES */
.menu{
	width: 500px;
	margin: 20px auto;
}
.menu li{
	padding: 5px;
	border: 1px solid;
	margin-bottom: 1em;
}
.menu li:hover, .menu li.active{
	background: blue;
	color: #fff;
}
JS
$(document).ready(function () {
    $('.menu li').click(function(event){
        $(this).addClass('active');
    });
});
parent() – 找到父階層元素
HTML
<!DOCTYPE html>
<html lang="en zh-hant">
<head>
    <meta charset="UTF-8">
    <meta name="viewport" content="width=device-width, initial-scale=1.0">
    <title>jQuery 練習</title>
    <link rel="stylesheet" href="css/style.css">
    <script src="js/jquery-3.5.1.js"></script>
    <script src="js/all.js"></script>
</head>
<body>

    <div class="cart">
        <h2>購物車</h2>
        <ul>
            <li>
                <input type="button" class="addCart" value="加入購物車">腳踏車
            </li>
            <li>
                <input type="button" class="addCart" value="加入購物車">冷氣機
            </li>
            <li>
                <input type="button" class="addCart" value="加入購物車">電視
            </li>
            <li>
                <input type="button" class="addCart" value="加入購物車">電腦
            </li>
            <li>
                <input type="button" class="addCart" value="加入購物車">平板電腦
            </li>
            <li>
                <input type="button" class="addCart" value="加入購物車">智慧型手機
            </li>
        </ul>
    </div>

</body>
</html>
CSS
/* CSS RESET */
/* CSS STYLES */
.cart{
	width: 300px;
	margin: 20px auto;
}
.cart h2{
	margin-bottom: 1em;
	font-size: 20px;
}
.cart li{
	border: 1px solid gray;
	padding: 5px;
	margin-bottom: 2em;
}
.cart li.active{
	background: #0095d4;
	color: #fff;
}
.addCart{
	background: blue;
	color: #fff;
	border: none;
	cursor: pointer;
	margin-right: 10px;
}
.addCart:hover, .addCart.active{
	background: #008dd8;
}
JS
$(document).ready(function () {
    $('.addCart').click(function(event){
        $(this).parent().toggleClass('active');
    });
});
簡報
- 呼叫 #Steven
- #Steven自己 的父層 書本
- 父層書本 燒毀
siblings() – 同層元素
HTML
<!DOCTYPE html>
<html lang="en zh-hant">
<head>
    <meta charset="UTF-8">
    <meta name="viewport" content="width=device-width, initial-scale=1.0">
    <title>jQuery 練習</title>
    <link rel="stylesheet" href="css/style.css">
    <script src="js/jquery-3.5.1.js"></script>
    <script src="js/all.js"></script>
</head>
<body>

    <ul class="menu">
        <li>選單1</li>
        <li>選單2</li>
        <li>選單3</li>
        <li>選單4</li>
        <li>選單5</li>
        <li>選單6</li>
    </ul>

</body>
</html>
CSS
/* CSS RESET */
/* CSS STYLES */
.menu{
	width: 500px;
	margin: 20px auto;
}
.menu li{
	padding: 5px;
	border: 1px solid;
	margin-bottom: 1em;
}
.menu li:hover, .menu li.active{
	background: blue;
	color: #fff;
}
JS
$(document).ready(function () {
    $('.menu li').click(function(event){
        /* Act on the event */
        $(this).addClass('active').siblings().removeClass('active');
    });
});
簡報
- 呼叫 #Ryan
- 選擇 #Ryan 以外的所有 同學 微笑
- 並且說 ‘Hello’
jQuery 小訣竅
在 jQuery 中 .siblings() 可選擇除了當前以外的同階層元素。
同學問與答,
ul > li > a 的 siblings 無法移除 class 問題
在這個結構上,兩個<a>並不屬於同一個層級,它都被包在<li>底下,所以點擊以後必需往外找到 li,再尋找 li 內部的 a,這樣才能夠順利運作。
範例程式碼
$(this).addClass('active').parent('li').siblings().find('a').removeClass('active');find() – 輕鬆找到子元素內容
子元素、子階層元素
HTML
<!DOCTYPE html>
<html lang="en zh-hant">
<head>
    <meta charset="UTF-8">
    <meta name="viewport" content="width=device-width, initial-scale=1.0">
    <title>jQuery 練習</title>
    <link rel="stylesheet" href="css/style.css">
    <script src="js/jquery-3.5.1.js"></script>
    <script src="js/all.js"></script>
</head>
<body>

    <div class="cart">
        <ul>
            <li>
                <h3>產品1</h3>
            </li>
            <li>
                <h3>產品2</h3>
            </li>
            <li>
                <h3>產品3</h3>
            </li>
            <li>
                <h3>產品4</h3>
            </li>
            <li>
                <h3>產品5</h3>
            </li>
            <li>
                <h3>產品6</h3>
            </li>
        </ul>
    </div>

</body>
</html>
CSS
/* CSS RESET */
/* CSS STYLES */
.cart{
	width: 500px;
	margin: 20px auto;
}
.cart li{
	width: 30%;
	float: left;
	height: 100px;
	margin: 1%;
	border: 1px solid #000;
	cursor: pointer;
}

.cart h3.active{
	background: blue;
}
JS
$(document).ready(function () {
    $('.cart li').click(function(event){
        $(this).find('h3').toggleClass('active');
    });
});
設定 QA 折疊選單
HTML
<!DOCTYPE html>
<html lang="en zh-hant">
<head>
    <meta charset="UTF-8">
    <meta name="viewport" content="width=device-width, initial-scale=1.0">
    <title>jQuery 練習</title>
    <link rel="stylesheet" href="css/style.css">
    <script src="js/jquery-3.5.1.js"></script>
    <script src="js/all.js"></script>
</head>
<body>

    <div class="question-list">
        <div class="question">
            <h3>1.請問1+1=多少</h3>
            <p>答案記得沒錯的話,應該是2吧!</p>
        </div>
        <div class="question">
            <h3>2.那假如是2+2的話呢</h3>
            <p>當然是4啊!</p>
        </div>
        <div class="question">
            <h3>3.ok,所以3+3就等於7喽</h3>
            <p>...我看你還是重讀小學吧!</p>
        </div>
    </div>

</body>
</html>
CSS
/* CSS RESET */
/* CSS STYLES */
.question-list{
	margin: 0 auto;
	width: 500px;
}
.question h3{
	border: 1px solid gray;
	padding: 5px;
	font-size: 18px;
}
.question h3:hover, .question h3.active{
	background: blue;
	color: #fff;
}
.question p{
	display: none;
	padding: 5px;
}
JS
$(document).ready(function () {
    $('.question h3').click(function(event){
        // 讓點擊到的 h3 亮起來,其他h3移除active樣式
        $(this).toggleClass('active');
        // 讓點擊到的 h3 找到父元素 .question ,再找裡面的 p 判斷收闔
        $(this).parent().find('p').slideToggle();
        // 自己以外的 p 隱藏起來
        $(this).parent().siblings().find('p').slideUp();
        // 自己以外的 h3 移除u樣式
        $(this).parent().siblings().find('h3').removeClass('active');
    });
});
簡報
- 呼叫 #Amy
- #Amy自己 的父階層 書本
- 書本中 尋找 深褐髮色的同學 並且 微笑
- 深褐髮色的同學 說 ‘Hello’
jQuery 小訣竅
在 jQuery 中 .find() 可選擇符合特定條件的內層元素,所以可以透過 .parent() 選取到外層元素後再選取特定條件的內層元素。
二階層式折疊選單設計
HTML
<!DOCTYPE html>
<html lang="en zh-hant">
<head>
    <meta charset="UTF-8">
    <meta name="viewport" content="width=device-width, initial-scale=1.0">
    <title>jQuery 練習</title>
    <link rel="stylesheet" href="css/style.css">
    <script src="js/jquery-3.5.1.js"></script>
    <script src="js/all.js"></script>
</head>
<body>

    <ul class="cart">
        <li>
            <a href="#">選單1</a>
            <ul>
                <li><a href="#">選單1-1</a></li>
                <li><a href="#">選單1-2</a></li>
                <li><a href="#">選單1-3</a></li>
            </ul>
        </li>
        <li>
            <a href="#">選單2</a>
            <ul>
                <li><a href="#">選單2-1</a></li>
                <li><a href="#">選單2-2</a></li>
                <li><a href="#">選單2-3</a></li>
            </ul>
        </li>
        <li>
            <a href="#">選單3</a>
            <ul>
                <li><a href="#">選單3-1</a></li>
                <li><a href="#">選單3-2</a></li>
                <li><a href="#">選單3-3</a></li>
            </ul>
        </li>
    </ul>

</body>
</html>
CSS
/* CSS RESET */
/* CSS STYLES */
.cart{
	width: 500px;
	margin: 20px auto;
}
.cart > li{
	margin-bottom: 1em;
}
.cart > li > a{
	color: blue;
	border: 1px solid gray;
	display: block;
	padding: 5px;
	text-decoration: none;
}
.cart > li li{
	margin: 5px 0;
}
.cart ul{
	display: none;
}
JS
$(document).ready(function () {
    $('.cart > li > a').click(function(event){
        event.preventDefault();
        // this 以外的都隱藏起來
        $(this).parent().siblings().find('ul').slideUp();
        // 我自己的 ul 做摺疊效果
        $(this).parent().find('ul').slideToggle();
    });
});
使用 html()、text() 載入內容
程式碼範例一
HTML
<!DOCTYPE html>
<html lang="en zh-hant">
<head>
    <meta charset="UTF-8">
    <meta name="viewport" content="width=device-width, initial-scale=1.0">
    <title>jQuery 練習</title>
    <link rel="stylesheet" href="css/style.css">
    <script src="js/jquery-3.5.1.js"></script>
    <script src="js/all.js"></script>
</head>
<body>


</body>
</html>
JS
$(document).ready(function () {
    $('body').html('<h1>哈哈你看不到我</h1>');
});
程式碼範例二
HTML
<!DOCTYPE html>
<html lang="en zh-hant">
<head>
    <meta charset="UTF-8">
    <meta name="viewport" content="width=device-width, initial-scale=1.0">
    <title>jQuery 練習</title>
    <link rel="stylesheet" href="css/style.css">
    <script src="js/jquery-3.5.1.js"></script>
    <script src="js/all.js"></script>
</head>
<body>

    <div class="box"></div>

</body>
</html>
JS
$(document).ready(function () {
    $('.box').html('<h1>哈哈你看不到我</h1>');
});
程式碼範例三
HTML
<!DOCTYPE html>
<html lang="en zh-hant">
<head>
    <meta charset="UTF-8">
    <meta name="viewport" content="width=device-width, initial-scale=1.0">
    <title>jQuery 練習</title>
    <link rel="stylesheet" href="css/style.css">
    <script src="js/jquery-3.5.1.js"></script>
    <script src="js/all.js"></script>
</head>
<body>

    <div class="box">
        <h1></h1>
    </div>

</body>
</html>
JS
$(document).ready(function () {
    $('.box h1').text('哈哈你看不到');
});
click()、on() 的差別
HTML
<!DOCTYPE html>
<html lang="en zh-hant">
<head>
    <meta charset="UTF-8">
    <meta name="viewport" content="width=device-width, initial-scale=1.0">
    <title>jQuery 練習</title>
    <link rel="stylesheet" href="css/style.css">
    <script src="js/jquery-3.5.1.js"></script>
    <script src="js/all.js"></script>
</head>
<body>

    <div class="wrap">
        <div class="box1">

        </div>

        <div class="box2">
            <h1>寫在HTML裡面的</h1>
        </div>
    </div>

</body>
</html>
CSS
/* CSS RESET */
/* CSS STYLES */
.wrap{
	width: 500px;
	margin: 20px auto;
}
.box1{
	border: 1px solid #000;
	margin: 20px;
	padding: 20px;
}
.box2{
	border: 1px solid #000;
	margin: 20px;
	padding: 20px;
}
JS
1.
$(document).ready(function () {
    $('h1').click(function(event){
        alert('有效!');
    });
    $('.box1').html('<h1>用jQuery動態產生的');
});
2.
$(document).ready(function () {
    $('.box1').html('<h1>用jQuery動態產生的');
    $('h1').click(function(event){
        alert('有效!');
    });
});$('.box1').html('<h1>用jQuery動態產生的');放在前面能綁定到點擊效果,放在後面無法有綁訂到點擊效果。
程式碼範例 – on
HTML
<!DOCTYPE html>
<html lang="en zh-hant">
<head>
    <meta charset="UTF-8">
    <meta name="viewport" content="width=device-width, initial-scale=1.0">
    <title>jQuery 練習</title>
    <link rel="stylesheet" href="css/style.css">
    <script src="js/jquery-3.5.1.js"></script>
    <script src="js/all.js"></script>
</head>
<body>

    <div class="wrap">
        <div class="box1">

        </div>

        <div class="box2">
            <h1>寫在HTML裡面的</h1>
        </div>
    </div>

</body>
</html>
CSS
/* CSS RESET */
/* CSS STYLES */
.wrap{
	width: 500px;
	margin: 20px auto;
}
.box1{
	border: 1px solid #000;
	margin: 20px;
	padding: 20px;
}
.box2{
	border: 1px solid #000;
	margin: 20px;
	padding: 20px;
}
JS
$(document).ready(function () {
    $('.wrap').on('click','h1', function(event){
        // 監聽
        event.preventDefault();
        /* Act on the event */
        alert('有效!');
    });
    $('.box1').html('<h1>用jQuery動態產生的');
});
在範圍內用 on-click 事件去監聽所需監聽的元素,就不用擔心是用jQuery動態產生的或者寫在HTML裡面的,都可以去處理這樣的事情。
click 與 on 的範例程式碼
$(document).ready(function() {
  // click範例
  $(".box").click(function(event) {
    event.preventDefault();
    //要執行的程式碼
  });

  // on 範例
  $('body').on('click', '.selector', function(event) {
    event.preventDefault();
    //要執行的程式碼
  });
});
總結回顧
jQuery 常用小技巧
attr() – 動態增加 HTML 標籤屬性
程式碼範例
HTML
<!DOCTYPE html>
<html lang="en zh-hant">
<head>
    <meta charset="UTF-8">
    <meta name="viewport" content="width=device-width, initial-scale=1.0">
    <title>jQuery 練習</title>
    <link rel="stylesheet" href="css/style.css">
    <script src="js/jquery-3.5.1.js"></script>
    <script src="js/all.js"></script>
</head>
<body>

    <img src="img/jquery.jpg" width="250" alt="">
    <img src="img/jquery.jpg" width="250" alt="">
    <img src="img/jquery.jpg" width="250" alt="">
    <img src="img/jquery.jpg" width="250" alt="">
    <br>
    <a href="#">Link</a>

</body>
</html>
JS
$(document).ready(function () {
    $('img').attr('width','50');
    $('a').attr('href','https://www.google.com.tw');
});- img:width、title
- a:href
remove() – 移除網頁標籤小工具
HTML
<!DOCTYPE html>
<html lang="en zh-hant">
<head>
    <meta charset="UTF-8">
    <meta name="viewport" content="width=device-width, initial-scale=1.0">
    <title>jQuery 練習</title>
    <link rel="stylesheet" href="css/style.css">
    <script src="js/jquery-3.5.1.js"></script>
    <script src="js/all.js"></script>
</head>
<body>

    <table>
        <tr>
            <td><input type="button" class="remove" value="刪除"></td>
            <td>內容1</td>
        </tr>
        <tr>
            <td><input type="button" class="remove" value="刪除"></td>
            <td>內容2</td>
        </tr>
        <tr>
            <td><input type="button" class="remove" value="刪除"></td>
            <td>內容3</td>
        </tr>
    </table>

</body>
</html>
CSS
/* CSS RESET */
/* CSS STYLES */
td, th{
	border: 1px solid #000;
}
JS
$(document).ready(function () {
    $('.remove').click(function(event){
        /* Act on the event */
        $(this).parent().parent().remove();
    });
});
top 滑動效果
HTML
<!DOCTYPE html>
<html lang="en zh-hant">
<head>
    <meta charset="UTF-8">
    <meta name="viewport" content="width=device-width, initial-scale=1.0">
    <title>jQuery 練習</title>
    <link rel="stylesheet" href="css/style.css">
    <script src="js/jquery-3.5.1.js"></script>
    <script src="js/all.js"></script>
</head>
<body>

    <div class="box">
        <h1>標題</h1>
        <p>文字段落</p>
        <p>文字段落</p>
        <p>文字段落</p>
        <p>文字段落</p>
        <p>文字段落</p>
        <p>文字段落</p>
        <p>文字段落</p>
        <p>文字段落</p>
        <p>文字段落</p>
        <p>文字段落</p>
        <p>文字段落</p>
        <p>文字段落</p>
    </div>
    <div class="top">
        <a href="#">
            <img src="img/f-top.png" alt="">
        </a>
    </div>

</body>
</html>
CSS
/* CSS RESET */
/* CSS STYLES */
p{
	margin: 50px 0;
}
.top{
	position: fixed;
	bottom: 0;
	right: 0;
}
JS
$(document).ready(function () {
    $('.top a').click(function(event){
        event.preventDefault();
        $('html,body').animate({
            scrollTop: 0
        }, 700);
    });
});
使用 fontAwesome 動態加入連結 icon
Font Awesome 是一個由文字檔做出來的,可以改變大小、顏色。
需載入的檔案
- fontawesome-all.css 放在css 資料夾裡面
- webfonts 資料夾 放在 project 裡面
程式碼範例一
HTML
<!DOCTYPE html>
<html lang="en zh-hant">
<head>
    <meta charset="UTF-8">
    <meta name="viewport" content="width=device-width, initial-scale=1.0">
    <title>jQuery 練習</title>
    <link rel="stylesheet" href="css/style.css">
    <link rel="stylesheet" href="css/fontawesome-all.css">
    <script src="js/jquery-3.5.1.js"></script>
    <script src="js/all.js"></script>
</head>
<body>

    <ul class="list">
        <li><a href="doc/word.jpg">圖片檔案</a></li>
        <li><a href="doc/word.doc">word檔案</a></li>
        <li><a href="doc/word.zip">壓縮檔案</a></li>
    </ul>

</body>
</html>
CSS
/* CSS RESET */
/* CSS STYLES */
.list a{
	text-decoration: none;
	color: gray;
}
.list a:hover{
	color: #434343;
}
.list a:before{
	margin-right: 15px;
}
.list li{
	margin-bottom: 20px;
	font-size: 40px;
}
JS
$(document).ready(function () {
    $("a[href$='.jpg']").addClass('far fa-file-image');
    $("a[href$='.doc']").addClass('far fa-file-word');
    $("a[href$='.zip']").addClass('far fa-file-archive');
});
範例程式碼二 – 動態切換 icon 效果
載入 css、js 程式碼
HTML
<div class="container">
  <div class="aside"></div>
  <div class="main">
    <div class="header">
      <button class="btn">
        <i class="fas fa-bars"></i>
      </button>
    </div>
  </div>
</div>
CSS
/* CSS RESET */
/* CSS STYLES */
.container{
  position: relative;
}
.main{
  width: 100%;
  height: 300px;
  background: #000;
  float: right;
  transition: .3s ease;
}
.header{
  height: 50px;
  background: red;
}
.aside{
  position: absolute;
  top: 0;
  bottom: 0;
  width: 270px;
  height: 300px;
  background: yellow;
  overflow: hidden;
  transform: translateX(-270px);
  transition: .3s ease;
}
.open .main{
  transform: translateX(270px);
}
.open .aside{
  transform: translateX(0px);
}

.btn{
  background: transparent;
  font-size: 36px;
  border: 0;
  outline: none;
  cursor: pointer;
  padding-top: 7px;
}
JS
$(document).ready(function(){
  $('.btn').click(function(event){
    /* Act on the event */
    $('body').toggleClass('open');
    $('.btn i').toggleClass('fa-bars').toggleClass('fa-times')
  });
});第三方 Plugin
使用第三方 plugin 需要注意的細節
- 確認熱門瀏覽器有無支援,至少 IE9 以上
- 確保該載入的 CSS、JS、IMG 皆有載入
- 如果發現有問題時,打開 Console 確認是否有錯誤
- 查詢插件的 JS 設定
- 修改 CSS 成自己要的樣式
使用第三方plugin需要注意的細節-課程補充
「課程說明」
由於老師課程錄製時間約 2016 年,當時在開發必需多加注意 IE 的相容性,但是因為時代背景的不同,目前瀏覽器的標準已經也不同,所以這邊會建議同學可以透過 Statcounter 來了解目前主流的瀏覽器是哪一個,以下老師會附上 Statcounter 的操作簡報以及連結
Lightbox 2 – 圖片燈箱效果 (上)
HTML
<!DOCTYPE html>
<html lang="en zh-hant">

<head>
    <meta charset="UTF-8">
    <meta name="viewport" content="width=device-width, initial-scale=1.0">
    <title>jQuery 練習</title>
    <link rel="stylesheet" href="css/lightbox.css">
    <link rel="stylesheet" href="css/style.css">
    <script src="js/jquery-3.5.1.js"></script>
    <script src="js/all.js"></script>
</head>

<body>

    <section>
        <h3>Two Individual Images</h3>
        <div>
          <a class="example-image-link" href="http://lokeshdhakar.com/projects/lightbox2/images/image-1.jpg" data-lightbox="example-1"><img class="example-image" src="http://lokeshdhakar.com/projects/lightbox2/images/thumb-1.jpg" alt="image-1" /></a>
          <a class="example-image-link" href="http://lokeshdhakar.com/projects/lightbox2/images/image-2.jpg" data-lightbox="example-2" data-title="Optional caption."><img class="example-image" src="http://lokeshdhakar.com/projects/lightbox2/images/thumb-2.jpg" alt="image-1"/></a>
        </div>

        <hr />

        <h3>A Four Image Set</h3>
        <div>
          <a class="example-image-link" href="http://lokeshdhakar.com/projects/lightbox2/images/image-3.jpg" data-lightbox="example-set" data-title="Click the right half of the image to move forward."><img class="example-image" src="http://lokeshdhakar.com/projects/lightbox2/images/thumb-3.jpg" alt=""/></a>
          <a class="example-image-link" href="http://lokeshdhakar.com/projects/lightbox2/images/image-4.jpg" data-lightbox="example-set" data-title="Or press the right arrow on your keyboard."><img class="example-image" src="http://lokeshdhakar.com/projects/lightbox2/images/thumb-4.jpg" alt="" /></a>
          <a class="example-image-link" href="http://lokeshdhakar.com/projects/lightbox2/images/image-5.jpg" data-lightbox="example-set" data-title="The next image in the set is preloaded as you're viewing."><img class="example-image" src="http://lokeshdhakar.com/projects/lightbox2/images/thumb-5.jpg" alt="" /></a>
          <a class="example-image-link" href="http://lokeshdhakar.com/projects/lightbox2/images/image-6.jpg" data-lightbox="example-set" data-title="Click anywhere outside the image or the X to the right to close."><img class="example-image" src="http://lokeshdhakar.com/projects/lightbox2/images/thumb-6.jpg" alt="" /></a>
        </div>
      </section>

      <section>
        <p>
          For more information, visit <a href="http://lokeshdhakar.com/projects/lightbox2/">http://lokeshdhakar.com/projects/lightbox2/</a>
        </p>
      </section>

      <script src="js/lightbox.js"></script>
</body>

</html>
Lightbox 2 – 圖片燈箱效果 (上)-課程補充
「課程說明」
由於老師錄製時間較早,因此目前 Lightbox 2 已經有改版,所以這邊老師提供 lightbox2 方面同學練習唷
Lightbox 2 – 圖片燈箱效果 (下)
CSS
/* CSS RESET */
/* CSS STYLES */
.lightboxOverlay {
	position: absolute;
	top: 0;
	left: 0;
	z-index: 9999;
	background-color: blueviolet;
	filter: progid:DXImageTransform.Microsoft.Alpha(Opacity=80);
	opacity: 0.5;
	display: none;
  }

.lb-details{
	display: none;
}
JS
$(document).ready(function () {
    // lightbox 效果
    lightbox.option({
        'resizeDuration': 2000,
        'wrapAround': true
      });
});
Swiper – 輪播效果 (上)
載入 CSS、JS 檔案到程式碼,以及 Add Swiper HTML Layout。
HTML
<!DOCTYPE html>
<html lang="en zh-hant">

<head>
  <meta charset="UTF-8">
  <meta name="viewport" content="width=device-width, initial-scale=1.0">
  <title>jQuery 練習</title>
  <link rel="stylesheet" href="css/swiper.css">
  <link rel="stylesheet" href="css/style.css">
  <script src="js/jquery-3.5.1.js"></script>
  <script src="js/all.js"></script>
</head>

<body>

  <!-- Slider main container -->
  <div class="swiper-container">
    <!-- Additional required wrapper -->
    <div class="swiper-wrapper">
      <!-- Slides -->
      <div class="swiper-slide">Slide 1</div>
      <div class="swiper-slide">Slide 2</div>
      <div class="swiper-slide">Slide 3</div>
      ...
    </div>
    <!-- If we need pagination -->
    <div class="swiper-pagination"></div>

    <!-- If we need navigation buttons -->
    <div class="swiper-button-prev"></div>
    <div class="swiper-button-next"></div>

    <!-- If we need scrollbar -->
    <div class="swiper-scrollbar"></div>
  </div>

  <script src="js/swiper.js"></script>
</body>

</html>
CSS
/* CSS RESET */
/* CSS STYLES */
.swiper-container {
    width: 600px;
    height: 300px;
}
JS
$(document).ready(function () {
  //initialize swiper when document ready
  var mySwiper = new Swiper ('.swiper-container', {
    // Optional parameters
    direction: 'vertical',
    loop: true,

    // If we need pagination
    pagination: {
      el: '.swiper-pagination',
    },

    // Navigation arrows
    navigation: {
      nextEl: '.swiper-button-next',
      prevEl: '.swiper-button-prev',
    },

    // And if we need scrollbar
    scrollbar: {
      el: '.swiper-scrollbar',
    },
  });
});
Swiper – 輪播效果 (上)-課程補充
「課程說明」
由於 Swiper 官方頁面後來有更新,為了避免同學找不到 CDN 連結,因此老師這邊提供相關 CDN 讓學生可以練習唷。
Swiper – 輪播效果 (中)
使用 Swiper API 的 Swiper Parameters (Swiper 參數),設定適合的功能和效果。
HTML
<!DOCTYPE html>
<html lang="en zh-hant">

<head>
  <meta charset="UTF-8">
  <meta name="viewport" content="width=device-width, initial-scale=1.0">
  <title>jQuery 練習</title>
  <link rel="stylesheet" href="css/swiper.css">
  <link rel="stylesheet" href="css/style.css">
  <script src="js/jquery-3.5.1.js"></script>
  <script src="js/all.js"></script>
</head>

<body>

  <!-- Slider main container -->
  <div class="swiper-container">
    <!-- Additional required wrapper -->
    <div class="swiper-wrapper">
      <!-- Slides -->
      <div class="swiper-slide">Slide 1</div>
      <div class="swiper-slide">Slide 2</div>
      <div class="swiper-slide">Slide 3</div>
    </div>
    <!-- If we need pagination -->
    <div class="swiper-pagination"></div>

    <!-- If we need navigation buttons -->
    <div class="swiper-button-prev"></div>
    <div class="swiper-button-next"></div>
  </div>

  <script src="js/swiper.js"></script>
</body>

</html>
CSS
/* CSS RESET */
/* CSS STYLES */
.swiper-container {
    width: 600px;
    height: 300px;
}
JS
$(document).ready(function () {
  //initialize swiper when document ready
  var mySwiper = new Swiper ('.swiper-container', {
    // Optional parameters
    direction: 'horizontal',
    loop: true,
    speed: 3000,
    autoplay: {
      delay: 5000,
    },
    effect: 'cube',

    // If we need pagination
    pagination: {
      el: '.swiper-pagination',
    },

    // Navigation arrows
    navigation: {
      nextEl: '.swiper-button-next',
      prevEl: '.swiper-button-prev',
    },

  });
});
Swiper – 輪播效果 (下)
新增輪播圖片到 HTML 以及設定 .swiper-container 的長度、寬度
HTML
<!DOCTYPE html>
<html lang="en zh-hant">

<head>
  <meta charset="UTF-8">
  <meta name="viewport" content="width=device-width, initial-scale=1.0">
  <title>jQuery 練習</title>
  <link rel="stylesheet" href="css/swiper.css">
  <link rel="stylesheet" href="css/style.css">
  <script src="js/jquery-3.5.1.js"></script>
  <script src="js/all.js"></script>
</head>

<body>

  <!-- Slider main container -->
  <div class="swiper-container">
    <!-- Additional required wrapper -->
    <div class="swiper-wrapper">
      <!-- Slides -->
      <div class="swiper-slide">
        <img src="img/up.jpg" alt="">
      </div>
      <div class="swiper-slide">
        <img src="img/walle.jpg" alt="">
      </div>
      <div class="swiper-slide">
        <img src="img/toystory.jpg" alt="">
      </div>
    </div>
    <!-- If we need pagination -->
    <div class="swiper-pagination"></div>

    <!-- If we need navigation buttons -->
    <div class="swiper-button-prev"></div>
    <div class="swiper-button-next"></div>
  </div>

  <script src="js/swiper.js"></script>
</body>

</html>
CSS
/* CSS RESET */
/* CSS STYLES */
.swiper-container {
    width: 618px;
    height: 246px;
}
JS
$(document).ready(function () {
  //initialize swiper when document ready
  var mySwiper = new Swiper ('.swiper-container', {
    // Optional parameters
    direction: 'horizontal',
    loop: true,
    speed: 3000,
    autoplay: {
      delay: 5000,
    },
    effect: 'slide',

    // If we need pagination
    pagination: {
      el: '.swiper-pagination',
    },

    // Navigation arrows
    navigation: {
      nextEl: '.swiper-button-next',
      prevEl: '.swiper-button-prev',
    },

  });
});
Swiper – 補充備註
swiper.css 與 swiper.min.css、swiper.js 與 swiper.min.js 的差別 – 有無壓縮
將上面的效果試著整合在一個網頁中吧!
css 放在 head、 js 放在 </body> 之前,排列順序由上到下為插件 css、個人 css,jQuery核心、插件 js、個人 js。
程式碼範例
HTML
<!DOCTYPE html>
<html lang="en zh-hant">

<head>
  <meta charset="UTF-8">
  <meta name="viewport" content="width=device-width, initial-scale=1.0">
  <title>jQuery 練習</title>
  <link rel="stylesheet" href="css/swiper.css">
  <link rel="stylesheet" href="css/lightbox.css">
  <link rel="stylesheet" href="css/style.css">
</head>

<body>

  <div class="wrap">

    <section>
      <!-- Slider main container -->
      <h3>Swiper 輪播效果</h3>
      <div class="swiper-container">
        <!-- Additional required wrapper -->
        <div class="swiper-wrapper">
          <!-- Slides -->
          <div class="swiper-slide">
            <img src="img/up.jpg" width="100%" alt="">
          </div>
          <div class="swiper-slide">
            <img src="img/walle.jpg" width="100%" alt="">
          </div>
          <div class="swiper-slide">
            <img src="img/toystory.jpg" width="100%" alt="">
          </div>
        </div>
        <!-- If we need pagination -->
        <div class="swiper-pagination"></div>

        <!-- If we need navigation buttons -->
        <div class="swiper-button-prev"></div>
        <div class="swiper-button-next"></div>
      </div>
    </section>

    <section>
      <h3>Lightbox 燈箱圖片效果</h3>
      <div>
        <a class="light-box" href="img/image-2.jpg" data-lightbox="lightbox-set" data-title="案右邊向下一張圖片"><img
            class="light-box-img" src="img/thumb-2.jpg" alt="" /></a>
        <a class="light-box" href="img/image-3.jpg" data-lightbox="lightbox-set" data-title="或者按鍵盤右鍵"><img
            class="light-box-img" src="img/thumb-3.jpg" alt="" /></a>
        <a class="light-box" href="img/image-4.jpg" data-lightbox="lightbox-set" data-title="這是最後一張圖片"><img
            class="light-box-img" src="img/thumb-4.jpg" alt="" /></a>
      </div>
    </section>

  </div>

  <script src="js/jquery-3.5.1.js"></script>
  <script src="js/swiper.js"></script>
  <script src="js/lightbox.js"></script>
  <script src="js/all.js"></script>
</body>

</html>
CSS
/* CSS RESET */
/* CSS STYLES */
.wrap{
	width: 960px;
	margin: 10px auto;
}
.swiper-container {
    width: 618px;
    height: 246px;
}
.swiper-container h3{
	text-align: center;
	padding: 30px 0;
}
section{
	text-align: center;
}
section h3{
	padding: 30px 0;
}
JS
$(document).ready(function () {
  //initialize swiper when document ready
  var mySwiper = new Swiper ('.swiper-container', {
    // Optional parameters 可選參數
    direction: 'horizontal',
    loop: true,
    speed: 3000,
    autoplay: {
      delay: 5000,
    },
    effect: 'slide',

    // If we need pagination 如果需要分頁設置
    pagination: {
      el: '.swiper-pagination',
    },

    // Navigation arrows 上一個/下一個 按鈕
    navigation: {
      nextEl: '.swiper-button-next',
      prevEl: '.swiper-button-prev',
    },

  });

});
如何去查詢別人使用的 jQuery 插件
查看網頁原始碼 – Ctrl + F,查詢 .js”></script>
網頁檢查從 class 名稱、id 名稱,例如:parallax.js、Peity。
開始喜歡 jQuery 了嗎?教你如何更精進!
將 jQ 與 CSS 樣式抽離心法
樣式與 jQuery 綁定,命名:jq-名稱,沒綁定,直接命名。
最終作業講解
- 下拉式選單功能
- Swiper Banner 輪播
- lightbox 燈箱
- top 效果
最後,你還可以往哪些方向精進
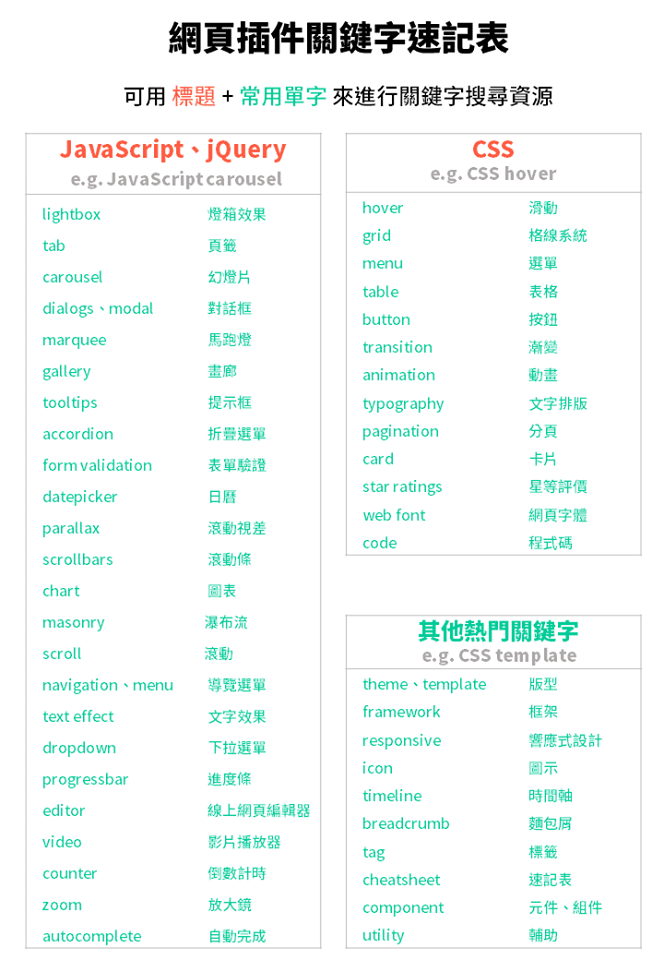
網頁關鍵字速記表