
(Complete guide, from Novice to Ninja)
Learning Udemy Course:Modern JavaScript
建立者:The Net Ninja (Shaun Pelling)
Learn Modern JavaScript from the very start to ninja-level & build awesome JavaScript applications.
您會學到
- Learn how to program with modern JavaScript, from the very beginning to more advanced topics
- Learn all about OOP (object-oriented programming) with JavaScript, working with prototypes & classes
- Learn how to create real-world front-end applications with JavaScript (quizes, weather apps, chat rooms etc)
- Learn how to make useful JavaScript driven UI components like popups, drop-downs, tabs, tool-tips & more.
- Learn how to use modern, cutting-edge JavaScript features today by using a modern workflow (Babel & Webpack)
- Learn how to use real-time databases to store, retrieve and update application data
- Explore API’s to make the most of third-party data (such as weather information)
Modern Workflow with Babel & Webpack
Modern Feature Support
MDN 文件
工具
An Introduction to Babel
Modern Code 編譯成 以前版本的 Code
資源
操作
- 點擊 Try it out 使用
沒有顯示舊版本的程式碼,Left side menu – ENV PRESET – FORCE ALL TRANSFORMS select.
// Babel 網頁版使用 - 1

function greet() {
  console.log('hello');
}
// Babel 網頁版使用 - 2
const greet = function() {
console.log('hello');
}// Babel 網頁版使用 - 3
const greet = function(name){
console.log(`hello ${name}`);
}// Babel 網頁版使用 - 4
const greet = (name) => {
console.log(`hello ${name}`);
}// Babel 網頁版使用 - 5
const greet = (name) => {
console.log(`hello ${name}`);
}
class User {
constructor(name){
this.name = name;
}
}Installing Node.js & Babel
可重複觀看、練習。
操作步驟
- 使用 Terminal 終端機查詢有無安裝 node.js
- 輸入指令 node -v
- 沒有就到Node.js官網下載、安裝,有就繼續以下步驟
- 清除 Terminal 終端機介面內容 clear
- 移動到專案資料夾 – cd 資料夾名稱
- 在 Terminal 終端機輸入 npm init 指令初始化項目,這裡沒有要特別設定就全部按 enter 就可以了,完成後會產生 package.json 檔案
- 使用 Terminal 終端機安裝 Babel core、Babel cli
- 指令 npm install @babel/core @babel/cli –save-dev
- 接著再使用 Terminal 終端機安裝 Babel preset-env
- 指令 npm install @babel/preset-env –save-dev
- 安裝好的套件會在 package.json 檔案呈現安裝的名稱、版本
- 建立一個 .babelrc 檔案
// .babelrc

{
  "presets": ["@babel/preset-env"]
}
Using Babel
- Install Node.js (and npm) on our computer
- Use npm init to create a package.json file in the project directory
- Use npm to install babel/core & babel/cli packages
- Install the babel preset (env) & register it in .babelrc
Using the Babel CLI
操作步驟
- 建立 before.js 檔案
- 使用 Terminal 終端機輸入指令
- node_modules/.bin/babel before.js -o after.js
- 完成後會產生 after.js 檔案、以及以前版本的程式碼
- 移除 node_modules 資料夾
- 使用 npm install 指令安裝 node_modules 資料夾
// before.js

const greet = (name) => {
  console.log(`hello ${name}`);
};

 greet();
講解
可以使用 npm install 安裝 package.json 檔案套件名稱、版本
NPM Scripts & Watching Files
可重複觀看、練習。
操作步驟
- 建立一個資料夾 src
- 在 src 資料夾裡面建立 index.js 檔案
- 建立一個資料夾 dist
- 在 dist 資料夾裡面建立 assets 資料夾
- 在 assets 資料夾裡面建立 bundle.js
- 在 dist 資料夾裡面建立 index.html 檔案
- 會在 src/index.js 檔案撰寫 js 程式碼
- 在 Terminal 終端機輸入指令
- node_modules/.bin/babel src/index.js -o dist/assets/bundle.js
- 完成後 index.js 程式碼就會編譯到 bundle.js
- 可以在 package.json 新增 “scripts” 指令
- 執行 “scripts” 指令 (因為沒有變動程式碼,所以接著以下步驟)
- npm run babel
- 在 index.js 檔案刪除這一行程式碼 greet(‘link’);、然後儲存
- 執行 “scripts” 指令
- npm run babel
- Watching Files 需要修改 “scripts” 指令
// dist/index.html

<html lang="en">
<head>
  <meta charset="UTF-8">
  <meta http-equiv="X-UA-Compatible" content="IE=edge">
  <meta name="viewport" content="width=device-width, initial-scale=1.0">
  <title>Document</title>
</head>
<body>

  <script src="assets/bundle.js"></script>
</body>
</html>
// index.js
const greet = name => {
console.log(`hello ${name}`);
};
greet('mario');
greet('luigi');
greet('link');// package.json - 1
{
"name": "modern-javascript",
"version": "1.0.0",
"description": "",
"main": "index.js",
"scripts": {
"babel": "node_modules/.bin/babel src/index.js -o dist/assets/bundle.js"
},
"author": "",
"license": "ISC",
"devDependencies": {
"@babel/cli": "^7.17.0",
"@babel/core": "^7.17.0",
"@babel/preset-env": "^7.16.11"
}
}
使用 “scripts” 指令產生錯誤無法執行
- 修改成以下程式碼
- “babel” “babel src/index.js -o dist/assets/bundle.js
// package.json - 2

{
  "name": "modern-javascript",
  "version": "1.0.0",
  "description": "",
  "main": "index.js",
  "scripts": {
    "babel": "babel src/index.js -o dist/assets/bundle.js"
  },
  "author": "",
  "license": "ISC",
  "devDependencies": {
    "@babel/cli": "^7.17.0",
    "@babel/core": "^7.17.0",
    "@babel/preset-env": "^7.16.11"
  }
}
// package.json - 3 Watching Files

{
  "name": "modern-javascript",
  "version": "1.0.0",
  "description": "",
  "main": "index.js",
  "scripts": {
    "babel": "babel src/index.js -w -o dist/assets/bundle.js"
  },
  "author": "",
  "license": "ISC",
  "devDependencies": {
    "@babel/cli": "^7.17.0",
    "@babel/core": "^7.17.0",
    "@babel/preset-env": "^7.16.11"
  }
}
// index.js - 3 Watching Files
const greet = name => {
console.log(`hello ${name}`);
};
greet('mario');
greet('luigi');
greet('link');
class User {
constructor(){
this.score = 0;
}
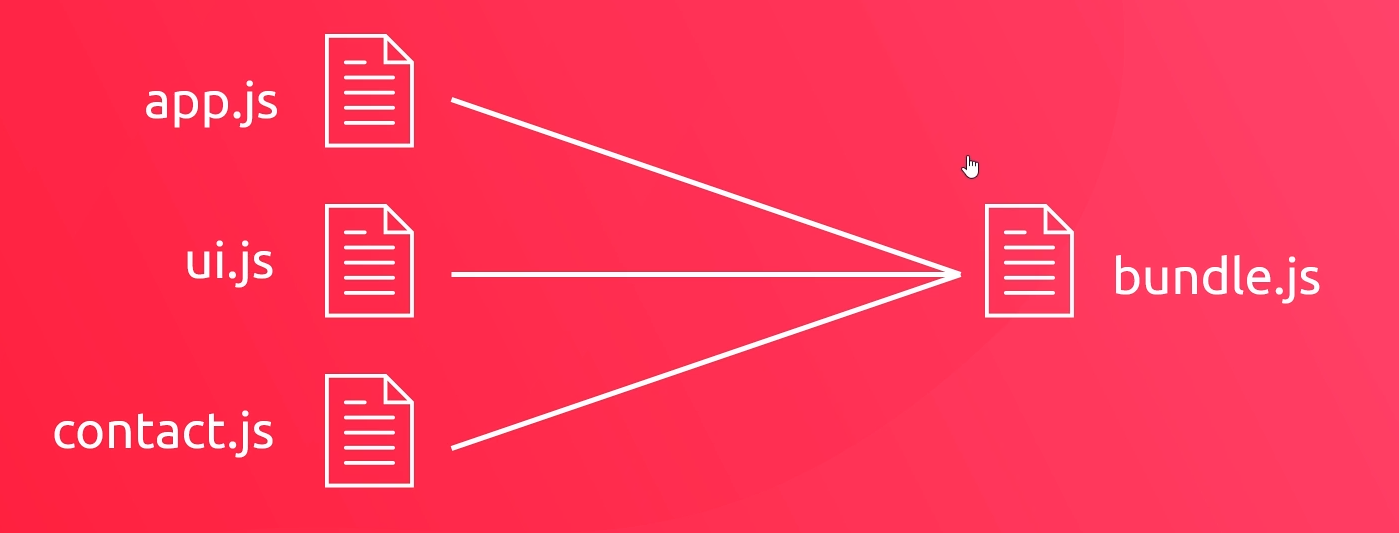
}What is Webpack?
Webpack
- Webpack is a module bundler(模組打包工具)
- Works well with babel
- Local development server
Setting up a Webpack File
可重複觀看、練習。
操作步驟
- 在專案裡建立 webpack.config.js 檔案
- entry 進入點、output 輸出點
// webpack.config.js

const path = require('path');

module.exports = {
  entry: './src/index.js',
  output: {
    path: path.resolve(__dirname, 'dist/assets'),
    filename: 'bundle.js'
  }
};
webpack 文件
Webpack CLI (Command-Line Interface 命令列介面)
可重複觀看、練習。
操作步驟
- 使用 Terminal 終端機移動到專案位置 cd 專案名稱
- 使用 Terminal 終端機輸入指令安裝 webpack、webpack-cli
- npm install webpack webpack-cli –save-dev
- 使用 Terminal 終端機輸入指令執行 webpack、在這之前調整 src/index.js 檔案內容,確認 webpack.config.js 有儲存、然後執行以下指令
- node_modules/.bin/webpack
- 完成後會發現 dist/assets/bundle.js 檔案有很大的不同,會變成只有一行程式碼
- 在 package.json 檔案 “scripts” 新增指令
- “webpack”: “node_modules/.bin/webpack”
- 在 index.js 修改程式碼內容後,執行 package.json 裡面的 “scripts” 的 “webpack” 指令
- 執行指令 npm run webpack
// index.js - 1

const greet = name => {
  console.log(`hello ${name}`);
};

greet('mario');
greet('luigi');
greet('link');
// package.json - 新增 "scripts" 指令 "webpack"

{
  "name": "modern-javascript",
  "version": "1.0.0",
  "description": "",
  "main": "index.js",
  "scripts": {
    "babel": "babel src/index.js -w -o dist/assets/bundle.js",
    "webpack": "node_modules/.bin/webpack"
  },
  "author": "",
  "license": "ISC",
  "devDependencies": {
    "@babel/cli": "^7.17.0",
    "@babel/core": "^7.17.0",
    "@babel/preset-env": "^7.16.11",
    "webpack": "^5.68.0",
    "webpack-cli": "^4.9.2"
  }
}
// index.js - 2

const greet = name => {
  console.log(`hello ${name}`);
};

greet('mario');
greet('luigi');
greet('link');
greet('link');
// package.json - 1 產生錯誤

{
  "name": "modern-javascript",
  "version": "1.0.0",
  "description": "",
  "main": "index.js",
  "scripts": {
    "babel": "babel src/index.js -w -o dist/assets/bundle.js",
    "webpack": "node_modules/.bin/webpack"
  },
  "author": "",
  "license": "ISC",
  "devDependencies": {
    "@babel/cli": "^7.17.0",
    "@babel/core": "^7.17.0",
    "@babel/preset-env": "^7.16.11",
    "webpack": "^5.68.0",
    "webpack-cli": "^4.9.2"
  }
}
執行 webpack 指令產生錯誤
- package.json 檔案裡面的 “scripts” 指令的 “webpack” 做修改
- “webpack”: “webpack”
// package.json - 2 修改 "webpack" 指令

{
  "name": "modern-javascript",
  "version": "1.0.0",
  "description": "",
  "main": "index.js",
  "scripts": {
    "babel": "babel src/index.js -w -o dist/assets/bundle.js",
    "webpack": "webpack"
  },
  "author": "",
  "license": "ISC",
  "devDependencies": {
    "@babel/cli": "^7.17.0",
    "@babel/core": "^7.17.0",
    "@babel/preset-env": "^7.16.11",
    "webpack": "^5.68.0",
    "webpack-cli": "^4.9.2"
  }
}
Introduction to Modules
比較複雜,不懂可重複觀看、練習。
操作步驟
- 刪除 src/index.js 裡面所有程式碼
- 在 src 資料夾裡面建立 dom.js 檔案
- 在 src/index.js 載入 dom.js
- 執行 webpack 指令
- npm run webpack
- 在 dist/assets/bundle.js 可以看到編譯後的程式碼
- 網頁出現錯誤、重新執行 live server,可以看到網頁畫面、以及 console.log 的結果
- 用 index.js 講解變數、函式無法從 dom.js 拿來 index.js 用,每個檔案有自己的獨特的範圍
- 執行 webpack 指令
- dom.js 新增 export
- index.js 修改 import
- 儲存後、執行 npm run webpack 指令,可以看到網頁新增 test 標題
- dom.js 刪除一些程式碼
- index.js 新增一些程式碼
- 執行 npm run webpack 指令,這樣仍會運作
- 在 dom.js 再新增 export
- 在 index.js 再新增 import
- 儲存後、執行 npm run webpack 指令
- dom.js 在底下一起 export
- index.js 一樣、不用變動
- 執行 npm run webpack 指令、一樣運作
// dom.js - 1

console.log('dom file');

const body = document.querySelector('body');

const styleBody = () => {
  body.style.background = 'peachpuff';
};

const addTitle = (text) => {
  const title = document.createElement('h1');
  title.textContent = text;
  body.appendChild(title)
};

styleBody();
addTitle('hello, world from the dom file');
// index.js - 1
import './dom';
console.log('index file');
// index.js - 2

import './dom';

console.log('index file');
addTitle('test');
// Google Console - 2
   dom file
   index file
x  Uncaught ReferenceError: addTitle is not defined
>
// dom.js - 3
console.log('dom file');
const body = document.querySelector('body');
export const styleBody = () => {
body.style.background = 'peachpuff';
};
export const addTitle = (text) => {
const title = document.createElement('h1');
title.textContent = text;
body.appendChild(title)
};
styleBody();
addTitle('hello, world from the dom file');// index.js - 3
import {styleBody, addTitle} from './dom';
console.log('index file');
addTitle('test');
// dom.js - 4 刪除一些程式碼

console.log('dom file');

const body = document.querySelector('body');

export const styleBody = () => {
  body.style.background = 'peachpuff';
};

export const addTitle = (text) => {
  const title = document.createElement('h1');
  title.textContent = text;
  body.appendChild(title)
};
// index.js - 4 新增一些程式碼

import {styleBody, addTitle} from './dom';

console.log('index file');
addTitle('test');
styleBody();
// dom.js - 5 再新增 export
console.log('dom file');
const body = document.querySelector('body');
export const styleBody = () => {
body.style.background = 'peachpuff';
};
export const addTitle = (text) => {
const title = document.createElement('h1');
title.textContent = text;
body.appendChild(title)
};
export const contact = 'mario@thenetninja.co.uk';
// index.js - 5 再新增 import

import {styleBody, addTitle, contact} from './dom';

console.log('index file');
addTitle('test');
styleBody();
console.log(contact);
// dom.js - 6 在底下一起 export
console.log('dom file');
const body = document.querySelector('body');
const styleBody = () => {
body.style.background = 'peachpuff';
};
const addTitle = (text) => {
const title = document.createElement('h1');
title.textContent = text;
body.appendChild(title)
};
const contact = 'mario@thenetninja.co.uk';
export { styleBody, addTitle, contact };Default Exports
可重複觀看、練習。
操作步驟
- 在 src 資料夾建立 data.js 檔案
- 在 data.js 檔案新增程式碼內容
- 在 index.js 檔案 import 載入 data.js
- 執行 webpack 指令
- 查看 Google Console
- 在 data.js 新增函式
- 在 index.js 程式碼新增
- 儲存後、執行 webpack 指令
- 查看 Google Console
- 在 data.js 另一種 export 寫法、其他不變
- 儲存後、執行 webpack 指令,所有仍然運作
// data.js - 1

const users = [
  { name: 'mario', premium: true },
  { name: 'luigi', premium: false },
  { name: 'yoshi', premium: true },
  { name: 'toad', premium: true },
  { name: 'peach', premium: false }
];

export default users;
// index.js - 1
import {styleBody, addTitle, contact} from './dom';
import users from './data';
console.log(users);
// Google Console - 1
   dom file
   (5) [{...}, {...}, {...}, {...}, {...}]
>
// data.js - 2 新增函式
const users = [
{ name: 'mario', premium: true },
{ name: 'luigi', premium: false },
{ name: 'yoshi', premium: true },
{ name: 'toad', premium: true },
{ name: 'peach', premium: false }
];
export const getPremUsers = (users) => {
return users.filter(user => user.premium);
};
export default users;// index.js - 2
import {styleBody, addTitle, contact} from './dom';
import users, { getPremUsers } from './data';
const premUsers = getPremUsers(users);
console.log(users, premUsers);
// Google Console - 2
   dom file
   (5) [{...}, {...}, {...}, {...}, {...}] (3) [{...}, {...}, {...}]
>
// data.js - 3 另一種 export 寫法
const users = [
{ name: 'mario', premium: true },
{ name: 'luigi', premium: false },
{ name: 'yoshi', premium: true },
{ name: 'toad', premium: true },
{ name: 'peach', premium: false }
];
const getPremUsers = (users) => {
return users.filter(user => user.premium);
};
export { getPremUsers, users as default }Watching for Changes
操作步驟
- 在 package.json 修改 “scripts” 中 “webpack” 指令
- 修改前 “node_modules/.bin/webpack -w”
- 修改後 “webpack”: “webpack -w”
- 用 index.js 檔案測試 watching 是否有正確使用
- 查看 Google Console 看是否有執行
- 停止 watching 可以在 Terminal 終端機使用 Ctrl + c、然後輸入 Y 停止
// package.json

{
  "name": "modern-javascript",
  "version": "1.0.0",
  "description": "",
  "main": "index.js",
  "scripts": {
    "babel": "babel src/index.js -w -o dist/assets/bundle.js",
    "webpack": "webpack -w"
  },
  "author": "",
  "license": "ISC",
  "devDependencies": {
    "@babel/cli": "^7.17.0",
    "@babel/core": "^7.17.0",
    "@babel/preset-env": "^7.16.11",
    "webpack": "^5.68.0",
    "webpack-cli": "^4.9.2"
  }
}
// index.js

import {styleBody, addTitle, contact} from './dom';
import users, { getPremUsers } from './data';

const premUsers = getPremUsers(users);
console.log(users, premUsers);

console.log('test');
// Google Console
dom file
(5) [{...}, {...}, {...}, {...}, {...}] (3) [{...}, {...}, {...}]
test
>The Webpack Dev Server
可重複觀看、練習。
操作步驟
- 停止 live server
- 使用 Terminal 終端機安裝套件
- 產生錯誤 npm install webpack-dev-server@3.2.1
- 修正後 npm install webpack-dev-server 版本是 4.7.4
- 在 webpack.config.js 新增關於 devServer 程式碼
- 在 package.json 新增 “scripts” 指令
- “serve”: “webpack-dev-server”
- 執行 serve 指令、產生錯誤
- 修改 webpack.config.js 的 devServer
- 在終端機 Project is running at 連結,使用 ctrl+左鍵打開網頁
- 用 index.js 來測試是否又正確執行,結果出現 test 沒有變動
- 再次修改 webpack.config.js 的 devServer,test 會變動了
- 有一個問題是虛擬檔案、沒有編譯程式碼到 bundle.js
- 藉由刪除 bundle.js 所有程式碼來展示確實沒有編譯程式碼到 bundle.js
- 用 index.js 來測試,bundle.js 一樣沒有編譯完成的程式碼
webpack 文件
// package.json

{
  "name": "modern-javascript",
  "version": "1.0.0",
  "description": "",
  "main": "index.js",
  "scripts": {
    "babel": "babel src/index.js -w -o dist/assets/bundle.js",
    "webpack": "webpack -w"
  },
  "author": "",
  "license": "ISC",
  "devDependencies": {
    "@babel/cli": "^7.17.0",
    "@babel/core": "^7.17.0",
    "@babel/preset-env": "^7.16.11",
    "webpack": "^5.68.0",
    "webpack-cli": "^4.9.2"
  },
  "dependencies": {
    "webpack-dev-server": "^4.7.4"
  }
}
// webpack.config.js - 修改前

const path = require('path');

module.exports = {
  entry: './src/index.js',
  output: {
    path: path.resolve(__dirname, 'dist/assets'),
    filename: 'bundle.js'
  },
  devServer: {
    contentBase: path.resolve(__dirname, 'dist'),
    publicPath: '/assets/'
  }
};
// package.json - 修改前

{
  "name": "modern-javascript",
  "version": "1.0.0",
  "description": "",
  "main": "index.js",
  "scripts": {
    "babel": "babel src/index.js -w -o dist/assets/bundle.js",
    "webpack": "webpack -w",
    "serve": "webpack-dev-server"
  },
  "author": "",
  "license": "ISC",
  "devDependencies": {
    "@babel/cli": "^7.17.0",
    "@babel/core": "^7.17.0",
    "@babel/preset-env": "^7.16.11",
    "webpack": "^5.68.0",
    "webpack-cli": "^4.9.2"
  },
  "dependencies": {
    "webpack-dev-server": "^4.7.4"
  }
}
// webpack.config.js - 修改後

const path = require('path');

module.exports = {
  entry: './src/index.js',
  output: {
    path: path.resolve(__dirname, 'dist/assets'),
    filename: 'bundle.js'
  },
  devServer: {
    static: {
      directory: path.join(__dirname, 'dist'),
    }
  }
};
// index.js - 測試

import {styleBody, addTitle, contact} from './dom';
import users, { getPremUsers } from './data';

const premUsers = getPremUsers(users);
console.log(users, premUsers);

console.log('test 2');
// webpack.config.js - 再次修改 devServer
const path = require('path');
module.exports = {
mode: 'none',
entry: './src/index.js',
output: {
path: path.resolve(__dirname, 'dist/assets'),
filename: 'bundle.js'
},
devServer: {
static: {
directory: path.join(__dirname, 'dist')
},
devMiddleware: {
publicPath: '/assets'
}
},
};
// index.js - 再測試

import {styleBody, addTitle, contact} from './dom';
import users, { getPremUsers } from './data';

const premUsers = getPremUsers(users);
console.log(users, premUsers);

console.log('test 3');
Production & Development Modes
可重複觀看、練習。
操作步驟
- 修改 package.json 的 “scripts” 指令
- 移除 “babel” 指令
- 修改 “webpack” 指令改成 “build” 指令
- 停止 Terminal 終端機 Ctrl + c
- 執行指令 npm run build,就會看到 bundle.js 編譯出程式碼
- 終端機出現警告是關於沒有設定 mode 的訊息
- 在 package.json “scripts” 指令 “build”、”serve” 設定 mode
- “build”: “webpack –mode production”
- “serve”: “webpack-dev-server –mode development”
- 在終端機先使用 clear 清楚終端機畫面,執行 npm run build 指令
- 執行 npm run serve 指令
// package.json - 1

{
  "name": "modern-javascript",
  "version": "1.0.0",
  "description": "",
  "main": "index.js",
  "scripts": {
    "build": "webpack",
    "serve": "webpack-dev-server"
  },
  "author": "",
  "license": "ISC",
  "devDependencies": {
    "@babel/cli": "^7.17.0",
    "@babel/core": "^7.17.0",
    "@babel/preset-env": "^7.16.11",
    "webpack": "^5.68.0",
    "webpack-cli": "^4.9.2"
  },
  "dependencies": {
    "webpack-dev-server": "^4.7.4"
  }
}
// webpack.config.js - 把 mode 移除

const path = require('path');

module.exports = {
  entry: './src/index.js',
  output: {
    path: path.resolve(__dirname, 'dist/assets'),
    filename: 'bundle.js'
  },
  devServer: {
    static: {
      directory: path.join(__dirname, 'dist')
    },
    devMiddleware: {
      publicPath: '/assets'
    }
  },
};
// package.json - 2 mode 設定

{
  "name": "modern-javascript",
  "version": "1.0.0",
  "description": "",
  "main": "index.js",
  "scripts": {
    "build": "webpack --mode production",
    "serve": "webpack-dev-server --mode development"
  },
  "author": "",
  "license": "ISC",
  "devDependencies": {
    "@babel/cli": "^7.17.0",
    "@babel/core": "^7.17.0",
    "@babel/preset-env": "^7.16.11",
    "webpack": "^5.68.0",
    "webpack-cli": "^4.9.2"
  },
  "dependencies": {
    "webpack-dev-server": "^4.7.4"
  }
}
webpack 指令模式
- production mode 上線模式
- development mode 開發模式
Babel & Webpack Together
可重複觀看、練習。
操作步驟
- 安裝 babel-loader 套件
- 終端機指令 npm install babel-loader –save-dev
- 在 webpack.config.js 新增 module 程式碼
- 在 data.js 我們有使用箭頭函式
- 在 Terminal 終端機輸入指令
- npm run build
- 查看 bundle.js 是否有編譯成以前的程式碼
// webpack.config.js

const path = require('path');

module.exports = {
  entry: './src/index.js',
  output: {
    path: path.resolve(__dirname, 'dist/assets'),
    filename: 'bundle.js'
  },
  devServer: {
    static: {
      directory: path.join(__dirname, 'dist')
    },
    devMiddleware: {
      publicPath: '/assets'
    }
  },
  module: {
    rules: [{
      test: /\.js$/,
      exclude: /node_modules/,
      use: {
        loader: 'babel-loader',
        options: {
          presets: ['@babel/preset-env']
        }
      }
    }]
  }
};
Webpack Boilerplate (Webpack 樣板)
可以下載 Webpack Boilerplate (Webpack 樣板) 使用。
資源
操作步驟
- 下載 Webpack Boilerplate
- 複製 Boilerplate 裡面的檔案,貼到自己的 project 專案
- 可以藉由 package.json 檔案裡面的套件名稱、版本安裝 node_modules 資料夾
- 終端機指令 npm install
- 在 package.json 找到 “scripts” 指令,並執行 “serve” 指令
- npm run serve
- 打開終端機出現的本地端網址,在 Google Console 上並沒有出現任何程式碼
- 在 index.js 撰寫程式碼
- 查看 Google Console 是否有出現 console 結果
// index.js

console.log('hello, ninjas');
Project – UI Library
比較複雜,可重複觀看、練習。
Project Preview & Setup
可重複觀看、練習。
操作步驟
- 下載 Webpack Boilerplate
- 建立一個資料夾 ui-lib-project
- 複製 Webpack Boilerplate 裡面的檔案到 ui-lib-project 資料夾
- 打開 Terminal 終端機移動到專案位置 cd ui-lib-project
- 安裝 package.json 裡面的所有套件
- 指令 npm install
- 查看 package.json 上的 “scripts” 指令中的 “serve” 指令
- 執行指令 npm run serve
- 開啟終端機上的本地端網址
- 藉由 index.js 測試是否有正常運行
- 查看 Google Console 有無出現 console 結果
- 在 src 資料夾裡面建立 ninja-ui 資料夾
// index.js

console.log('test');
UI Library CSS
Keep the library css in JavaScript together inside the folder right here. And that means we’re going to need to process our css through webpack using css loader, because this is in the source folder, not the distribution folder.
在下一章節會講到如何透過 Webpack 處理 CSS。
CSS & Style Loaders (webpack)
可重複觀看、練習。
操作步驟
- 停止終端機 Ctrl + C
- 安裝 css-loader、style-loader 套件
- 終端機指令 npm install css-loader style-loader –save-dev
- 在 webpack.config.js module 的 rules 裡面程式碼新增第二個
- 執行 “scripts” 指令 npm run serve
- 在 src 資料夾新增一個 test.css 檔案
- 使用終端機打開本地端網頁,沒有產生渲染結果,因為我們沒有 import 這個 css 檔案
- 在 index.js import 載入 test.css
- 查看 Goolge Elemets 在 <head> 可以看到 CSS 樣式
- 在 ninja_ui 資料夾建立一個 styles 資料夾
// webpack.config.js

const path = require('path');

module.exports = {
  entry: './src/index.js',
  output: {
    path: path.resolve(__dirname, 'dist/assets'),
    filename: 'bundle.js'
  },
  devServer: {
    static: {
      directory: path.join(__dirname, 'dist')
    },
    devMiddleware: {
      publicPath: '/assets'
    }
  },
  module: {
    rules: [
      {
        test: /\.js$/,
        exclude: /node_modules/,
        use: {
          loader: 'babel-loader',
          options: {
            presets: ['@babel/preset-env']
          }
        }
      },
      {
        test: /\.css$/,
        use: ['style-loader', 'css-loader']
      }
    ]
  }
};
// test.css

body {
  background: orange;
}
// index.js
import './test.css';
console.log('test');Tooltips (工具提示框)
可重複觀看、練習。
操作步驟
- 在 index.html 新增程式碼內容、樣式
- 在 ninja-ui 資料夾建立 tooltip.js 檔案
- 在 index.js import 載入 Tooltip、並 create a tooltip,在那之前要先在 tooltip.js export 匯出
- 在 styles 資料夾建立 tooltip.css 檔案
- 在 tooltip.js import 載入 tooltip.css
// index.html

<html lang="en">
<head>
  <meta charset="UTF-8">
  <meta http-equiv="X-UA-Compatible" content="IE=edge">
  <meta name="viewport" content="width=device-width, initial-scale=1.0">
  <title>UI Library</title>
  <style>
    body {
      font-size: 1.5em;
    }

    .container {
      margin: 40px;
      margin-top: 60px;
    }
  </style>
</head>
<body>

  <div class="container">
    <!-- tooltop -->
    <p>Lorem ipsum dolor sit amet consectetur adipisicing elit. Hic, reiciendis vel mollitia neque libero nulla, earum, nisi a distinctio doloremque porro aliquam. Alias, ratione. Laudantium neque enim et ipsa corrupti. <span class="tooltip" data-message="I'm a tooltip!!">Lorem, ipsum.</span>Lorem ipsum, dolor sit amet consectetur adipisicing elit. Quasi sequi natus pariatur odio repudiandae provident. Accusamus quidem quaerat, enim beatae dolorum iusto in iure similique esse tempora animi, non eveniet!</p>
  </div>

  <script src="assets/bundle.js"></script>
</body>
</html>
// tooltip.js - 1
class Tooltip {
constructor(element){
this.element = element;
this.message = element.getAttribute('data-message');
}
init(){
const tip = document.createElement('div');
tip.classList.add('tip');
tip.textContent = this.message;
this.element.appendChild(tip);
}
}// tooltip.js - 2 export 匯出
class Tooltip {
constructor(element){
this.element = element;
this.message = element.getAttribute('data-message');
}
init(){
const tip = document.createElement('div');
tip.classList.add('tip');
tip.textContent = this.message;
this.element.appendChild(tip);
}
}
export { Tooltip as default };// index.js
import Tooltip from './ninja-ui/tooltip';
// create a tooltip
const tooltip = new Tooltip(document.querySelector('.tooltip'));
tooltip.init();
// tooltip.js - 3 addEventListener

class Tooltip {
  constructor(element){
    this.element = element;
    this.message = element.getAttribute('data-message');
  }
  init(){
    const tip = document.createElement('div');
    tip.classList.add('tip');
    tip.textContent = this.message;
    this.element.appendChild(tip);

    this.element.addEventListener('mouseenter', () => {
      tip.classList.add('active');
    });

    this.element.addEventListener('mouseleave', () => {
      tip.classList.remove('active');
    });
  }
}

export { Tooltip as default };
// styles/tooltip.css
.tooltip {
position: relative;
display: inline-block;
color: #ff6565;
border-bottom: 1px dotted #ff6565;
cursor: help;
}
.tip {
visibility: hidden;
width: 150px;
background-color: #ff6565;
color: #fff;
text-align: center;
border-radius: 10px;
padding: 5px 0;
position: absolute;
bottom: 120%;
left: 50%;
margin-left: -75px;
opacity: 0;
transition: opacity 0.3s;
}
.tip.active {
visibility: visible;
opacity: 1;
}
.tip::after {
content: "";
position: absolute;
top: 100%;
left: 50%;
margin-left: -4px;
border-width: 4px;
border-style: solid;
border-color: transparent;
border-top-color: #ff6565;
}// tooltip.js - 4
import './styles/tooltip.css';
class Tooltip {
constructor(element){
this.element = element;
this.message = element.getAttribute('data-message');
}
init(){
const tip = document.createElement('div');
tip.classList.add('tip');
tip.textContent = this.message;
this.element.appendChild(tip);
this.element.addEventListener('mouseenter', () => {
tip.classList.add('active');
});
this.element.addEventListener('mouseleave', () => {
tip.classList.remove('active');
});
}
}
export { Tooltip as default };Dropdowns
可重複觀看、練習。
操作步驟
- 在 index.html 新增程式碼內容
- 在 ninja-ui 資料夾建立 dropdown.js 檔案
- 在 index.js import 載入 Dropdown、並 create dropdowns
- 使用 Google 檢查、藉由點擊觸發監聽行為
- 在 styles 資料夾建立 dropdown.css 檔案、新增程式碼內容
- 在 dropdown.js import 載入 dropdown.css
// index.html

<html lang="en">
<head>
  <meta charset="UTF-8">
  <meta http-equiv="X-UA-Compatible" content="IE=edge">
  <meta name="viewport" content="width=device-width, initial-scale=1.0">
  <title>UI Library</title>
  <style>
    body {
      font-size: 1.5em;
    }

    .container {
      margin: 40px;
      margin-top: 60px;
    }
  </style>
</head>
<body>

  <div class="container">
    <!-- tooltop -->
    <p>Lorem ipsum dolor sit amet consectetur adipisicing elit. Hic, reiciendis vel mollitia neque libero nulla, earum, nisi a distinctio doloremque porro aliquam. Alias, ratione. Laudantium neque enim et ipsa corrupti. <span class="tooltip" data-message="I'm a tooltip!!">Lorem, ipsum.</span>Lorem ipsum, dolor sit amet consectetur adipisicing elit. Quasi sequi natus pariatur odio repudiandae provident. Accusamus quidem quaerat, enim beatae dolorum iusto in iure similique esse tempora animi, non eveniet!</p>
    <h2>Services</h2>
    <!-- dropdowns -->
    <div class="dropdown">
      <div class="trigger">Awesome T-shirt Designs</div>
      <div class="content">
        <p>Lorem ipsum dolor, sit amet consectetur adipisicing elit. Animi minus non sed assumenda molestiae amet quisquam temporibus ratione dolorem. Ea non quibusdam eveniet eum tempora molestiae asperiores labore, dolorum iste.</p>
      </div>
    </div>
    <div class="dropdown">
      <div class="trigger">Cool Sticker Printing</div>
      <div class="content">
        <p>Lorem ipsum dolor sit amet consectetur adipisicing elit. Culpa quidem nihil nam quasi consequatur deserunt nemo alias corrupti ex at nisi fugit veritatis veniam voluptate error recusandae, dolorem debitis unde.</p>
      </div>
    </div>
  </div>

  <script src="assets/bundle.js"></script>
</body>
</html>
// dropdown.js
class Dropdown {
constructor(container){
this.container = container;
this.trigger = container.querySelector('.trigger');
this.content = container.querySelector('.content');
}
init(){
this.trigger.addEventListener('click', () => {
this.trigger.classList.toggle('active');
this.content.classList.toggle('active');
})
}
}
export { Dropdown as default };// index.js
import Tooltip from './ninja-ui/tooltip';
import Dropdown from './ninja-ui/dropdown';
// create a tooltip
const tooltip = new Tooltip(document.querySelector('.tooltip'));
tooltip.init();
// create dropdowns
const dropdowns = document.querySelectorAll('.dropdown');
dropdowns.forEach(dropdown => {
const instance = new Dropdown(dropdown);
instance.init();
})// dropdown.css
.dropdown .trigger{
border-bottom: 1px solid #ddd;
padding: 10px;
position: relative;
cursor: pointer;
}
.dropdown .trigger::after{
content: ">";
display: inline-block;
position: absolute;
right: 15px;
transform: rotate(90deg) scale(0.5, 1);
font-weight: bold;
transition: transform 0.3s;
}
.dropdown .trigger.active::after{
transform: rotate(-90deg) scale(0.5, 1);
}
.dropdown .content{
display: none;
}
.dropdown .content.active{
display: block;
}// dropdown.js import 載入 dropdown.css
import './styles/dropdown.css';
class Dropdown {
constructor(container){
this.container = container;
this.trigger = container.querySelector('.trigger');
this.content = container.querySelector('.content');
}
init(){
this.trigger.addEventListener('click', () => {
this.trigger.classList.toggle('active');
this.content.classList.toggle('active');
})
}
}
export { Dropdown as default };Tabbed Content (頁籤內容)
可重複觀看、練習。
操作步驟
- 新增 index.html Tabbed Content 內容
- 使用終端機執行指令 npm run serve 看網頁是否有新增 Tabbed Content 內容
- 在 ninja-ui 資料夾建立 tabs.js 檔案,新增 tabs.js 程式碼、export 預設匯出 Tabs
- 在 index.js import 載入 Tabs 從 tabs.js,並在下面 create tabs
- 在 Google Console 出現錯誤,在 tabs.js 的地方、我們必需把 querySelector 改成 querySelectorAll
- 在 Google Elements 測試點擊頁籤看是否會切換 active
- 在 styles 資料夾新增 tabs.css 檔案,並新增 CSS 樣式
- 在 tabs.js import 載入 tabs.css
// index.html

<html lang="en">
<head>
  <meta charset="UTF-8">
  <meta http-equiv="X-UA-Compatible" content="IE=edge">
  <meta name="viewport" content="width=device-width, initial-scale=1.0">
  <title>UI Library</title>
  <style>
    body {
      font-size: 1.5em;
    }

    .container {
      margin: 40px;
      margin-top: 60px;
    }
  </style>
</head>
<body>

  <div class="container">
    <!-- tooltop -->
    <p>Lorem ipsum dolor sit amet consectetur adipisicing elit. Hic, reiciendis vel mollitia neque libero nulla, earum, nisi a distinctio doloremque porro aliquam. Alias, ratione. Laudantium neque enim et ipsa corrupti. <span class="tooltip" data-message="I'm a tooltip!!">Lorem, ipsum.</span>Lorem ipsum, dolor sit amet consectetur adipisicing elit. Quasi sequi natus pariatur odio repudiandae provident. Accusamus quidem quaerat, enim beatae dolorum iusto in iure similique esse tempora animi, non eveniet!</p>
    <h2>Services</h2>
    <!-- dropdowns -->
    <div class="dropdown">
      <div class="trigger">Awesome T-shirt Designs</div>
      <div class="content">
        <p>Lorem ipsum dolor, sit amet consectetur adipisicing elit. Animi minus non sed assumenda molestiae amet quisquam temporibus ratione dolorem. Ea non quibusdam eveniet eum tempora molestiae asperiores labore, dolorum iste.</p>
      </div>
    </div>
    <div class="dropdown">
      <div class="trigger">Cool Sticker Printing</div>
      <div class="content">
        <p>Lorem ipsum dolor sit amet consectetur adipisicing elit. Culpa quidem nihil nam quasi consequatur deserunt nemo alias corrupti ex at nisi fugit veritatis veniam voluptate error recusandae, dolorem debitis unde.</p>
      </div>
    </div>
    <h2>More information</h2>
    <!-- tabs -->
    <div class="tabs">
      <ul>
        <li class="trigger active" data-target="#about">About</li>
        <li class="trigger" data-target="#delivery">Delivery info</li>
        <li class="trigger" data-target="#returns">Returns info</li>
      </ul>
      <div id="about" class="content active">
        <h3>about</h3>
        <p>Lorem ipsum dolor sit amet consectetur adipisicing elit. Explicabo natus sequi nemo sint error cupiditate praesentium nisi commodi, beatae laborum quisquam ea, atque recusandae totam optio suscipit, ab corrupti illo.</p>
      </div>
      <div id="delivery" class="content">
        <h3>delivery</h3>
        <p>Lorem ipsum dolor sit amet, consectetur adipisicing elit. Dolore autem quisquam architecto aliquam. Corporis veniam recusandae doloribus, vitae illum voluptate earum impedit molestiae deleniti voluptatum inventore voluptates! Delectus, quia excepturi?</p>
      </div>
      <div id="returns" class="content">
        <h3>returns</h3>
        <p>Lorem ipsum dolor sit amet consectetur adipisicing elit. Assumenda, ullam aut! Saepe, pariatur! Est aperiam provident dicta cum. Dolorum doloremque error id! Veniam aut architecto necessitatibus reiciendis officiis quisquam delectus!</p>
      </div>
    </div>
  </div>

  <script src="assets/bundle.js"></script>
</body>
</html>
// tabs.js
class Tabs{
constructor(container){
this.container = container;
this.tabs = container.querySelector('.trigger');
}
init(){
this.tabs.forEach(tab => {
tab.addEventListener('click', e => {
this.toggleTabs(e);
this.toggleContent(e);
})
})
}
toggleTabs(e){
// remove current active classes
this.tabs.forEach(tab => tab.classList.remove('active'));
// add new active class to clicked tab
e.target.classList.add('active');
}
toggleContent(e){
// remove current active classes from content
this.container.querySelectorAll('.content').forEach(item => {
item.classList.remove('active');
});
// add new active class to content
const selector = e.target.getAttribute('data-target');
const content = this.container.querySelector(selector);
content.classList.add('active');
}
}
export { Tabs as default };// index.js
import Tooltip from './ninja-ui/tooltip';
import Dropdown from './ninja-ui/dropdown';
import Tabs from './ninja-ui/tabs';
// create a tooltip
const tooltip = new Tooltip(document.querySelector('.tooltip'));
tooltip.init();
// create dropdowns
const dropdowns = document.querySelectorAll('.dropdown');
dropdowns.forEach(dropdown => {
const instance = new Dropdown(dropdown);
instance.init();
});
// create tabs
const tabs = new Tabs(document.querySelector('.tabs'));
tabs.init();// tabs.js - 把第4行 querySelector 改成 querySelectorAll
class Tabs{
constructor(container){
this.container = container;
this.tabs = container.querySelectorAll('.trigger');
}
init(){
this.tabs.forEach(tab => {
tab.addEventListener('click', e => {
this.toggleTabs(e);
this.toggleContent(e);
})
})
}
toggleTabs(e){
// remove current active classes
this.tabs.forEach(tab => tab.classList.remove('active'));
// add new active class to clicked tab
e.target.classList.add('active');
}
toggleContent(e){
// remove current active classes from content
this.container.querySelectorAll('.content').forEach(item => {
item.classList.remove('active');
});
// add new active class to content
const selector = e.target.getAttribute('data-target');
const content = this.container.querySelector(selector);
content.classList.add('active');
}
}
export { Tabs as default };// tabs.css
.tabs > ul {
padding: 0;
}
.tabs .trigger {
list-style-type: none;
padding: 10px;
background: #f2f2f2;
margin: 4px;
border-radius: 6px;
display: inline-block;
padding: 10px 20px;
cursor: pointer;
}
.tabs .trigger.active {
background: #ff6565;
color: white;
}
.tabs .content {
background: #fbfbfb;
padding: 10px 20px;
border-radius: 6px;
display: none;
}
.tabs .content.active {
display: block;
}// tabs.js
import './styles/tabs.css';
class Tabs{
constructor(container){
this.container = container;
this.tabs = container.querySelectorAll('.trigger');
}
init(){
this.tabs.forEach(tab => {
tab.addEventListener('click', e => {
this.toggleTabs(e);
this.toggleContent(e);
})
})
}
toggleTabs(e){
// remove current active classes
this.tabs.forEach(tab => tab.classList.remove('active'));
// add new active class to clicked tab
e.target.classList.add('active');
}
toggleContent(e){
// remove current active classes from content
this.container.querySelectorAll('.content').forEach(item => {
item.classList.remove('active');
});
// add new active class to content
const selector = e.target.getAttribute('data-target');
const content = this.container.querySelector(selector);
content.classList.add('active');
}
}
export { Tabs as default };Snackbars
可重複觀看、練習。
操作步驟
- 在 index.html 新增 snackbars 內容、以及按鈕的 CSS 樣式
- 在 ninja-ui 資料夾建立 snackbar.js 檔案,新增 Snackbar 程式碼內容、以及 export 預設載入 Snackbar
- 在 index.js import 匯入 Snackbar 從 snackbar.js,並在下面 create snackbar
- 在 Google Elements 可在 <body> 之前看到 snackbar 類別
- 在 snackbar.js 新增 show() 方法
- 在 index.js 新增關於 button addEventListener 按鈕監聽
- 在網頁點擊按鈕後會出現文字
- 在 styles 資料夾建立 snackbar.css 檔案、並新增 CSS 內容
- 在 snackbar.js import 載入 snackbar.css
// index.html

<html lang="en">
<head>
  <meta charset="UTF-8">
  <meta http-equiv="X-UA-Compatible" content="IE=edge">
  <meta name="viewport" content="width=device-width, initial-scale=1.0">
  <title>UI Library</title>
  <style>
    body {
      font-size: 1.5em;
    }

    .container {
      margin: 40px;
      margin-top: 60px;
    }

    button {
      width: 200px;
      background: #eee;
      padding: 10px;
      margin: 20px auto;
      border: none;
      border-radius: 4px;
      font-size: 1em;
      cursor: pointer;
      display: block;
    }
  </style>
</head>
<body>

  <div class="container">
    <!-- tooltop -->
    <p>Lorem ipsum dolor sit amet consectetur adipisicing elit. Hic, reiciendis vel mollitia neque libero nulla, earum, nisi a distinctio doloremque porro aliquam. Alias, ratione. Laudantium neque enim et ipsa corrupti. <span class="tooltip" data-message="I'm a tooltip!!">Lorem, ipsum.</span>Lorem ipsum, dolor sit amet consectetur adipisicing elit. Quasi sequi natus pariatur odio repudiandae provident. Accusamus quidem quaerat, enim beatae dolorum iusto in iure similique esse tempora animi, non eveniet!</p>
    <h2>Services</h2>
    <!-- dropdowns -->
    <div class="dropdown">
      <div class="trigger">Awesome T-shirt Designs</div>
      <div class="content">
        <p>Lorem ipsum dolor, sit amet consectetur adipisicing elit. Animi minus non sed assumenda molestiae amet quisquam temporibus ratione dolorem. Ea non quibusdam eveniet eum tempora molestiae asperiores labore, dolorum iste.</p>
      </div>
    </div>
    <div class="dropdown">
      <div class="trigger">Cool Sticker Printing</div>
      <div class="content">
        <p>Lorem ipsum dolor sit amet consectetur adipisicing elit. Culpa quidem nihil nam quasi consequatur deserunt nemo alias corrupti ex at nisi fugit veritatis veniam voluptate error recusandae, dolorem debitis unde.</p>
      </div>
    </div>
    <h2>More information</h2>
    <!-- tabs -->
    <div class="tabs">
      <ul>
        <li class="trigger active" data-target="#about">About</li>
        <li class="trigger" data-target="#delivery">Delivery info</li>
        <li class="trigger" data-target="#returns">Returns info</li>
      </ul>
      <div id="about" class="content active">
        <h3>about</h3>
        <p>Lorem ipsum dolor sit amet consectetur adipisicing elit. Explicabo natus sequi nemo sint error cupiditate praesentium nisi commodi, beatae laborum quisquam ea, atque recusandae totam optio suscipit, ab corrupti illo.</p>
      </div>
      <div id="delivery" class="content">
        <h3>delivery</h3>
        <p>Lorem ipsum dolor sit amet, consectetur adipisicing elit. Dolore autem quisquam architecto aliquam. Corporis veniam recusandae doloribus, vitae illum voluptate earum impedit molestiae deleniti voluptatum inventore voluptates! Delectus, quia excepturi?</p>
      </div>
      <div id="returns" class="content">
        <h3>returns</h3>
        <p>Lorem ipsum dolor sit amet consectetur adipisicing elit. Assumenda, ullam aut! Saepe, pariatur! Est aperiam provident dicta cum. Dolorum doloremque error id! Veniam aut architecto necessitatibus reiciendis officiis quisquam delectus!</p>
      </div>
    </div>
    <div>
      <button class="snackbar-trigger">click me</button>
    </div>
  </div>

  <script src="assets/bundle.js"></script>
</body>
</html>
// snackbar.js
class Snackbar {
constructor(){
this.snackbar = document.createElement('div');
}
init(){
this.snackbar.classList.add('snackbar');
document.querySelector('body').appendChild(this.snackbar);
}
}
export { Snackbar as default };// index.js
import Tooltip from './ninja-ui/tooltip';
import Dropdown from './ninja-ui/dropdown';
import Tabs from './ninja-ui/tabs';
import Snackbar from './ninja-ui/snackbar';
// create a tooltip
const tooltip = new Tooltip(document.querySelector('.tooltip'));
tooltip.init();
// create dropdowns
const dropdowns = document.querySelectorAll('.dropdown');
dropdowns.forEach(dropdown => {
const instance = new Dropdown(dropdown);
instance.init();
});
// create tabs
const tabs = new Tabs(document.querySelector('.tabs'));
tabs.init();
// create snackbar
const snackbar = new Snackbar();
snackbar.init();// snackbar.js - show()
class Snackbar {
constructor(){
this.snackbar = document.createElement('div');
}
init(){
this.snackbar.classList.add('snackbar');
document.querySelector('body').appendChild(this.snackbar);
}
show(message){
this.snackbar.textContent = message;
this.snackbar.classList.add('active');
setTimeout(() => {
this.snackbar.classList.remove('active');
}, 4000);
}
}
export { Snackbar as default };// index.js - button addEventListener
import Tooltip from './ninja-ui/tooltip';
import Dropdown from './ninja-ui/dropdown';
import Tabs from './ninja-ui/tabs';
import Snackbar from './ninja-ui/snackbar';
// create a tooltip
const tooltip = new Tooltip(document.querySelector('.tooltip'));
tooltip.init();
// create dropdowns
const dropdowns = document.querySelectorAll('.dropdown');
dropdowns.forEach(dropdown => {
const instance = new Dropdown(dropdown);
instance.init();
});
// create tabs
const tabs = new Tabs(document.querySelector('.tabs'));
tabs.init();
// create snackbar
const snackbar = new Snackbar();
snackbar.init();
const button = document.querySelector('button');
button.addEventListener('click', () => {
snackbar.show('you clicked me :)');
});// styles/snackbar.css
.snackbar {
width: 200px;
padding: 20px;
position: fixed;
left: 50%;
margin-left: -120px;
top: 0;
border-radius: 0 0 5px 5px;
box-shadow: 1px 3px 5px rgba(0,0,0,0.2);
background: #ff6565;
text-align: center;
color: #fff;
margin-top: -100%;
transition: all 0.2s;
}
.snackbar.active {
margin-top: 0;
}// snackbar.js - import 載入 snackbar.css
import './styles/snackbar.css';
class Snackbar {
constructor(){
this.snackbar = document.createElement('div');
}
init(){
this.snackbar.classList.add('snackbar');
document.querySelector('body').appendChild(this.snackbar);
}
show(message){
this.snackbar.textContent = message;
this.snackbar.classList.add('active');
setTimeout(() => {
this.snackbar.classList.remove('active');
}, 4000);
}
}
export { Snackbar as default };Extending the Library
build and upload our final project (建立以及上傳你最終專案)
- 在 package.json 查看 “scripts” 指令
- 執行 “build” 指令 npm run build
延伸使用 Library
- ninja-ui 資料夾可以複製到不同專案上使用
Using Firebase Database (& Auth) Version 9
更新之前 Databases (Firebase) 章節。
What’s New in Firebase 9?
Firebase Documentation
資源
Webpack Setup
可重複觀看、練習。
操作步驟
- 建立一個專案資料夾 firebase-9-dojo
- 在專案裡面建立 src 資料夾
- 在 src 資料夾建立 index.js 檔案,當作 entry file 進入點
- 在專案裡面建立 dist 資料夾
- 在 dist 資料夾建立 index.html 檔案,並新增 index.html 內容
- 打開 Terminal 終端機執行初始化指令 npm init -y 快速建立 package.json 檔案
- 使用 Terminal 終端機安裝 webpack、webpack-cli 套件
- npm i webpack webpack-cli -D
- 在專案裡新增 webpack.config.js 檔案、並設定 webpack
- 在 package.json “scripts” 指令設定客製化指令
- “build”: “webpack”,build 可以自行設定指令名稱
- 在 index.js 新增一些程式碼,確認是否能正確運作
- 打開 Terminal 終端機,先使用 clear 指令清除終端機畫面、接著執行 npm run build,會產生 bundle.js 檔案
- 在 index.html 新增<script> 把 bundle.js 載入
- 使用 live server 插件 (沒有安裝需到 Extensions 搜尋安裝)、執行 live server
- 查看 Google Console 看是否有正確顯示
// index.html

<html lang="en">
<head>
  <meta charset="UTF-8">
  <meta http-equiv="X-UA-Compatible" content="IE=edge">
  <meta name="viewport" content="width=device-width, initial-scale=1.0">
  <title>Firebase 9</title>
</head>
<body>
  <h1>Getting started with firebase 9</h1>

</body>
</html>
// webpack.config.js
const path = require('path');
module.exports = {
mode: 'development',
entry: './src/index.js',
output: {
path: path.resolve(__dirname, 'dist'),
filename: 'bundle.js'
},
watch: true
}// package.json
{
"name": "firebase-9-dojo",
"version": "1.0.0",
"description": "",
"main": "index.js",
"scripts": {
"test": "echo \"Error: no test specified\" && exit 1",
"build": "webpack"
},
"keywords": [],
"author": "",
"license": "ISC",
"devDependencies": {
"webpack": "^5.68.0",
"webpack-cli": "^4.9.2"
}
}
// index.js

console.log('hello from index.js');
// index.html
<html lang="en">
<head>
<meta charset="UTF-8">
<meta http-equiv="X-UA-Compatible" content="IE=edge">
<meta name="viewport" content="width=device-width, initial-scale=1.0">
<title>Firebase 9</title>
</head>
<body>
<h1>Getting started with firebase 9</h1>
<script src="bundle.js"></script>
</body>
</html>Creating a Firebase Project
可重複觀看、練習。
操作步驟
- 到 Firebase Console (控制台)
- Add project (新增專案)
- Firebase name – Firebase 9 Dojo、然後按下繼續
- 我們這個專案不需要 Google Analytics (Google 分析)、然後按下建立專案、完成後按繼續
- 將 Firebase 新增至應用程式即可開始使用,點選網頁
- Register app (註冊應用程式)
- App nickname: firebase 9 dojo website
- Continue to console (前往控制台)
- 點擊 1個 個應用程式、設定按鈕
- 在 SDK 設定和配置,選擇設定、並複製下面的程式碼
- 在 index.js 先把 console.log 程式碼移除、並把剛複製的程式碼貼上、在儲存之前我們先打開終端機安裝 firebase 套件,安裝後儲存
- npm install firebase
- 在 index.js import 載入 firebase、複習 8 的版本、如何使用 9 的版本
// index.js - 1 API串接資料查詢 Firebase

const firebaseConfig = {
  apiKey: "",
  authDomain: "",
  projectId: "",
  storageBucket: "",
  messagingSenderId: "",
  appId: ""
};
// index.js - 2 Firebase 8 版本
import firebase from 'firebase/app'
const firebaseConfig = {
apiKey: "",
authDomain: "",
projectId: "",
storageBucket: "",
messagingSenderId: "",
appId: ""
};
firebase.initializeApp(firebaseConfig)// index.js - 3 Firebase 9 版本
import { initializeApp } from 'firebase/app'
const firebaseConfig = {
apiKey: "",
authDomain: "",
projectId: "",
storageBucket: "",
messagingSenderId: "",
appId: ""
};
initializeApp(firebaseConfig)Firestore Setup & Fetching Data
可重複觀看、練習。
操作步驟
- 建立 Firestore Database
- 點擊建立資料庫、在這我們先使用以測試模式啟動
- 設定 Cloud Firestore 位置、然後啟用
- 點擊新增集合、集合 ID 叫做 books、然後按下一步
- 新增第一份文件、文件 ID 使用自動產生的 ID、欄位 title, 類型 string, 值 the name of the wind、欄位 author, 類型 string, 值 patrick rothfuss,然後按下儲存
- 再新增兩份類似的文件,欄位 title, 類型 string, 值 the wise man’s fear、欄位 author, 類型 string, 值 patrick rothfuss,然後按下儲存,欄位 title, 類型 string, 值 the final empire、欄位 author, 類型 string, 值 brandon sanders,然後按下儲存
- 在 index.js 新增新的註解、程式碼
- 使用 live server、查看 Google Console
- 修改 index.js get collection data 程式碼,然後再次查看 Google Console
// index.js - API串接資料查看 Firebase

import { initializeApp } from 'firebase/app'
import {
  getFirestore, collection, getDocs
} from 'firebase/firestore'

const firebaseConfig = {
  apiKey: "",
  authDomain: "",
  projectId: "",
  storageBucket: "",
  messagingSenderId: "",
  appId: ""
};

// init firebase app
initializeApp(firebaseConfig)

// init services
const db = getFirestore()

// collection ref
const colRef = collection(db, 'books')

// get collection data
getDocs(colRef)
  .then((snapshot) => {
    console.log(snapshot.docs)
  })
// index.js 修改 get collection data
// API 串接資料查閱 Firebase
import { initializeApp } from 'firebase/app'
import {
getFirestore, collection, getDocs
} from 'firebase/firestore'
const firebaseConfig = {
apiKey: "",
authDomain: "",
projectId: "",
storageBucket: "",
messagingSenderId: "",
appId: ""
};
// init firebase app
initializeApp(firebaseConfig)
// init services
const db = getFirestore()
// collection ref
const colRef = collection(db, 'books')
// get collection data
getDocs(colRef)
.then((snapshot) => {
let books = []
snapshot.docs.forEach((doc) => {
books.push({ ...doc.data(), id: doc.id })
})
console.log(books)
})
.catch(err => {
console.log(err.message)
})Adding & Deleting Documents
可重複觀看、練習。
操作步驟
- 在 index.html 新增樣板內容
- 在 index.js 新增增加文件、刪除文件程式碼
- 在 index.js 增加 import 內容、addDoc,然後儲存
- 使用 live server 開啟網頁輸入標題 the way of kings、作者 brandon anderson、然後新增書本
- 在 index.js 增加 import 內容、deleteDoc, doc,然後儲存
- 在網頁的 Google Console 找到資料 id、然後複製貼到 Document id 欄位並且按下刪除書本,會清除欄位,在網頁重新整理後會剩下3筆資料
// index.html

<html lang="en">
<head>
  <meta charset="UTF-8">
  <meta http-equiv="X-UA-Compatible" content="IE=edge">
  <meta name="viewport" content="width=device-width, initial-scale=1.0">
  <title>Firebase 9</title>
</head>
<body>
  <h1>Getting started with firebase 9</h1>

  <h2>Firebase Firestore</h2>

  <form class="add">
    <label for="title">Title:</label>
    <input type="text" name="title" required>
    <label for="author">Author:</label>
    <input type="text" name="author" required>

    <button>add a new book</button>
  </form>

  <form class="delete">
    <label for="id">Document id:</label>
    <input type="text" name="id" required>

    <button>delete a book</button>
  </form>

  <script src="bundle.js"></script>
</body>
</html>
// index.js - 1 adding, deleting documents
// API 串接資料查閱 Firebase
import { initializeApp } from 'firebase/app'
import {
getFirestore, collection, getDocs
} from 'firebase/firestore'
const firebaseConfig = {
apiKey: "",
authDomain: "",
projectId: "",
storageBucket: "",
messagingSenderId: "",
appId: ""
};
// init firebase app
initializeApp(firebaseConfig)
// init services
const db = getFirestore()
// collection ref
const colRef = collection(db, 'books')
// get collection data
getDocs(colRef)
.then((snapshot) => {
let books = []
snapshot.docs.forEach((doc) => {
books.push({ ...doc.data(), id: doc.id })
})
console.log(books)
})
.catch(err => {
console.log(err.message)
})
// adding documents
const addBookForm = document.querySelector('.add')
addBookForm.addEventListener('submit', (e) => {
e.preventDefault()
})
// deleting documents
const deleteBookForm = document.querySelector('.delete')
deleteBookForm.addEventListener('submit', (e) => {
e.preventDefault()
})// index.js - 2 增加 import 內容、addDoc
// API 串接資料查閱 Firebase
import { initializeApp } from 'firebase/app'
import {
getFirestore, collection, getDocs,
addDoc
} from 'firebase/firestore'
const firebaseConfig = {
apiKey: "",
authDomain: "",
projectId: "",
storageBucket: "",
messagingSenderId: "",
appId: ""
};
// init firebase app
initializeApp(firebaseConfig)
// init services
const db = getFirestore()
// collection ref
const colRef = collection(db, 'books')
// get collection data
getDocs(colRef)
.then((snapshot) => {
let books = []
snapshot.docs.forEach((doc) => {
books.push({ ...doc.data(), id: doc.id })
})
console.log(books)
})
.catch(err => {
console.log(err.message)
})
// adding documents
const addBookForm = document.querySelector('.add')
addBookForm.addEventListener('submit', (e) => {
e.preventDefault()
addDoc(colRef, {
title: addBookForm.title.value,
author: addBookForm.author.value,
})
.then(() => {
addBookForm.reset()
})
})
// deleting documents
const deleteBookForm = document.querySelector('.delete')
deleteBookForm.addEventListener('submit', (e) => {
e.preventDefault()
})// index.js - 3 增加 import 內容、deleteDoc, doc
// API 串接資料查閱 Firebase
import { initializeApp } from 'firebase/app'
import {
getFirestore, collection, getDocs,
addDoc, deleteDoc, doc
} from 'firebase/firestore'
const firebaseConfig = {
apiKey: "",
authDomain: "",
projectId: "",
storageBucket: "",
messagingSenderId: "",
appId: ""
};
// init firebase app
initializeApp(firebaseConfig)
// init services
const db = getFirestore()
// collection ref
const colRef = collection(db, 'books')
// get collection data
getDocs(colRef)
.then((snapshot) => {
let books = []
snapshot.docs.forEach((doc) => {
books.push({ ...doc.data(), id: doc.id })
})
console.log(books)
})
.catch(err => {
console.log(err.message)
})
// adding documents
const addBookForm = document.querySelector('.add')
addBookForm.addEventListener('submit', (e) => {
e.preventDefault()
addDoc(colRef, {
title: addBookForm.title.value,
author: addBookForm.author.value,
})
.then(() => {
addBookForm.reset()
})
})
// deleting documents
const deleteBookForm = document.querySelector('.delete')
deleteBookForm.addEventListener('submit', (e) => {
e.preventDefault()
const docRef = doc(db, 'books', deleteBookForm.id.value)
deleteDoc(docRef)
.then(() => {
deleteBookForm.reset()
})
})Google Console 出現警告 – DevTools failed to load source map
- F12 > 設定圖示 > Preferences > Sources 取消勾選
- Enable JavaScript source maps
- Enable CSS source maps
新增一筆資料,Google Console 沒有顯示新增的資料
- 執行”build” 指令 npm run build
Real Time Collection Data
可重複觀看、練習。
操作步驟
- 修改 index.js 檔案 get collection data 改成 real time collection data、import 的 getDocs 改成 onSnapshot,新增 onSnapshot 方法、刪除 getDocs 方法、然後儲存
- 在 Google Console 複製 “the wise man’s fear” 這筆資料 id、然後貼到欄位、按下刪除書本,可即時刪除剩下3筆資料
- 新增一筆資料,標題 the wise man’s fear、作者 patrick rothfuss、按下新增書本,可即時新增變成4筆資料
// index.js - 修改 index.js 檔案
// api 串接資料查閱 Firebase

import { initializeApp } from 'firebase/app'
import {
  getFirestore, collection, onSnapshot,
  addDoc, deleteDoc, doc
} from 'firebase/firestore'

const firebaseConfig = {
  apiKey: "",
  authDomain: "",
  projectId: "",
  storageBucket: "",
  messagingSenderId: "",
  appId: ""
};

// init firebase app
initializeApp(firebaseConfig)

// init services
const db = getFirestore()

// collection ref
const colRef = collection(db, 'books')

// real time collection data
onSnapshot(colRef, (snapshot) => {
  let books = []
  snapshot.docs.forEach((doc) => {
    books.push({ ...doc.data(), id: doc.id })
  })
  console.log(books)
})

// adding documents
const addBookForm = document.querySelector('.add')
addBookForm.addEventListener('submit', (e) => {
  e.preventDefault()

  addDoc(colRef, {
    title: addBookForm.title.value,
    author: addBookForm.author.value,
  })
  .then(() => {
    addBookForm.reset()
  })

})

// deleting documents
const deleteBookForm = document.querySelector('.delete')
deleteBookForm.addEventListener('submit', (e) => {
  e.preventDefault()

  const docRef = doc(db, 'books', deleteBookForm.id.value)

  deleteDoc(docRef)
    .then(() => {
      deleteBookForm.reset()
    })
})
// Google Console
(4) [{...}, {...}, {...}, {...}]
0: {author: 'patrick rothfuss', title: 'the name of the wind'}
1: {author: 'brandon sanderson', title: 'the final empire'}
2: {title: "the wise man's fear", author: 'patrick rothfuss'}
3: {author: 'brandon sanderson', title: 'the way of kings'}
[[Prototype]]: Array(0)
>Firestore Queries
可重複觀看、練習。
操作步驟
- 在 index.js 增加 import 內容、新增 queries 註解
- 在網頁欄位標題 abc、作者 def,然後新增書本不會顯示新增資料
- 在網頁欄位標題 abc、作者 patrick rothfuss,會新增資料
- 複製標題為 abc 資料的 id 貼到欄位,然後刪除書本
// index.js 增加 import 內容、新增 queries 註解、修改 real time collection data
// api 串接資料查閱 Firebase

import { initializeApp } from 'firebase/app'
import {
  getFirestore, collection, onSnapshot,
  addDoc, deleteDoc, doc,
  query, where
} from 'firebase/firestore'

const firebaseConfig = {
  apiKey: "",
  authDomain: "",
  projectId: "",
  storageBucket: "",
  messagingSenderId: "",
  appId: ""
};

// init firebase app
initializeApp(firebaseConfig)

// init services
const db = getFirestore()

// collection ref
const colRef = collection(db, 'books')

// queries
const q = query(colRef, where("author", "==", "patrick rothfuss"))

// real time collection data
onSnapshot(q, (snapshot) => {
  let books = []
  snapshot.docs.forEach((doc) => {
    books.push({ ...doc.data(), id: doc.id })
  })
  console.log(books)
})

// adding documents
const addBookForm = document.querySelector('.add')
addBookForm.addEventListener('submit', (e) => {
  e.preventDefault()

  addDoc(colRef, {
    title: addBookForm.title.value,
    author: addBookForm.author.value,
  })
  .then(() => {
    addBookForm.reset()
  })

})

// deleting documents
const deleteBookForm = document.querySelector('.delete')
deleteBookForm.addEventListener('submit', (e) => {
  e.preventDefault()

  const docRef = doc(db, 'books', deleteBookForm.id.value)

  deleteDoc(docRef)
    .then(() => {
      deleteBookForm.reset()
    })
})
Timestamps & Ordering Data
可重複觀看、練習。
操作步驟
- 在 index.js 新增 import 內容、在 queries 新增 orderBy,然後到 Google Console 查看會顯示錯誤
- 依 Google Console 顯示錯誤指示點擊連結、點擊建立索引(建立需要一些時間,完成後狀態會是已啟用)
- 在 Cloud Firestore 點擊資料、然後刪除集合
- 在 index.js adding documents 的 addDoc 新增 createdAt,在 import 新增 serverTimestamp,在 queries 修改 orderBy、移除 where,然後儲存
- 從網頁新增資料,標題 the wise man’s fear、作者 patrick rothfuss、然後新增書本,再新增標題 the name of the wind、作者 patrick rothfuss、然後新增書本,再新增標題 the way of kings、作者 brandon sanderson、然後新增書本
- 我們可以看到 Google Console 資料有依時間序列排列,在網頁新增資料,標題 the final empire、作者 brandon sanderson、然後新增書本
- 新增資料時可以看到 Google Console 顯示兩次資料
// index.js - 1 新增 import 內容、在 queries 新增 orderBy
// API 串接資料查閱 Firebase

import { initializeApp } from 'firebase/app'
import {
  getFirestore, collection, onSnapshot,
  addDoc, deleteDoc, doc,
  query, where,
  orderBy
} from 'firebase/firestore'

const firebaseConfig = {
  apiKey: "",
  authDomain: "",
  projectId: "",
  storageBucket: "",
  messagingSenderId: "",
  appId: ""
};

// init firebase app
initializeApp(firebaseConfig)

// init services
const db = getFirestore()

// collection ref
const colRef = collection(db, 'books')

// queries
const q = query(colRef, where("author", "==", "patrick rothfuss"), orderBy('title', 'desc'))

// real time collection data
onSnapshot(q, (snapshot) => {
  let books = []
  snapshot.docs.forEach((doc) => {
    books.push({ ...doc.data(), id: doc.id })
  })
  console.log(books)
})

// adding documents
const addBookForm = document.querySelector('.add')
addBookForm.addEventListener('submit', (e) => {
  e.preventDefault()

  addDoc(colRef, {
    title: addBookForm.title.value,
    author: addBookForm.author.value,
  })
  .then(() => {
    addBookForm.reset()
  })

})

// deleting documents
const deleteBookForm = document.querySelector('.delete')
deleteBookForm.addEventListener('submit', (e) => {
  e.preventDefault()

  const docRef = doc(db, 'books', deleteBookForm.id.value)

  deleteDoc(docRef)
    .then(() => {
      deleteBookForm.reset()
    })
})
// Google Console - 顯示錯誤資訊
x Uncaught Error in snapshot listener: FirebaseError: The query requires an index. You can create it here: url
x GET url net::ERR_FAILED 200
>// index.js - 2 新增 createdAt、serverTimestamp,修改 orderBy,移除 where
// API 串接資料查閱 Firebase
import { initializeApp } from 'firebase/app'
import {
getFirestore, collection, onSnapshot,
addDoc, deleteDoc, doc,
query, where,
orderBy, serverTimestamp
} from 'firebase/firestore'
const firebaseConfig = {
apiKey: "",
authDomain: "",
projectId: "",
storageBucket: "",
messagingSenderId: "",
appId: ""
};
// init firebase app
initializeApp(firebaseConfig)
// init services
const db = getFirestore()
// collection ref
const colRef = collection(db, 'books')
// queries
const q = query(colRef, orderBy('createdAt'))
// real time collection data
onSnapshot(q, (snapshot) => {
let books = []
snapshot.docs.forEach((doc) => {
books.push({ ...doc.data(), id: doc.id })
})
console.log(books)
})
// adding documents
const addBookForm = document.querySelector('.add')
addBookForm.addEventListener('submit', (e) => {
e.preventDefault()
addDoc(colRef, {
title: addBookForm.title.value,
author: addBookForm.author.value,
createdAt: serverTimestamp()
})
.then(() => {
addBookForm.reset()
})
})
// deleting documents
const deleteBookForm = document.querySelector('.delete')
deleteBookForm.addEventListener('submit', (e) => {
e.preventDefault()
const docRef = doc(db, 'books', deleteBookForm.id.value)
deleteDoc(docRef)
.then(() => {
deleteBookForm.reset()
})
})Fetching Single Documents
可重複觀看、練習。
操作步驟
- 在 index.js import 新增 getDoc、在下面新增 get a single document 內容,然後儲存查看 Google Console
- 在 index.js get a single document 新增 onSnapshot 內容,然後上面的 getDoc 刪除,然後儲存
- 在 Cloud Firestore 更改該 id 的值為大寫 T,值 The wise man’s fear 、然後更新,查看 Google Console 可以看到標題開頭變成大寫
// index.js - 1 import 新增 getDoc、新增 get a single document
// API 串接資料查閱 Firebase

import { initializeApp } from 'firebase/app'
import {
  getFirestore, collection, onSnapshot,
  addDoc, deleteDoc, doc,
  query, where,
  orderBy, serverTimestamp,
  getDoc
} from 'firebase/firestore'

const firebaseConfig = {
  apiKey: "",
  authDomain: "",
  projectId: "",
  storageBucket: "",
  messagingSenderId: "",
  appId: ""
};

// init firebase app
initializeApp(firebaseConfig)

// init services
const db = getFirestore()

// collection ref
const colRef = collection(db, 'books')

// queries
const q = query(colRef, orderBy('createdAt'))

// real time collection data
onSnapshot(q, (snapshot) => {
  let books = []
  snapshot.docs.forEach((doc) => {
    books.push({ ...doc.data(), id: doc.id })
  })
  console.log(books)
})

// adding documents
const addBookForm = document.querySelector('.add')
addBookForm.addEventListener('submit', (e) => {
  e.preventDefault()

  addDoc(colRef, {
    title: addBookForm.title.value,
    author: addBookForm.author.value,
    createdAt: serverTimestamp()
  })
  .then(() => {
    addBookForm.reset()
  })

})

// deleting documents
const deleteBookForm = document.querySelector('.delete')
deleteBookForm.addEventListener('submit', (e) => {
  e.preventDefault()

  const docRef = doc(db, 'books', deleteBookForm.id.value)

  deleteDoc(docRef)
    .then(() => {
      deleteBookForm.reset()
    })
})

// get a single document
const docRef = doc(db, 'books', 'lS9bzDHdk7rwUNknNtnz')

getDoc(docRef)
  .then((doc) => {
    console.log(doc.data(), doc.id)
  })
// index.js - 2 在最下面新增 onSnapshot 內容、移除上面的 getDoc
// API 串接資料查閱 Firebase
import { initializeApp } from 'firebase/app'
import {
getFirestore, collection, onSnapshot,
addDoc, deleteDoc, doc,
query, where,
orderBy, serverTimestamp,
getDoc
} from 'firebase/firestore'
const firebaseConfig = {
apiKey: "",
authDomain: "",
projectId: "",
storageBucket: "",
messagingSenderId: "",
appId: ""
};
// init firebase app
initializeApp(firebaseConfig)
// init services
const db = getFirestore()
// collection ref
const colRef = collection(db, 'books')
// queries
const q = query(colRef, orderBy('createdAt'))
// real time collection data
onSnapshot(q, (snapshot) => {
let books = []
snapshot.docs.forEach((doc) => {
books.push({ ...doc.data(), id: doc.id })
})
console.log(books)
})
// adding documents
const addBookForm = document.querySelector('.add')
addBookForm.addEventListener('submit', (e) => {
e.preventDefault()
addDoc(colRef, {
title: addBookForm.title.value,
author: addBookForm.author.value,
createdAt: serverTimestamp()
})
.then(() => {
addBookForm.reset()
})
})
// deleting documents
const deleteBookForm = document.querySelector('.delete')
deleteBookForm.addEventListener('submit', (e) => {
e.preventDefault()
const docRef = doc(db, 'books', deleteBookForm.id.value)
deleteDoc(docRef)
.then(() => {
deleteBookForm.reset()
})
})
// get a single document
const docRef = doc(db, 'books', 'lS9bzDHdk7rwUNknNtnz')
onSnapshot(docRef, (doc) => {
console.log(doc.data(), doc.id)
})Updating Documents
可重複觀看、練習。
操作步驟
- 修改、新增 index.html 內容
- 在 index.js 新增 updating a document、在 import 新增 updateDoc,然後儲存
- 在 Google Console 複製文件的 id 到網頁上、按下更新書本
// index.html

<html lang="en">
<head>
  <meta charset="UTF-8">
  <meta http-equiv="X-UA-Compatible" content="IE=edge">
  <meta name="viewport" content="width=device-width, initial-scale=1.0">
  <title>Firebase 9</title>
</head>
<body>
  <h1>Getting started with firebase 9</h1>

  <h2>Firebase Firestore</h2>

  <form class="add">
    <label for="title">Title:</label>
    <input type="text" name="title" required>
    <label for="author">Author:</label>
    <input type="text" name="author" required>

    <button>add a new book</button>
  </form>

  <form class="delete">
    <label for="id">Document id:</label>
    <input type="text" name="id" required>

    <button>delete a book</button>
  </form>

  <form class="update">
    <label for="id">Document id:</label>
    <input type="text" name="id" required>

    <button>update a book</button>
  </form>

  <script src="bundle.js"></script>
</body>
</html>
// index.js - 1 updating a document、在 import 新增 updateDoc
// API 串接資料查閱 Firebase
import { initializeApp } from 'firebase/app'
import {
getFirestore, collection, onSnapshot,
addDoc, deleteDoc, doc,
query, where,
orderBy, serverTimestamp,
getDoc, updateDoc
} from 'firebase/firestore'
const firebaseConfig = {
apiKey: "",
authDomain: "",
projectId: "",
storageBucket: "",
messagingSenderId: "",
appId: ""
};
// init firebase app
initializeApp(firebaseConfig)
// init services
const db = getFirestore()
// collection ref
const colRef = collection(db, 'books')
// queries
const q = query(colRef, orderBy('createdAt'))
// real time collection data
onSnapshot(q, (snapshot) => {
let books = []
snapshot.docs.forEach((doc) => {
books.push({ ...doc.data(), id: doc.id })
})
console.log(books)
})
// adding documents
const addBookForm = document.querySelector('.add')
addBookForm.addEventListener('submit', (e) => {
e.preventDefault()
addDoc(colRef, {
title: addBookForm.title.value,
author: addBookForm.author.value,
createdAt: serverTimestamp()
})
.then(() => {
addBookForm.reset()
})
})
// deleting documents
const deleteBookForm = document.querySelector('.delete')
deleteBookForm.addEventListener('submit', (e) => {
e.preventDefault()
const docRef = doc(db, 'books', deleteBookForm.id.value)
deleteDoc(docRef)
.then(() => {
deleteBookForm.reset()
})
})
// get a single document
const docRef = doc(db, 'books', 'lS9bzDHdk7rwUNknNtnz')
onSnapshot(docRef, (doc) => {
console.log(doc.data(), doc.id)
})
// updating a document
const updateForm = document.querySelector('.update')
updateForm.addEventListener('submit', (e) => {
e.preventDefault()
const docRef = doc(db, 'books', updateForm.id.value)
updateDoc(docRef, {
title: 'updated title'
})
.then(() => {
updateForm.reset()
})
})Firebase Auth Setup
操作步驟
- 點擊左邊建立的 Authentication、開始使用
- 選擇電子郵件/密碼、然後啟用、儲存
- 在前端需要初始化驗證服務,在 index.js 新增 import、在 init services 新增內容
// index.js - 新增 import、在 init services 新增內容
// API 串接資料查閱 Firebase

import { initializeApp } from 'firebase/app'
import {
  getFirestore, collection, onSnapshot,
  addDoc, deleteDoc, doc,
  query, where,
  orderBy, serverTimestamp,
  getDoc, updateDoc
} from 'firebase/firestore'
import {
  getAuth
} from 'firebase/auth'

const firebaseConfig = {
  apiKey: "",
  authDomain: "",
  projectId: "",
  storageBucket: "",
  messagingSenderId: "",
  appId: ""
};

// init firebase app
initializeApp(firebaseConfig)

// init services
const db = getFirestore()
const auth = getAuth()

// collection ref
const colRef = collection(db, 'books')

// queries
const q = query(colRef, orderBy('createdAt'))

// real time collection data
onSnapshot(q, (snapshot) => {
  let books = []
  snapshot.docs.forEach((doc) => {
    books.push({ ...doc.data(), id: doc.id })
  })
  console.log(books)
})

// adding documents
const addBookForm = document.querySelector('.add')
addBookForm.addEventListener('submit', (e) => {
  e.preventDefault()

  addDoc(colRef, {
    title: addBookForm.title.value,
    author: addBookForm.author.value,
    createdAt: serverTimestamp()
  })
  .then(() => {
    addBookForm.reset()
  })

})

// deleting documents
const deleteBookForm = document.querySelector('.delete')
deleteBookForm.addEventListener('submit', (e) => {
  e.preventDefault()

  const docRef = doc(db, 'books', deleteBookForm.id.value)

  deleteDoc(docRef)
    .then(() => {
      deleteBookForm.reset()
    })
})

// get a single document
const docRef = doc(db, 'books', 'lS9bzDHdk7rwUNknNtnz')

onSnapshot(docRef, (doc) => {
  console.log(doc.data(), doc.id)
})

// updating a document
const updateForm = document.querySelector('.update')
updateForm.addEventListener('submit', (e) => {
  e.preventDefault()

  const docRef = doc(db, 'books', updateForm.id.value)

  updateDoc(docRef, {
    title: 'updated title'
  })
  .then(() => {
    updateForm.reset()
  })

})
Signing Users Up
可重複觀看、練習。
操作步驟
- 在 index.html 新增 Firebase Auth 內容
- 在 index.js 新增 signing users up 內容,在最上面 import 新增 createUserWithEmailAndPassword,再新增 email、password 程式碼內容,然後儲存
- 接著到網頁輸入 email, password (隨意信箱、密碼測試),產生錯誤,密碼需要至少6個字元 mario@netninja.dev、test12345,點擊註冊就會在 Google Console 顯示資料
// index.html - 1 新增 Firebase Auth 內容

<html lang="en">
<head>
  <meta charset="UTF-8">
  <meta http-equiv="X-UA-Compatible" content="IE=edge">
  <meta name="viewport" content="width=device-width, initial-scale=1.0">
  <title>Firebase 9</title>
</head>
<body>
  <h1>Getting started with firebase 9</h1>

  <h2>Firebase Firestore</h2>

  <form class="add">
    <label for="title">Title:</label>
    <input type="text" name="title" required>
    <label for="author">Author:</label>
    <input type="text" name="author" required>

    <button>add a new book</button>
  </form>

  <form class="delete">
    <label for="id">Document id:</label>
    <input type="text" name="id" required>

    <button>delete a book</button>
  </form>

  <form class="update">
    <label for="id">Document id:</label>
    <input type="text" name="id" required>

    <button>update a book</button>
  </form>

  <h2>Firebase Auth</h2>

  <form class="signup">
    <label for="email">email:</label>
    <input type="email" name="email">
    <label for="password">password:</label>
    <input type="password" name="password">
    <button>signup</button>
  </form>

  <script src="bundle.js"></script>
</body>
</html>
// index.js - 1 新增 signing users up 內容
// API 串接資料查閱 Firebase
import { initializeApp } from 'firebase/app'
import {
getFirestore, collection, onSnapshot,
addDoc, deleteDoc, doc,
query, where,
orderBy, serverTimestamp,
getDoc, updateDoc
} from 'firebase/firestore'
import {
getAuth,
createUserWithEmailAndPassword
} from 'firebase/auth'
const firebaseConfig = {
apiKey: "",
authDomain: "",
projectId: "",
storageBucket: "",
messagingSenderId: "",
appId: ""
};
// init firebase app
initializeApp(firebaseConfig)
// init services
const db = getFirestore()
const auth = getAuth()
// collection ref
const colRef = collection(db, 'books')
// queries
const q = query(colRef, orderBy('createdAt'))
// real time collection data
onSnapshot(q, (snapshot) => {
let books = []
snapshot.docs.forEach((doc) => {
books.push({ ...doc.data(), id: doc.id })
})
console.log(books)
})
// adding documents
const addBookForm = document.querySelector('.add')
addBookForm.addEventListener('submit', (e) => {
e.preventDefault()
addDoc(colRef, {
title: addBookForm.title.value,
author: addBookForm.author.value,
createdAt: serverTimestamp()
})
.then(() => {
addBookForm.reset()
})
})
// deleting documents
const deleteBookForm = document.querySelector('.delete')
deleteBookForm.addEventListener('submit', (e) => {
e.preventDefault()
const docRef = doc(db, 'books', deleteBookForm.id.value)
deleteDoc(docRef)
.then(() => {
deleteBookForm.reset()
})
})
// get a single document
const docRef = doc(db, 'books', 'lS9bzDHdk7rwUNknNtnz')
onSnapshot(docRef, (doc) => {
console.log(doc.data(), doc.id)
})
// updating a document
const updateForm = document.querySelector('.update')
updateForm.addEventListener('submit', (e) => {
e.preventDefault()
const docRef = doc(db, 'books', updateForm.id.value)
updateDoc(docRef, {
title: 'updated title'
})
.then(() => {
updateForm.reset()
})
})
// signing users up
const signupForm = document.querySelector('.signup')
signupForm.addEventListener('submit', (e) => {
e.preventDefault()
const email = signupForm.email.value
const password = signupForm.password.value
createUserWithEmailAndPassword(auth, email, password)
.then((cred) => {
console.log('user created:', cred.user)
signupForm.reset()
})
.catch((err) => {
console.log(err.message)
})
})Logging in & Logging Out
可重複觀看、練習。
操作步驟
- 在 index.html 新增 login、logout 內容
- 在 index.js 新增 logging in and out 內容,在最上面新增 import signOut,接著新增 logout 內容,回到網頁測試登出是否能正確執行,在最上面新增 import signInWithEmailAndPassword,接著新增 login 內容、email、password,然後儲存
- 到網頁使用登入功能,先使用未註冊的 email 測試,會回傳 Error (auth/user-not-found),接著測試有註冊的 email、錯誤的密碼,會回傳 Error (auth/wrong-password),接著使用正確已註冊的 email、密碼登入,會成功回傳訊息
- 點擊登出按鈕也會回傳訊息
// index.html - 新增 login、logout 內容

<html lang="en">
<head>
  <meta charset="UTF-8">
  <meta http-equiv="X-UA-Compatible" content="IE=edge">
  <meta name="viewport" content="width=device-width, initial-scale=1.0">
  <title>Firebase 9</title>
</head>
<body>
  <h1>Getting started with firebase 9</h1>

  <h2>Firebase Firestore</h2>

  <form class="add">
    <label for="title">Title:</label>
    <input type="text" name="title" required>
    <label for="author">Author:</label>
    <input type="text" name="author" required>

    <button>add a new book</button>
  </form>

  <form class="delete">
    <label for="id">Document id:</label>
    <input type="text" name="id" required>

    <button>delete a book</button>
  </form>

  <form class="update">
    <label for="id">Document id:</label>
    <input type="text" name="id" required>

    <button>update a book</button>
  </form>

  <h2>Firebase Auth</h2>

  <form class="signup">
    <label for="email">email:</label>
    <input type="email" name="email">
    <label for="password">password:</label>
    <input type="password" name="password">
    <button>signup</button>
  </form>

  <form class="login">
    <label for="email">email:</label>
    <input type="email" name="email">
    <label for="password">password:</label>
    <input type="password" name="password">
    <button>login</button>
  </form>

  <button class="logout">logout</button>

  <script src="bundle.js"></script>
</body>
</html>
// index.js - 新增 logging in and out
// API 串接資料查閱 Firebase
import { initializeApp } from 'firebase/app'
import {
getFirestore, collection, onSnapshot,
addDoc, deleteDoc, doc,
query, where,
orderBy, serverTimestamp,
getDoc, updateDoc
} from 'firebase/firestore'
import {
getAuth,
createUserWithEmailAndPassword,
signOut, signInWithEmailAndPassword
} from 'firebase/auth'
const firebaseConfig = {
apiKey: "",
authDomain: "",
projectId: "",
storageBucket: "",
messagingSenderId: "",
appId: ""
};
// init firebase app
initializeApp(firebaseConfig)
// init services
const db = getFirestore()
const auth = getAuth()
// collection ref
const colRef = collection(db, 'books')
// queries
const q = query(colRef, orderBy('createdAt'))
// real time collection data
onSnapshot(q, (snapshot) => {
let books = []
snapshot.docs.forEach((doc) => {
books.push({ ...doc.data(), id: doc.id })
})
console.log(books)
})
// adding documents
const addBookForm = document.querySelector('.add')
addBookForm.addEventListener('submit', (e) => {
e.preventDefault()
addDoc(colRef, {
title: addBookForm.title.value,
author: addBookForm.author.value,
createdAt: serverTimestamp()
})
.then(() => {
addBookForm.reset()
})
})
// deleting documents
const deleteBookForm = document.querySelector('.delete')
deleteBookForm.addEventListener('submit', (e) => {
e.preventDefault()
const docRef = doc(db, 'books', deleteBookForm.id.value)
deleteDoc(docRef)
.then(() => {
deleteBookForm.reset()
})
})
// get a single document
const docRef = doc(db, 'books', 'lS9bzDHdk7rwUNknNtnz')
onSnapshot(docRef, (doc) => {
console.log(doc.data(), doc.id)
})
// updating a document
const updateForm = document.querySelector('.update')
updateForm.addEventListener('submit', (e) => {
e.preventDefault()
const docRef = doc(db, 'books', updateForm.id.value)
updateDoc(docRef, {
title: 'updated title'
})
.then(() => {
updateForm.reset()
})
})
// signing users up
const signupForm = document.querySelector('.signup')
signupForm.addEventListener('submit', (e) => {
e.preventDefault()
const email = signupForm.email.value
const password = signupForm.password.value
createUserWithEmailAndPassword(auth, email, password)
.then((cred) => {
console.log('user created:', cred.user)
signupForm.reset()
})
.catch((err) => {
console.log(err.message)
})
})
// logging in and out
const logoutButton = document.querySelector('.logout')
logoutButton.addEventListener('click', () => {
signOut(auth)
.then(() => {
console.log('the user signed out')
})
.catch((err) => {
console.log(err.message)
})
})
const loginForm = document.querySelector('.login')
loginForm.addEventListener('submit', (e) => {
e.preventDefault()
const email = loginForm.email.value
const password = loginForm.password.value
signInWithEmailAndPassword(auth, email, password)
.then((cred) => {
console.log('user logged in:', cred.user)
})
.catch((err) => {
console.log(err.message)
})
})這個章節沒有提到關於使用 HTML 操作登入、登出。
Listening to Auth Changes
可重複觀看、練習。
操作步驟
- 在 index.js import 新增 onAuthStateChanged,在最下面新增 subscribing to auth changes 內容,把 signing users up、logging in and out 的 console 註解,然後儲存
- 接著到網頁重新整理,可以在 Google Console 看到 user status changed: null 的顯示
- 在 email 輸入 mario@netninja.dev、password 輸入 test12345,然後按下登入會回傳 user status changed: 資料內容
- 接著按下登出就會回傳 user status changed: null
- 在註冊欄位 email 輸入 luigi@netninja.dev、password 輸入 test12345,然後按下註冊,就會回傳 user status changed: 資料內容
- 在點擊登出,在 Google Console 會回傳訊息 user status changed: null
// index.js - import 新增 onAuthStateChanged,新增 subscribing to auth changes 內容
// API 串接資料查閱 Firebase

import { initializeApp } from 'firebase/app'
import {
  getFirestore, collection, onSnapshot,
  addDoc, deleteDoc, doc,
  query, where,
  orderBy, serverTimestamp,
  getDoc, updateDoc
} from 'firebase/firestore'
import {
  getAuth,
  createUserWithEmailAndPassword,
  signOut, signInWithEmailAndPassword,
  onAuthStateChanged
} from 'firebase/auth'

const firebaseConfig = {
  apiKey: "",
  authDomain: "",
  projectId: "",
  storageBucket: "",
  messagingSenderId: "",
  appId: ""
};

// init firebase app
initializeApp(firebaseConfig)

// init services
const db = getFirestore()
const auth = getAuth()

// collection ref
const colRef = collection(db, 'books')

// queries
const q = query(colRef, orderBy('createdAt'))

// real time collection data
onSnapshot(q, (snapshot) => {
  let books = []
  snapshot.docs.forEach((doc) => {
    books.push({ ...doc.data(), id: doc.id })
  })
  console.log(books)
})

// adding documents
const addBookForm = document.querySelector('.add')
addBookForm.addEventListener('submit', (e) => {
  e.preventDefault()

  addDoc(colRef, {
    title: addBookForm.title.value,
    author: addBookForm.author.value,
    createdAt: serverTimestamp()
  })
  .then(() => {
    addBookForm.reset()
  })

})

// deleting documents
const deleteBookForm = document.querySelector('.delete')
deleteBookForm.addEventListener('submit', (e) => {
  e.preventDefault()

  const docRef = doc(db, 'books', deleteBookForm.id.value)

  deleteDoc(docRef)
    .then(() => {
      deleteBookForm.reset()
    })
})

// get a single document
const docRef = doc(db, 'books', 'lS9bzDHdk7rwUNknNtnz')

onSnapshot(docRef, (doc) => {
  console.log(doc.data(), doc.id)
})

// updating a document
const updateForm = document.querySelector('.update')
updateForm.addEventListener('submit', (e) => {
  e.preventDefault()

  const docRef = doc(db, 'books', updateForm.id.value)

  updateDoc(docRef, {
    title: 'updated title'
  })
  .then(() => {
    updateForm.reset()
  })

})

// signing users up
const signupForm = document.querySelector('.signup')
signupForm.addEventListener('submit', (e) => {
  e.preventDefault()

  const email = signupForm.email.value
  const password = signupForm.password.value

  createUserWithEmailAndPassword(auth, email, password)
    .then((cred) => {
      // console.log('user created:', cred.user)
      signupForm.reset()
    })
    .catch((err) => {
      console.log(err.message)
    })

})

// logging in and out
const logoutButton = document.querySelector('.logout')
logoutButton.addEventListener('click', () => {
  signOut(auth)
    .then(() => {
      // console.log('the user signed out')
    })
    .catch((err) => {
      console.log(err.message)
    })
})

const loginForm = document.querySelector('.login')
loginForm.addEventListener('submit', (e) => {
  e.preventDefault()

  const email = loginForm.email.value
  const password = loginForm.password.value

  signInWithEmailAndPassword(auth, email, password)
    .then((cred) => {
      // console.log('user logged in:', cred.user)
    })
    .catch((err) => {
      console.log(err.message)
    })

})

// subscribing to auth changes
onAuthStateChanged(auth, (user) => {
  console.log('user status changed:', user)
})
Unsubscribing from Changes
可重複觀看、練習。
操作步驟
- 在 index.html 新增 unsubscribing
- 在 index.js 新增 unsubscribing from changes (auth & db) 內容,在 real time collection data 的 onSnapshot 的地方修改新增 unsubCol 變數,在 get a single document 的 onSnapshot 的地方修改新增 unsubDoc 變數,在 subscribing to auth changes 的 onAuthStateChanged 的地方修改新增 unsubAuth 變數,接著回到 unsubscribing from changes (auth & db) 繼續新增內容,然後儲存
- 到網頁介面,先展示上面的功能還是能使用,Firebase Firestore 的 Title abc、Author def,Firebase Auth 的 email mario@netninja.dev、password test12345、然後登入,一樣有回傳訊息
- 接著在Google Console按下清楚 console 內容,然後按下 unsubscribing 的按鈕,會回傳 unsubscribing 訊息,再次使用 Firebase Firestore、Firebase Auth 功能
// index.html

<html lang="en">
<head>
  <meta charset="UTF-8">
  <meta http-equiv="X-UA-Compatible" content="IE=edge">
  <meta name="viewport" content="width=device-width, initial-scale=1.0">
  <title>Firebase 9</title>
</head>
<body>
  <h1>Getting started with firebase 9</h1>

  <h2>Firebase Firestore</h2>

  <form class="add">
    <label for="title">Title:</label>
    <input type="text" name="title" required>
    <label for="author">Author:</label>
    <input type="text" name="author" required>

    <button>add a new book</button>
  </form>

  <form class="delete">
    <label for="id">Document id:</label>
    <input type="text" name="id" required>

    <button>delete a book</button>
  </form>

  <form class="update">
    <label for="id">Document id:</label>
    <input type="text" name="id" required>

    <button>update a book</button>
  </form>

  <h2>Firebase Auth</h2>

  <form class="signup">
    <label for="email">email:</label>
    <input type="email" name="email">
    <label for="password">password:</label>
    <input type="password" name="password">
    <button>signup</button>
  </form>

  <form class="login">
    <label for="email">email:</label>
    <input type="email" name="email">
    <label for="password">password:</label>
    <input type="password" name="password">
    <button>login</button>
  </form>

  <button class="logout">logout</button>

  <h2>Unsubscribing</h2>
  <button class="unsub">unsubscribe from db/auth changes</button>

  <script src="bundle.js"></script>
</body>
</html>
// index.js
// API串接資料查閱 Firebase
import { initializeApp } from 'firebase/app'
import {
getFirestore, collection, onSnapshot,
addDoc, deleteDoc, doc,
query, where,
orderBy, serverTimestamp,
getDoc, updateDoc
} from 'firebase/firestore'
import {
getAuth,
createUserWithEmailAndPassword,
signOut, signInWithEmailAndPassword,
onAuthStateChanged
} from 'firebase/auth'
const firebaseConfig = {
apiKey: "",
authDomain: "",
projectId: "",
storageBucket: "",
messagingSenderId: "",
appId: ""
};
// init firebase app
initializeApp(firebaseConfig)
// init services
const db = getFirestore()
const auth = getAuth()
// collection ref
const colRef = collection(db, 'books')
// queries
const q = query(colRef, orderBy('createdAt'))
// real time collection data
const unsubCol = onSnapshot(q, (snapshot) => {
let books = []
snapshot.docs.forEach((doc) => {
books.push({ ...doc.data(), id: doc.id })
})
console.log(books)
})
// adding documents
const addBookForm = document.querySelector('.add')
addBookForm.addEventListener('submit', (e) => {
e.preventDefault()
addDoc(colRef, {
title: addBookForm.title.value,
author: addBookForm.author.value,
createdAt: serverTimestamp()
})
.then(() => {
addBookForm.reset()
})
})
// deleting documents
const deleteBookForm = document.querySelector('.delete')
deleteBookForm.addEventListener('submit', (e) => {
e.preventDefault()
const docRef = doc(db, 'books', deleteBookForm.id.value)
deleteDoc(docRef)
.then(() => {
deleteBookForm.reset()
})
})
// get a single document
const docRef = doc(db, 'books', 'lS9bzDHdk7rwUNknNtnz')
const unsubDoc = onSnapshot(docRef, (doc) => {
console.log(doc.data(), doc.id)
})
// updating a document
const updateForm = document.querySelector('.update')
updateForm.addEventListener('submit', (e) => {
e.preventDefault()
const docRef = doc(db, 'books', updateForm.id.value)
updateDoc(docRef, {
title: 'updated title'
})
.then(() => {
updateForm.reset()
})
})
// signing users up
const signupForm = document.querySelector('.signup')
signupForm.addEventListener('submit', (e) => {
e.preventDefault()
const email = signupForm.email.value
const password = signupForm.password.value
createUserWithEmailAndPassword(auth, email, password)
.then((cred) => {
// console.log('user created:', cred.user)
signupForm.reset()
})
.catch((err) => {
console.log(err.message)
})
})
// logging in and out
const logoutButton = document.querySelector('.logout')
logoutButton.addEventListener('click', () => {
signOut(auth)
.then(() => {
// console.log('the user signed out')
})
.catch((err) => {
console.log(err.message)
})
})
const loginForm = document.querySelector('.login')
loginForm.addEventListener('submit', (e) => {
e.preventDefault()
const email = loginForm.email.value
const password = loginForm.password.value
signInWithEmailAndPassword(auth, email, password)
.then((cred) => {
// console.log('user logged in:', cred.user)
})
.catch((err) => {
console.log(err.message)
})
})
// subscribing to auth changes
const unsubAuth = onAuthStateChanged(auth, (user) => {
console.log('user status changed:', user)
})
// unsubscribing from changes (auth & db)
const unsubButton = document.querySelector('.unsub')
unsubButton.addEventListener('click', () => {
console.log('unsubscribing')
unsubCol()
unsubDoc()
unsubAuth()
})最後,關於 Firebase 更多學習應用,可以參考瀏覽說明文件 Firebase Documentation 來使用。