
從基礎開始,完整學習 Vue.js 開發流程。
您會學到
- 完整了解 Vue 的運行概念
- 學會使用 Vue 串接後端 API
- 使用 Vue Cli (或不使用) 都可以完成一個互動網頁作品
- 具有獨立完成一個 Vue 應用程式的能力
第1節:介紹
課程最終任務說明
本課程特色
- 從基礎開始學
- 含 Cli, Router, Webpack 各工具
- ES6 常用技巧
- 額外 API,開發電商大平台
課程說明
- ES6
- 使用 BABEL 編譯
- WEBPACK
- VUE CLI
- SPA (Single Page Application) – 單頁應用
課程內容進程
JS+Vue.js → ES6 → WEBPACK → Vue Cli (SPA)
六角學院線上社團
第2節:基礎 Vue.js 概述
課程資源連結
- 主要範例資源連結
- Vue 中文文件
- Vue Devtools
-
VSCode Vue 套件參考
(目前下述套件功能已很全面,且安裝人數最多)
延伸套件不影響課程說明,可自行選用習慣的即可
附註說明
1. 為什麼要使用 Web Server
因為課程範例非常多
為了確保連結正確以及範例能夠正常運行
所以本範例一定要用 Web Server 運行
2. 一定要用 VSCode 嗎?
並沒有強制,你可以選擇自己喜歡的文字編輯器
不過記得,用其它工具時也要記得運行 Web Server 喔
3. 為什麼 VSCode Web Server 打開的路徑是錯誤的(或者沒有載入 CSS)
這部分要請先確認是否以專案形式載入 “範例資料夾”
如還有問題,可以重啟 VSCode
再不行可截圖放到問答區發問
Q:為什麼會沒辦法顯示樣式呢?
這與相對路徑與絕對路徑有關係,範例中都是使用絕對路徑
所以一定要使用 Web Server 才能正確顯示喔
路徑觀念影片
Vue 開發環境介紹
Vue的開發環境
- 使用 Vue Dev Tools 查看本章節範例
文字編輯器:VSCode
套件:Web Server
VSCode 左方列表介紹:
- 檔案總管
- 搜尋以及取代
- Git 的版本控管工具
- Node.js 的除錯功能
- 套件的安裝
套件的安裝:
- Preview on Web Server
- VUE – vscode-vue
- Vue 2 Snippets – Vue 2 Snippets for Visual Studio Code
Preview on Web Server 熱鍵是 Ctrl+Shift+L
Vue.js 官網文件、Vue.js 中文版
兼容性 – Vue不支持IE8及以下版本。
Vue Devtools
開發版本、生產版本,差別在能不能使用開發者工具、錯誤題示完不完整。
範例上,點擊右鍵檢視原始碼,在課程中這裡面有載入一個 JavaScript vendor 裡面就包含 Vue.js,是開發的版本。
MAC 系統的 VSCode 按下 CMD + P
WINDOWS 系統的 VSCode 按下 Ctrl + P
輸入路徑:basic/dev.html
主要練習一下 Vue Dev Tools 怎麼去使用
Vue有一個很大的特色,是用資料來驅動畫面
Google – Vue.js devtools 基本介面、功能介紹
VSCode Preview on Web Server 替代套件
如果使用 Preview on Web Server 尚有任何問題,可以試著使用另一個套件 – LiveServer 。
使用方式:
- 安裝後重新啟動 VSCode
- 打開任何一個 .html 檔案
- 在 VSCode 畫面的右下角可以找到 Go Live 的按鈕
- 按下後就能打開該網頁
應用程式建立
- Ctrl + P
- 輸入路徑:basic/instant.html
- 所有的範例裡面,往下會有一個 “練習開始”的一個註解
建立 Vue 的應用程式
- 建立一個應用程式使資料呈現於畫面上
- 建立兩個應用程式
- 試試看巢狀應用程式 (不能建立巢狀應用程式)
basic/instant.html
<div id="app">
  {{ text }}
</div>
<div id="app2">
  {{ text }}
</div>

<script>
var app = new Vue({
  el: '#app',
  data: {
    text: '這裡是一段話'
  }
});
var app2 = new Vue({
  el: '#app2',
  data: {
    text: '這裡是一段話 2'
  }
});
</script>
綁定 Vue 的應用程式的時候,不是只能用 ID,也可以用 Class,然後 ID 還是比較常使用到。
Vue 一次只能綁定一個元素。
一個網頁上是可以放入兩個 Vue 的應用程式。
Vue 的應用程式是不可以使用巢狀的方式去建立,裡面這個 Vue 的應用程式是等同於無效。
我們在建立 Vue 的應用程式,其實我們通常只會建立一個,但是你要建立兩個在同一頁面上面是可行的。
特別注意的是,它是不能建立巢狀的應用程式。
- el:element,要綁定的 DOM element
- data:綁定的資料
雙向綁定的資料
MVVM – 維基百科
MVVM (Model – View – ViewModel) 是一種軟體架構模式。
MVVM 模式的組成部分
- 模型:指代表內容的資料存取層 (以資料為中心)
- 視圖:是使用者在螢幕上看到的結構、布局和外觀 (UI)。
- 視圖模型:是暴露公共屬性和命令的視圖的抽象。有的是一個繫節氣。繫結器在視圖和資料繫節器之間進行通信。
畫面上所看到的就是 View,所操控的內容是 Model,中間自動綁定的部分就是 ViewModel。
MVVM 是什麼樣的概念
- 使用雙花括號與資料串接
- 試試看使用 HTML 屬性綁定
- 試試看雙向綁定
使用雙花括號、Vue指令,將資料呈現於畫面。
- {{ message }}
- v-model=”message”
- v-text=”message”
- v-html=”message”
basic/mvvm.html
<div id="app">
  // mustache語法、花括號或者是大括號
  {{ message }}
  // Vue指令 v-model="message"
  <input type="text" v-model="message">
  // Vue指令 v-text="message"
  <div v-text="message"></div>
  // Vue指令 v-html="message",可以插入新的 HTML 的標籤
  <div v-html="message"></div>

</div>

<script>
var app = new Vue({
  el: '#app',
  // 在此建立資料內容

  data: {
    message: '哈囉'
  }
})
</script>
MVVM 的概念
MVC架構,是一個前後端的架構。
View,就是我們看到的畫面
Controller,就是指控制器
Model,就是指模型也是資料介接的地方
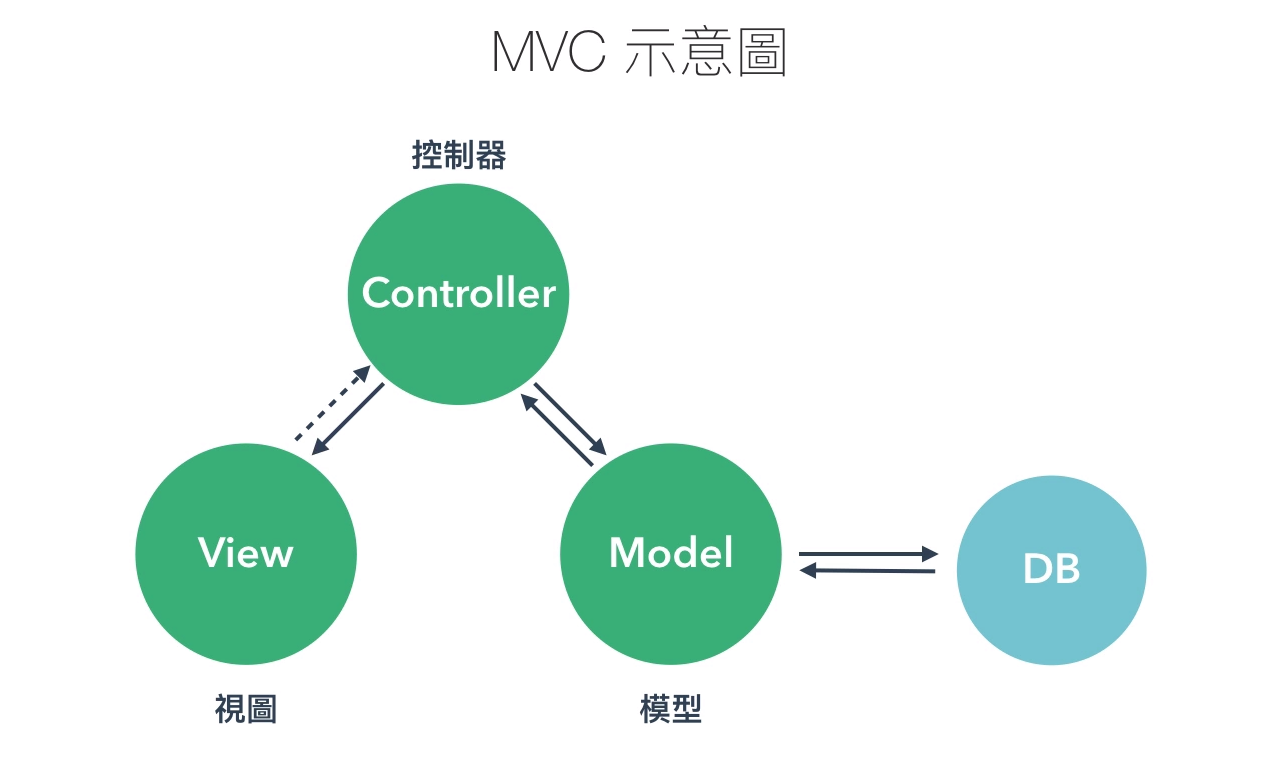

重點說明:VUE JS 是以資料狀態操作畫面。
傳統的 jQuery,我們是直接操作畫面上的 DOM 元素。
在 Vue.js 在操作 DOM 元素的時候,是透過資料的狀態去變動它。
v-bind 動態屬性指令
指令
- 透過指令(v-bind)的方式,將圖片加載於畫面之上
Vue.js 學習→API→指令
v-bind:是用來更新 HTML 上面的屬性。
basic/directive.html
<div id="app">
  <img v-bind:src="imgSrc" v-bind:class="className" alt="">
</div>

<script>
var app = new Vue({
  el: '#app',
  data: {
    imgSrc: 'https://images.unsplash.com/photo-1479568933336-ea01829af8de?ixlib=rb-0.3.5&ixid=eyJhcHBfaWQiOjEyMDd9&s=d9926ef56492b20aea8508ed32ec6030&auto=format&fit=crop&w=2250&q=80',
    className: 'img-fluid'
  }
})
</script>
v-for 動態產生多筆資料於畫面上
模板語法的延伸 v-if 及 v-for
- 使用 v-for 來呈現資料列表
- 使用 v-if 擷取部分資訊
basic/if_for.html
<div id="app">
  <pre>{{ list }}</pre>
  <ul>
    <li v-for="(item, index) in list" v-if="item.age < 25">
      {{ index + 1 }} - {{ item.name }} 年齡是 {{ item.age }} 歲
    </li>
  </ul>
</div>

<script>
var app = new Vue({
  el: '#app',
  data: {
    list: [
      {
        name: '小明',
        age: 16
      },
      {
        name: '媽媽',
        age: 38,
      },
      {
        name: '漂亮阿姨',
        age: 24
      }
    ]
  }
})
</script>
補充:Vue.js 文件
講解
使用 v-for 這個指令,這個 v-for 就有點像是在 li 上面使用 forEach 一樣,那麼我們會先使用一個自定義的變數,這個自訂的變數名稱是可以自己決定的,通常會使用 item,然後 in 一個陣列上,這個陣列就會一一的將值取出來然後將它存到 item 這個變數上。
接下來我們就可以把這裡面的值,呈現在 li 上。這裡我們就可以輸入 item,那這 item 指的就是裡面這一個一個的物件,所以如果我要把這個名稱給取出來的話,我就可以使用 item.name 。
接下來我們也可以將後面的字串繼續加上去,年齡是幾歲,這裡就可以加上 item.age 。
這個就是 v-for 的一個很標準的使用方法。
如果說我需要了解這個每一個 li 它現在在陣列它的索引是第幾個,我們在這個自定義變數,我們就可以這樣寫 item index,前面這個就是陣列地值,那後面這個就是陣列的索引,那我們也可以把這個索引加到畫面上面來,index。要記得索引是從 0 開始,如果你要把它從 1 開始,那就是 index + 1。
v-if 就是在這個迴圈上面再加上一個判斷式,加上去的方式,就是可以直接 v-for 後面再加上 v-if,這個 v-if 就是直接在這個標籤上面加上一個判斷式,然後依據它所回傳的值是 true 或 false,來決定要不要去渲染這個標籤,所以當它如果是 false 的時候,這個標籤那就不會渲染,那如果它是 true 的話,就會把這一段標籤渲染出來。
接下來我們就可以加入一個判斷式叫做假設它的年齡是小於 25 歲的話,那麼就把這一個 li 給渲染出來。這個 item.age 就是指這裡面每一個人的年齡,所以我們定義在小於 25 歲的話,就把這個 li 給渲染出來。
試著使用 v-for 將這個陣列的值一一的渲染出來,那另外再使用 v-if 拿來判斷部分的條件。
使用 v-on 來操作頁面行為
處理互動式行為 v-on 指令
- 使用 v-on 指令來製作互動行為
- 反轉字串
basic/v_on.html
<div id="app">
  <input type="text" class="form-control" v-model="text">
  <button class="btn btn-primary mt-1" v-on:click="reverseText">反轉字串</button>
  <div class="mt-3">
    {{ newText }}
  </div>
</div>

<script>
var app = new Vue({
  el: '#app',
  data: {
    text: '',
    newText: ''
},
// 請在此撰寫 JavaScript
  methods: {
    reverseText: function(){
      console.log('點我', this.text);
      this.newText = this.text.split('').reverse().join('');
    }
  }
});
</script>
介紹 v-on 以及 methods 的操作方式。
- methods:方法
預先定義資料狀態的重要性
預先定義資料結構
- 了解資料結構預先定義與未定義之差異
// 接續上一個章節
// 當我們可以操作資料內容之後,預先定義資料結構變成一件很重要的事情。

// {{ newText }}
// data: {
     newText: ''
}
// 兩個資料互相綁定,在這個時候,我們一定要預先定義資料結構的習慣。

// 在我們 Vue 裡面,如果要操作資料內容,它一定要預先定義好它的資料結構。

// 在後面的課程也會介紹到,如果沒有辦法預先定義的話該怎麼做。
defined_var.html
<div id="app">
  <input type="text" class="form-control" v-model="text">
  <button class="btn btn-primary mt-1" v-on:click="reverseText">反轉字串</button>
  <div class="mt-3">
    {{ newText }}
  </div>
</div>

<script>
var app = new Vue({
  el: '#app',
  data: {
    text: '',
    newText: ''
},
// 請在此撰寫 JavaScript
  methods: {
    reverseText: function(){
      console.log('點我', this.text);
      this.newText = this.text.split('').reverse().join('');
    }
  }
});
</script>
透過修飾符,讓 v-on 操作更簡單
處理互動式行為 v-on 指令
- 請將 button 改成 a 標籤,並加上 preventDefault()
- 使用修飾符取代
- 將 input 加上 Enter 事件
- 將範例改成使用縮寫表示
jQuery preventDefault() 寫法 – 取消默認行為
<div id="app">
  <input type="text" class="form-control" v-model="text">
  <a href="#" class="btn btn-primary mt-1">反轉字串</a>
  <div class="mt-3">
    {{ newText }}
  </div>
</div>

<script>
$(document).ready(function(){
  $('a.btn').on('click', function(evt){
    console.log(evt);
    evt.preventDefault();
  })
});
</script>

br*20
basic/modifiers.html
<div id="app">
  <input type="text" class="form-control" v-model="text">
  <a href="#" class="btn btn-primary mt-1" v-on:click.prevent="reverseText">反轉字串</a>
  <div class="mt-3">
    {{ newText }}
  </div>
</div>

<script>
var app = new Vue({
  el: '#app',
  data: {
    text: '',
    newText: ''
  },
  // 請在此撰寫 JavaScript
  methods: {
    reverseText(event){
    // console.log(event);
    // event.preventDefault();
    this.newText = this.text.split('').reverse().join('');
    }
  }
});
</script>

br*20
Vue.js 官網文件 – 事件處理
- 事件修飾符
- 按鍵修飾符
按鍵修飾符 – enter
<div id="app">
  <input type="text" class="form-control" v-on:keyup.enter="reverseText" v-model="text">
  <a class="btn btn-primary mt-1" v-on:click.prevent="reverseText">反轉字串</a>
  <div class="mt-3">
    {{ newText }}
  </div>
</div>

<script>
var app = new Vue({
  el: '#app',
  data: {
    text: '',
    newText: ''
  },
  // 請在此撰寫 JavaScript
  methods: {
    reverseText(event) {
      this.newText = this.text.split('').reverse().join('');
      }
    }
});
</script>
v-on 寫法
v-on:keyup.enter="reverseText"
v-on:click.prevent="reverseText"
v-on 縮寫寫法
@keyup.enter="reverseText"
@click.prevent="reverseText"
指令 v-bind
<div id="app">
  <input type="text" class="form-control" @keyup.enter="reverseText" v-model="text">
  <a v-bind:href="link" class="btn btn-primary mt-1" @click="reverseText">反轉字串</a>
  <div class="mt-3">
    {{ newText }}
  </div>
</div>

<script>
var app = new Vue({
  el: '#app',
  data: {
    text: '',
    newText: '',
    link: 'https://www.google.com.tw/'
},
// 請在此撰寫 JavaScript
  methods: {
    reverseText(event){
      this.newText = this.text.split('').reverse().join('');
    }
  }
});
</script>
v-bind 寫法
v-bind:href="link"v-bind 縮寫寫法
:href="link"縮寫
v-on == @
v-bind: == :
v-class 動態切換 className
切換 Class
- 為 .box 動態加上 className “rotate”
怎麼透過 Vue 來動態的切換 class name。
basic/v_class.html
// :class="{ '要加入的 ClassName': 判斷式 }"<div id="app">
<div class="box" :class="{ 'rotate': isTransform }"></div>
<hr>
<button class="btn btn-outline-primary" @click="isTransform = !isTransform">選轉物件</button>
</div>
<script>
var app = new Vue({
el: '#app',
data: {
isTransform: false
},
});
</script>
<style>
.box {
transition: transform .5s;
}
.box.rotate {
transform: rotate(45deg)
}
</style>computed 運算功能
計算屬性
- 使用 computed 取代原有的表達式
介紹 computed 這個方法。
computed 直接會將結果存到這個變數裡面,然後這個變數,是可以直接使用。
在 computed 裡面,我們所宣告任何屬性它都是 function 並且它都會 return 一個值。
類似直接在 data 上面宣告一些值,不同的是 computed 會將結果回傳於這個變數之中,並且可以運用在我們的畫面上。
basic/computed.html
<div id="app">
  <input type="text" class="form-control" v-model="text">
  <div class="mt-3">
    {{ text.split('').reverse().join('') }}
  </div>
  {{ reverseText }}
</div>

<script>
var app = new Vue({
  el: '#app',
  data: {
    text: '',
    newText: ''
  },
  // 請在此撰寫 JavaScript
  computed: {
    reverseText: function() {
      // return 'aaa';
      return this.text.split('').reverse().join('');
    }
  }
});
</script>
注意的地方,computed 的觸發條件是透過這個 data 裡面的值,如果受到更動的時候,這個 computed 的結果,才會跟著做更動。如果說你的值並不是在這個 data 內,也就是說它不是在這個 this 下,它的更動無法被觸發的。
Methods 與 Computed 的使用情境
- computed 是在監控資料更動後,重新運算結果呈現於畫面上。
一般來說不會修改資料,只會回傳用於畫面呈現的資料。 - methods 就是互動的函式,需要觸發才會運作。
會用來修改資料內容。
效能
如果資料量大,computed 自然會比較慢
只要資料變動就會觸發,無形之中執行次數也會增加
因此在大量資料時,會建議透過 methods 減少不必要的運算
- computed:需要計算後才能使用的屬性
Vue 表單與資料的綁定
表單雙向綁定
- 請跟隨課程完成此章節。
介紹表單跟 Vue 的資料綁定。
basic/form.html
<div id="app">
  <h4>字串</h4>
  {{ text }}
  <input type="text" class="form-control" v-model="text">
  <hr>
  <pre>{{ textarea }}</pre>
  <textarea cols="30" rows="3" class="form-control" v-model="textarea"></textarea>
  <hr>
  <h4>Checkbox 與 Radio</h4>
  <div class="form-check">
    <input type="checkbox" class="form-check-input" id="check1" v-model="checkbox1">
    <label class="form-check-label" for="check1"> 你要不要看電影 </label>
  </div>
  <hr>
  <div class="form-check">
    <input type="checkbox" class="form-check-input" id="check2" v-model="checkboxArray" value="雞">
    <label class="form-check-label" for="check2">雞</label>
  </div>
  <div class="form-check">
    <input type="checkbox" class="form-check-input" id="check3" v-model="checkboxArray" value="豬">
    <label class="form-check-label" for="check3">豬</label>
  </div>
  <div class="form-check">
    <input type="checkbox" class="form-check-input" id="check4" v-model="checkboxArray" value="牛">
    <label class="form-check-label" for="check4">牛</label>
  </div>
  <p>晚餐火鍋裡有 <span v-for="item in checkboxArray">{{ item }} </span>。</p>
  <hr>
  <div class="form-check">
    <input type="radio" class="form-check-input" id="radio2" v-model="singleRadio" value="雞">
    <label class="form-check-label" for="radio2">雞</label>
  </div>
  <div class="form-check">
    <input type="radio" class="form-check-input" id="radio3" v-model="singleRadio" value="豬">
    <label class="form-check-label" for="radio3">豬</label>
  </div>
  <div class="form-check">
    <input type="radio" class="form-check-input" id="radio4" v-model="singleRadio" value="牛">
    <label class="form-check-label" for="radio4">牛</label>
  </div>
  <p>晚餐火鍋裡有 {{ singleRadio }}。</p>
  <hr>
  <h4>Select</h4>
  <select name="" id="" class="form-control" v-model="selected">
    <option value="" disabled>-- 請選擇 --</option>
    <option value="小明">小明</option>
    <option value="小美">漂亮的小美</option>
  </select>
</div>

<script>
var app = new Vue({
  el: '#app',
  data: {
    text: '',
    textarea: '',
    checkbox1: false,
    checkboxArray: [],
    singleRadio: '',
    selected: '',
  },
});
</script>
元件基礎概念
元件化
- 將以下元素轉為元件
Vue 的每一個元件,它都可以獨立的儲存自己的狀態。
建立一個元件,我們可以在前方加入個 Vue 的 component,定義一個它的 component 的名稱,然後後面一樣插入一個物件。
這裡的 component 名稱是可以自己定義的,也是我們套用在畫面上所使用的標籤,這裡叫做 counter-component。
在寫 data 的時候會改使用 function,那 function 會 return 一個物件。規定一定要使用 function 來 return 這個資料內容。
如果我們是新增一個應用程式的話,則不需要使用這個 function,當我們在建立元件的時候就必須使用 function 來 return 這個資料。
接下來就是要定義,這個元件長什麼樣子,這裡是使用反引號,是 ES6 的新的語法,定義字串內容的。
(反引號多行時不需要加入其它符號,比較適合呈現本範例),
// Vue.component('component 名稱', {
     data: function() {
       return {
         物件
       }
     },
     template: `
       加入 div,並且把元件的內容直接加進來
     `
});
basic/components.html
<div id="app">
  <div>
    你已經點擊 <button class="btn btn-outline-secondary btn-sm" @click="counter += 1">{{ counter }}</button> 下。
    你已經點擊 <button class="btn btn-outline-secondary btn-sm" @click="counter += 1">{{ counter }}</button> 下。
    <counter-component></counter-component>
    <counter-component></counter-component>
    <counter-component></counter-component>
  </div>
</div>

<script>
// 請在此撰寫 JavaScript
Vue.component('counter-component',{
  data: function() {
    return {
      counter: 0
    }
  },
  template: `
    <div>
      <button class="btn btn-outline-secondary btn-sm" @click="counter += 1">{{ counter }}</button>
    </div>
  `
});


var app = new Vue({
  el: '#app',
  data: {
    counter: 0
  },
});
</script>
第3節:製作一個 Todo List 來小試身手吧
這個範例要練習什麼!?
Todo 範例製作
- 請跟隨課程完成此章節。
basic/todo.html – 初始程式碼
<div id="app">
  <div class="input-group mb-3">
    <div class="input-group-prepend">
      <span class="input-group-text" id="basic-addon1">待辦事項</span>
    </div>
    <input type="text" class="form-control" placeholder="準備要做的任務">
    <div class="input-group-append">
      <button class="btn btn-primary" type="button">新增</button>
    </div>
  </div>
  <div class="card text-center">
    <div class="card-header">
      <ul class="nav nav-tabs card-header-tabs">
        <li class="nav-item">
          <a class="nav-link active" href="#">全部</a>
        </li>
        <li class="nav-item">
          <a class="nav-link " href="#">進行中</a>
        </li>
        <li class="nav-item">
          <a class="nav-link" href="#">已完成</a>
        </li>
      </ul>
    </div>
    <ul class="list-group list-group-flush text-left">
      <li class="list-group-item">
        <div class="d-flex">
          <div class="form-check">
            <input type="checkbox" class="form-check-input" id="a1">
            <label class="form-check-label" for="a1">
              Cras justo odio
            </label>
          </div>
          <button type="button" class="close ml-auto" aria-label="Close">
            <span aria-hidden="true">×</span>
          </button>
        </div>
      </li>
      <li class="list-group-item">
        <div class="d-flex">
          <div class="form-check">
            <input type="checkbox" class="form-check-input" id="a1">
            <label class="form-check-label completed" for="a1">
              Cras justo odio
            </label>
          </div>
          <button type="button" class="close ml-auto" aria-label="Close">
            <span aria-hidden="true">×</span>
          </button>
        </div>
      </li>
      <li class="list-group-item">
        <input type="text" class="form-control">
      </li>
    </ul>
    <div class="card-footer d-flex justify-content-between">
      <span>還有 3 筆任務未完成</span>
      <a href="#">清除所有任務</a>
    </div>
  </div>
</div>

<script>
var app = new Vue({
  el: '#app',
  data: {},
});
</script>

<style>
.completed {
  text-decoration: line-through
}
</style>
套用版型及建立待辦事項列表的資料
<input> 的內容加到 todo 的列表裡面,todo 的列表基本上會使用 v-for 來製作,會有個陣列來儲存這些資料內容,我們可以先定義它叫 item in todos,這個 todos 會用來儲存所有待辦事項資料內容。
<input> 用來新增待辦事項內容, v-model=”newTodo”,這個資料內容輸入之後,會透過<button>新增一個辦事項到 todos 裡面,<button>會加入一個方法,叫做 @click=”addTodo”。
接下來,我們把這些項目加到下面 Vue 的原始碼裡面。
在 data 裡面,我們會用 newTodo 來新增一個待辦事項,它是一個純文字,另外我們還會用 todos,它是一個陣列,用來呈現目前的待辦事項有哪些內容。
剛剛也有新增一個方法 (methods),用來新增一個新的待辦事項,叫做 addTodo,基本上整個比較基礎的架構都建立起來了。
現在因為 todos 裡面沒有內容,我們可以先試寫一份,等下要呈現的內容,等下再來新增的時候,我們心中會比較有一個概念。
我們先在 todos 新增一個假的資料,先新增一個物件,基本上它會有個 id,這個 id 的作用是,在這個地方有個 checkbox,當我們要透過這個名稱去選擇這個 checkbox 的時候,它兩邊的名稱是需要對應的,所以這個地方必須要有個 id 去選擇它,這邊會有個 id、title、completed,我們就先用這筆資料來呈現在畫面上試試看。
另外一份假的資料先註解起來,我們先留下這份要呈現的資料,在 <label> 文字內容方面,就會改成 {{ item.title }},<input>裡面的 id 會改成 :id=”item.id”,並把 <label> 裡面的 for 改成 :for=”item.id”,這樣 :for 和 :id 就可以對應起來。
completed 我們會把有沒有完成把它畫掉,它是透過 classname 做切換,現在還不能選擇,因為我們 id 是空的,id 先給它一個隨意的數字,那現在我們點擊 你好 就可以選取到這個框框的內容,它所切換的是這個 completed,在 <input> 加入 v-model=”item.completed”。
接下來透過 Vue 開發工具,來看資料是否正確。在 Root 裡面有個 todos,todos 有個第0筆資料,這裡有 completed、id、title,那我們去按下 你好 這個字,它會去觸發這個 checkbox,然後它的 completed 會從 false 變成 true,所以這個資料結構就是我們所需要的。
從上方的 <input> 去新增一個資料到下面的地方,methods 裡面的 addTodo 可以新宣告一個變數,暫時儲存 newTodo 所存下的內容,var value = this.newTodo;,接下來我們需要一個隨機的 id,id 的方式我們可以使用 timestamp 的方式,就是使用時間然後轉為數字的一種格式,我們叫做 timestamp,var timestamp = Math.floor(Date.now());,timestamp 取得可以直接使用 Date.now(); 來取得,並且透過 Math.floor 把它轉為正整數,這樣子就是一個文字以及 id,value 就會包含它的標題以及它的 timestamp。
使用 console.log(value, timestamp) 查詢這些內容,會出現標題內容、以及一串數字,數字我們就是要做為 id 使用。
接下來我們要把這筆資料寫到 todos 裡面,this.todos.push,push 就會把一個新的資料推到這個 todos 陣列裡面,推的方式我們就會新增一個物件,新的物件就會加在 todos 陣列裡面已有資料的後方,現在我們就要推一個新的物件進去,這個物件包含 id: timestamp, title: value, completed: false,然後看程式碼是否有正確運作。
<input> 新增待辦事項文字後的清除,this.newTodo = ”;,每次輸入的內容點擊新增後會加到下面的地方,並清除 <input> 文字內容。
除了按下新增按鈕新增內容以外,還有另外一個方式,是透過按鍵的行為把資料內容給新增下來,<input> 加入 @keyup.enter=”addTodo”
// 待辦事項的列表 <li> 用 v-for 製作
<li class="list-group-item" v-for="item in todos">
// <input> 用來新增待辦內容,加入 v-model="newTodo"
// <button> 透過按鈕新增待辦事項,加入 @click="addTodo"
// 把 v-for、v-model、@click 加入 Vue 原始碼裡面
data: {
  newTodo: '',
  todos: [],
},
methods: {
  addTodo: function() {

}
// 試寫一份資料內容,呈現在畫面看看
todos: [
  {
    id: '',
    title: '你好',
    completed: false
  }
]
// 把另外一份假資料註解起來,留下要呈現的。
<label> 文字內容改成 {{ item.title }}
// <input> checkbox 的 id 的部分改成 :id="item.id"
// <label> for 改成 :for="item.id"
// id 是空的,先隨意給個數字。
// <input> checkbox 加入 v-model="item.completed"
// 使用 Vue 開發者工具查看資料是否正確
// 資料結構是我們需要的
// <input> 新增資料到下方列表
methods: {
  addTodo: function() {
    var value = this.newTodo; // 儲存資料
    var timestamp = Math.floor(Date.now()); // 抓取時間命名 id
    console.log(value, timestamp);
    this.todos.push({
      id: timestamp,
      title: value,
      completed: false
    }); // 將id, title, completed加入陣列
    this.newTodo = '' // 清除輸入欄位
  }
}
// 透過按鍵行為把資料內容新增
// <input> 加入 @keyup.enter="addTodo"
basic/todo.html
<div id="app">
  <div class="input-group mb-3">
    <div class="input-group-prepend">
      <span class="input-group-text" id="basic-addon1">待辦事項</span>
    </div>
    <input type="text" class="form-control" placeholder="準備要做的任務" v-model="newTodo" @keyup.enter="addTodo">
    <div class="input-group-append">
      <button class="btn btn-primary" type="button" @click="addTodo">新增</button>
    </div>
  </div>
  <div class="card text-center">
    <div class="card-header">
      <ul class="nav nav-tabs card-header-tabs">
        <li class="nav-item">
          <a class="nav-link active" href="#">全部</a>
        </li>
        <li class="nav-item">
          <a class="nav-link " href="#">進行中</a>
        </li>
        <li class="nav-item">
          <a class="nav-link" href="#">已完成</a>
        </li>
      </ul>
    </div>
    <ul class="list-group list-group-flush text-left">
      <li class="list-group-item" v-for="item in todos">
        <div class="d-flex">
          <div class="form-check">
            <input type="checkbox" class="form-check-input" v-model="item.completed" :id="item.id">
            <label class="form-check-label" :for="item.id">
              {{ item.title }}
            </label>
          </div>
          <button type="button" class="close ml-auto" aria-label="Close">
            <span aria-hidden="true">×</span>
          </button>
        </div>
      </li>
      <!-- <li class="list-group-item">
        <div class="d-flex">
          <div class="form-check">
            <input type="checkbox" class="form-check-input" id="a1">
            <label class="form-check-label completed" for="a1">
              Cras justo odio
            </label>
          </div>
          <button type="button" class="close ml-auto" aria-label="Close">
            <span aria-hidden="true">×</span>
          </button>
        </div>
      </li> -->
      <li class="list-group-item">
        <input type="text" class="form-control">
      </li>
    </ul>
    <div class="card-footer d-flex justify-content-between">
      <span>還有 3 筆任務未完成</span>
      <a href="#">清除所有任務</a>
    </div>
  </div>
</div>

<script>
var app = new Vue({
  el: '#app',
  data: {
    newTodo:'',
    todos: [
      {
        id: '345',
        title: '你好',
        completed: false
      }
    ],
  },
  methods: {
    addTodo: function() {
      var value = this.newTodo;
      var timestamp = Math.floor(Date.now());
      console.log(value, timestamp);
      this.todos.push({
        id: timestamp,
        title: value,
        computed: false
      });
      this.newTodo = '';
    }
  }
});
</script>

<style>
.completed {
  text-decoration: line-through
}
</style>
刪除陣列上的特定資料
// 解決新增空白的列表
// 如果value是空值,return終止
if (!value) {
  return;
}
// 解決使用空白鍵還是可以新增內容的問題
// 並且可以刪除內容前後端的空白
// 加入 .trim()
var value = this.newTodo.trim();
// 製作刪除的功能
<button> 加入 @click="removeTodo"
// methods 下方加入 removeTodo
// <li> v-for 改成 v-for="(item, key) in todos"
// <button> @click="removeTodo" 改成 @click="removeTodo(key)"
// 移除陣列的值可以使用 .splice()
removeTodo: function(key) {
  this.todos.splice(key, 1)
}
basic/todo.html
<div id="app">
  <div class="input-group mb-3">
    <div class="input-group-prepend">
      <span class="input-group-text" id="basic-addon1">待辦事項</span>
    </div>
    <input type="text" class="form-control" placeholder="準備要做的任務" v-model="newTodo" @keyup.enter="addTodo">
    <div class="input-group-append">
      <button class="btn btn-primary" type="button" @click="addTodo">新增</button>
    </div>
  </div>
  <div class="card text-center">
    <div class="card-header">
      <ul class="nav nav-tabs card-header-tabs">
        <li class="nav-item">
          <a class="nav-link active" href="#">全部</a>
        </li>
        <li class="nav-item">
          <a class="nav-link " href="#">進行中</a>
        </li>
        <li class="nav-item">
          <a class="nav-link" href="#">已完成</a>
        </li>
      </ul>
    </div>
    <ul class="list-group list-group-flush text-left">
      <li class="list-group-item" v-for="(item, key) in todos">
        <div class="d-flex">
          <div class="form-check">
            <input type="checkbox" class="form-check-input" v-model="item.completed" :id="item.id">
            <label class="form-check-label" :for="item.id">
              {{ item.title }}
            </label>
          </div>
          <button type="button" class="close ml-auto" @click="removeTodo(key)" aria-label="Close">
            <span aria-hidden="true">×</span>
          </button>
        </div>
      </li>
      <!-- <li class="list-group-item">
        <div class="d-flex">
          <div class="form-check">
            <input type="checkbox" class="form-check-input" id="a1">
            <label class="form-check-label completed" for="a1">
              Cras justo odio
            </label>
          </div>
          <button type="button" class="close ml-auto" aria-label="Close">
            <span aria-hidden="true">×</span>
          </button>
        </div>
      </li> -->
      <li class="list-group-item">
        <input type="text" class="form-control">
      </li>
    </ul>
    <div class="card-footer d-flex justify-content-between">
      <span>還有 3 筆任務未完成</span>
      <a href="#">清除所有任務</a>
    </div>
  </div>
</div>

<script>
var app = new Vue({
  el: '#app',
  data: {
    newTodo:'',
    todos: [
      {
        id: '345',
        title: '你好',
        completed: false
      }
    ],
  },
  methods: {
    addTodo: function() {
      var value = this.newTodo.trim();
      var timestamp = Math.floor(Date.now());
      // console.log(value, timestamp);
      if (!value) {
        return;
      }
      this.todos.push({
        id: timestamp,
        title: value,
        computed: false
      });
      this.newTodo = '';
    },
    removeTodo: function(key) {
      this.todos.splice(key, 1);
    }
  }
});
</script>

<style>
.completed {
  text-decoration: line-through
}
</style>
製作頁籤分類的功能
// 製作刪除的效果、上方頁籤過濾的功能
// className 的切換
<label class="form-check-label"
:class="{'completed': item.completed}"
:for="item.id">
  {{ item.title }}
</label>
// 頁籤切換的效果
//在 data 新增一個變數 visibility
visibility: 'all'
// 刪除 class的active
// 加上 :class、@click
<ul class="nav nav-tabs card-header-tabs">
    <li class="nav-item">
      <a class="nav-link" :class="{'active': visibility == 'all'}" @click="visibility= 'all'" href="#">全部</a>
    </li>
    <li class="nav-item">
      <a class="nav-link " :class="{'active': visibility == 'active'}" @click="visibility= 'active'" href="#">進行中</a>
    </li>
    <li class="nav-item">
      <a class="nav-link" :class="{'active': visibility == 'completed'}" @click="visibility= 'completed'" href="#">已完成</a>
    </li>
</ul>
// 過濾的功能會使用 computed
computed: {
  filteredTodos: function() {
    return this.todos;
  }
}
// <li> v-for中的 todos 換成 filteredTodos
<li class="list-group-item" v-for="(item, key) in filteredTodos">
// 使用判斷式寫一些方法
computed: {
  filteredTodos: function() {
    if (this.visibility == 'all') {
      return this.todos;
    }
    return [];
  }
}
// 加上 else if 判斷進行中、已完成
computed: {
  filteredTodos: function() {
    if (this.visibility == 'all') {
      return this.todos;
    } else if (this.visibility == 'active') {
      var newTodos = [];
      this.todos.forEach(function (item){
        if (!item.completed) {
          newTodos.push(item);
        }
      })
      return newTodos;
    } else if (this.visibility == 'completed') {
      var newTodos = [];
      this.todos.forEach(function (item){
        if (item.completed) {
          newTodos.push(item);
        }
      })
      return newTodos;
    }
    return [];
  }
}
basic/todo.html
<div id="app">
  <div class="input-group mb-3">
    <div class="input-group-prepend">
      <span class="input-group-text" id="basic-addon1">待辦事項</span>
    </div>
    <input type="text" class="form-control" placeholder="準備要做的任務" v-model="newTodo" @keyup.enter="addTodo">
    <div class="input-group-append">
      <button class="btn btn-primary" type="button" @click="addTodo">新增</button>
    </div>
  </div>
  <div class="card text-center">
    <div class="card-header">
      <ul class="nav nav-tabs card-header-tabs">
        <li class="nav-item">
          <a class="nav-link" :class="{'active': visibility == 'all'}" @click="visibility= 'all'" href="#">全部</a>
        </li>
        <li class="nav-item">
          <a class="nav-link " :class="{'active': visibility == 'active'}" @click="visibility= 'active'" href="#">進行中</a>
        </li>
        <li class="nav-item">
          <a class="nav-link" :class="{'active': visibility == 'completed'}" @click="visibility= 'completed'" href="#">已完成</a>
        </li>
      </ul>
    </div>
    <ul class="list-group list-group-flush text-left">
      <li class="list-group-item" v-for="(item, key) in filteredTodos">
        <div class="d-flex">
          <div class="form-check">
            <input type="checkbox" class="form-check-input" v-model="item.completed" :id="item.id">
            <label class="form-check-label"
            :class="{'completed': item.completed}"
            :for="item.id">
              {{ item.title }}
            </label>
          </div>
          <button type="button" class="close ml-auto" @click="removeTodo(key)" aria-label="Close">
            <span aria-hidden="true">×</span>
          </button>
        </div>
      </li>
      <!-- <li class="list-group-item">
        <div class="d-flex">
          <div class="form-check">
            <input type="checkbox" class="form-check-input" id="a1">
            <label class="form-check-label completed" for="a1">
              Cras justo odio
            </label>
          </div>
          <button type="button" class="close ml-auto" aria-label="Close">
            <span aria-hidden="true">×</span>
          </button>
        </div>
      </li> -->
      <li class="list-group-item">
        <input type="text" class="form-control">
      </li>
    </ul>
    <div class="card-footer d-flex justify-content-between">
      <span>還有 3 筆任務未完成</span>
      <a href="#">清除所有任務</a>
    </div>
  </div>
</div>

<script>
var app = new Vue({
  el: '#app',
  data: {
    newTodo:'',
    todos: [
      {
        id: '345',
        title: '你好',
        completed: false
      }
    ],
    visibility: 'all'
  },
  methods: {
    addTodo: function() {
      var value = this.newTodo.trim();
      var timestamp = Math.floor(Date.now());
      // console.log(value, timestamp);
      if (!value) {
        return;
      }
      this.todos.push({
        id: timestamp,
        title: value,
        computed: false
      });
      this.newTodo = '';
    },
    removeTodo: function(key) {
      this.todos.splice(key, 1);
    }
  },
  computed: {
    filteredTodos: function() {
      if (this.visibility == 'all') {
        return this.todos;
      } else if (this.visibility == 'active') {
        var newTodos = [];
        this.todos.forEach(function(item) {
          if (!item.completed) {
            newTodos.push(item);
          }
        })
        return newTodos;
      } else if (this.visibility == 'completed') {
        var newTodos = [];
        this.todos.forEach(function(item) {
          if (item.completed) {
            newTodos.push(item);
          }
        })
        return newTodos;
      }
      return [];
    }
  }
});
</script>

<style>
.completed {
  text-decoration: line-through
}
</style>
雙擊修改資料內容
// 編輯待辦事項
// <li> 加入 @dblclick="editTodo(item)"
// methods的地方加上 editTodo
editTodo: function(item) {
  console.log(item);
}
// data 的地方新增 cacheTodo、cacheTitle
cacheTodo: {},
cacheTitle: '',
// editTodo
editTodo: function(item) {
  console.log(item);
  this.cacheTodo = item;
  this.cacheTitle = item.title;
// 註解程式碼 <li>
// 把 <input> 取出放在 .d-flex 的下方
// 製作判斷
// .d-flex 加入 v-if="item.id !== cacheTodo.id"
// <input> 加上 v-if="item.id === cacheTodo.id"
// 打開 Vue 開發工具查看
// 把事件加到 <input> 上面
<input type="text" class="form-control"
 v-model="cacheTitle"
 @keyup.esc="cancelEdit()"
 v-if="item.id === cacheTodo.id">
// methods 下方加上 cancelEdit
cancelEdit: function() {
  this.cacheTodo = {}
}
// 將編輯的內容存進去
<input type="text" class="form-control"
 v-model="cacheTitle"
 @keyup.esc="cancelEdit()"
 @keyup.enter="doneEdit(item)"
 v-if="item.id === cacheTodo.id">
// methods 下方加上 doneEdit
doneEdit: function(item) {
  item.title = this.cacheTitle;
  this.cacheTitle = '';
  this.cacheTodo = {};
}
basic/todo.html
<div id="app">
  <div class="input-group mb-3">
    <div class="input-group-prepend">
      <span class="input-group-text" id="basic-addon1">待辦事項</span>
    </div>
    <input type="text" class="form-control" placeholder="準備要做的任務" v-model="newTodo" @keyup.enter="addTodo">
    <div class="input-group-append">
      <button class="btn btn-primary" type="button" @click="addTodo">新增</button>
    </div>
  </div>
  <div class="card text-center">
    <div class="card-header">
      <ul class="nav nav-tabs card-header-tabs">
        <li class="nav-item">
          <a class="nav-link" :class="{'active': visibility == 'all'}" @click="visibility= 'all'" href="#">全部</a>
        </li>
        <li class="nav-item">
          <a class="nav-link " :class="{'active': visibility == 'active'}" @click="visibility= 'active'" href="#">進行中</a>
        </li>
        <li class="nav-item">
          <a class="nav-link" :class="{'active': visibility == 'completed'}" @click="visibility= 'completed'" href="#">已完成</a>
        </li>
      </ul>
    </div>
    <ul class="list-group list-group-flush text-left">
      <li class="list-group-item" v-for="(item, key) in filteredTodos" @dblclick="editTodo(item)">
        <div class="d-flex" v-if="item.id !== cacheTodo.id">
          <div class="form-check">
            <input type="checkbox" class="form-check-input" v-model="item.completed" :id="item.id">
            <label class="form-check-label"
            :class="{'completed': item.completed}"
            :for="item.id">
              {{ item.title }}
            </label>
          </div>
          <button type="button" class="close ml-auto" @click="removeTodo(key)" aria-label="Close">
            <span aria-hidden="true">×</span>
          </button>
        </div>
        <input type="text" class="form-control"
         v-model="cacheTitle"
         @keyup.esc="cancelEdit()"
         @keyup.enter="doneEdit(item)"
         v-if="item.id === cacheTodo.id">
      </li>
      <!-- <li class="list-group-item">
        <input type="text" class="form-control">
      </li> -->
    </ul>
    <div class="card-footer d-flex justify-content-between">
      <span>還有 3 筆任務未完成</span>
      <a href="#">清除所有任務</a>
    </div>
  </div>
</div>

<script>
var app = new Vue({
  el: '#app',
  data: {
    newTodo:'',
    todos: [
      {
        id: '345',
        title: '你好',
        completed: false
      }
    ],
    visibility: 'all',
    cacheTodo: {},
    cacheTitle: '',
  },
  methods: {
    addTodo: function() {
      var value = this.newTodo.trim();
      var timestamp = Math.floor(Date.now());
      // console.log(value, timestamp);
      if (!value) {
        return;
      }
      this.todos.push({
        id: timestamp,
        title: value,
        computed: false
      });
      this.newTodo = '';
    },
    removeTodo: function(key) {
      this.todos.splice(key, 1);
    },
    editTodo: function(item) {
      console.log(item);
      this.cacheTodo = item;
      this.cacheTitle = item.title;
    },
    cancelEdit: function() {
      this.cacheTodo = {}
    },
    doneEdit: function(item) {
      item.title = this.cacheTitle;
      this.cacheTitle = '';
      this.cacheTodo = {};
    }
  },
  computed: {
    filteredTodos: function() {
      if (this.visibility == 'all') {
        return this.todos;
      } else if (this.visibility == 'active') {
        var newTodos = [];
        this.todos.forEach(function(item) {
          if (!item.completed) {
            newTodos.push(item);
          }
        })
        return newTodos;
      } else if (this.visibility == 'completed') {
        var newTodos = [];
        this.todos.forEach(function(item) {
          if (item.completed) {
            newTodos.push(item);
          }
        })
        return newTodos;
      }
      return [];
    }
  }
});
</script>

<style>
.completed {
  text-decoration: line-through
}
</style>
刪除項目補充說明
// 索引的位置會有變化。
// 利用之前存好的id,先宣告 newIndex 等於一個空的值,並且透過 forEach 取得的是相同的值。
// 原本傳入的是 key 改成 todo
removeTodo: function (todo) {
  var newIndex: '';

  this.todos.splice(key, 1);
},
// 刪除的部分,原本是 key 改成 item
// @click="removeTodo(item)
/* 方法一
removeTodo: function (todo) {
  var newIndex = '';
  var vm = this;
  vm.todos.forEach(function(item, key) {
    if (todo.id === item.id) {
      newIndex = key
    }
  })
  this.todos.splice(newIndex, 1);
},
*/
// 方法二
/*
removeTodo: functioon (todo) {
  var vm = this;
  var newIndex = vm.todos.findIndex(function (item, key) {
    return todo.id === item.id;
  })
  this.todos.splice(newIndex, 1);
},
*/
basic/todo.html
<div id="app">
  <div class="input-group mb-3">
    <div class="input-group-prepend">
      <span class="input-group-text" id="basic-addon1">待辦事項</span>
    </div>
    <input type="text" class="form-control" placeholder="準備要做的任務" v-model="newTodo" @keyup.enter="addTodo">
    <div class="input-group-append">
      <button class="btn btn-primary" type="button" @click="addTodo">新增</button>
    </div>
  </div>
  <div class="card text-center">
    <div class="card-header">
      <ul class="nav nav-tabs card-header-tabs">
        <li class="nav-item">
          <a class="nav-link" :class="{'active': visibility == 'all'}" @click="visibility= 'all'" href="#">全部</a>
        </li>
        <li class="nav-item">
          <a class="nav-link " :class="{'active': visibility == 'active'}" @click="visibility= 'active'" href="#">進行中</a>
        </li>
        <li class="nav-item">
          <a class="nav-link" :class="{'active': visibility == 'completed'}" @click="visibility= 'completed'" href="#">已完成</a>
        </li>
      </ul>
    </div>
    <ul class="list-group list-group-flush text-left">
      <li class="list-group-item" v-for="(item, key) in filteredTodos" @dblclick="editTodo(item)">
        <div class="d-flex" v-if="item.id !== cacheTodo.id">
          <div class="form-check">
            <input type="checkbox" class="form-check-input" v-model="item.completed" :id="item.id">
            <label class="form-check-label"
            :class="{'completed': item.completed}"
            :for="item.id">
              {{ item.title }}
            </label>
          </div>
          <button type="button" class="close ml-auto" @click="removeTodo(item)" aria-label="Close">
            <span aria-hidden="true">×</span>
          </button>
        </div>
        <input type="text" class="form-control"
         v-model="cacheTitle"
         @keyup.esc="cancelEdit()"
         @keyup.enter="doneEdit(item)"
         v-if="item.id === cacheTodo.id">
      </li>
      <!-- <li class="list-group-item">
        <input type="text" class="form-control">
      </li> -->
    </ul>
    <div class="card-footer d-flex justify-content-between">
      <span>還有 3 筆任務未完成</span>
      <a href="#">清除所有任務</a>
    </div>
  </div>
</div>

<script>
var app = new Vue({
  el: '#app',
  data: {
    newTodo:'',
    todos: [
      // {
      //   id: '345',
      //   title: '你好',
      //   completed: false
      // }
    ],
    visibility: 'all',
    cacheTodo: {},
    cacheTitle: '',
  },
  methods: {
    addTodo: function() {
      var value = this.newTodo.trim();
      var timestamp = Math.floor(Date.now());
      // console.log(value, timestamp);
      if (!value) {
        return;
      }
      this.todos.push({
        id: timestamp,
        title: value,
        computed: false
      });
      this.newTodo = '';
    },
    // 方法一
    // removeTodo: function(todo) {
    //   var newIndex = '';
    //   var vm = this;
    //   vm.todos.forEach(function(item, key) {
    //     if (todo.id === item.id) {
    //       newIndex = key
    //     }
    //   })
    //   this.todos.splice(newIndex, 1);
    // },
    // 方法二
    removeTodo: function (todo) {
      var vm = this;
      var newIndex = vm.todos.findIndex(function (item, key) {
        return todo.id === item.id;
      })
      this.todos.splice(newIndex, 1);
    },
    editTodo: function(item) {
      console.log(item);
      this.cacheTodo = item;
      this.cacheTitle = item.title;
    },
    cancelEdit: function() {
      this.cacheTodo = {}
    },
    doneEdit: function(item) {
      item.title = this.cacheTitle;
      this.cacheTitle = '';
      this.cacheTodo = {};
    }
  },
  computed: {
    filteredTodos: function() {
      if (this.visibility == 'all') {
        return this.todos;
      } else if (this.visibility == 'active') {
        var newTodos = [];
        this.todos.forEach(function(item) {
          if (!item.completed) {
            newTodos.push(item);
          }
        })
        return newTodos;
      } else if (this.visibility == 'completed') {
        var newTodos = [];
        this.todos.forEach(function(item) {
          if (item.completed) {
            newTodos.push(item);
          }
        })
        return newTodos;
      }
      return [];
    }
  }
});
</script>

<style>
.completed {
  text-decoration: line-through
}
</style>
換你來試試看,完成這份作業吧
顯示還剩下多少未完成項目
HTML
<div class="card-footer d-flex justify-content-between">
  <span>還有 {{ countActiveTodo }} 筆任務未完成</span>
</div>
JavaScript
computed:{
...
  countActiveTodo: function(){
    return this.todos.filter( item => item.completed === false).length;
  }
}
刪除所有資料
HTML
<div class="card-footer d-flex justify-content-between">
  <span>還有 {{ countActiveTodo }} 筆任務未完成</span>
  <a href="#' @click.prevent="deleteAllTodo"></a>
</div>
JavaScript
methods:{
...
  deleteAllTodo: function(){
    this.todos = [];
  }
}參考資源:Alysa Chan、Alysa Chan筆記
作業連結:Todo Vue.js 作業
實戰體驗 – Todo List 的資源連結
作業模板:
Todo Demo Template
“進入此連結後可 Fork 到自己的帳號下”
此模板與課程範例進行的類似
同學可以在此練習作業
並透過 Udemy 問答區繳交作業
透過此範例,同學可提早完整了解 Vue.js 的概觀
接下來在學習 Vue 的語法細節及生命週期
會更容易了解這些的相關性
第4節:進階模板語法介紹
模板資料細節說明
基礎模板語法
- 字串
- 原始 HTML
- 單次綁定
- 表達式
- HTML 屬性
v-html – 額外注意事項
在網站上動態渲染任意HTML是非常危險的,因為容易導致XSS攻擊。只在可信內容上使用v-html,永不用在用戶提交的內容上。
跨網站指令碼 (Cross-site scripting,通常簡稱為:XSS),是一種網站應用程式的安全漏洞攻擊,是代碼注入的一種。它允許惡意使用者將程式碼注入到網頁上,其他使用者在觀看網頁時就會受到影響。
template/basic.html
<div id="app">
  <h4>字串</h4>
  {{ text }}
  <input type="text" class="form-control" v-model="text">

  <h4 class="mt-3">原始 HTML</h4>
  {{ rawHtml }}
  <p v-html="rawHtml">請在此加入原始 HTML 結構</p>
  <p><a href="https://cn.vuejs.org/v2/api/#v-html">額外注意事項</a></p>

  <h4 class="mt-3">單次綁定</h4>
  <div v-text="text" v-once>請將此欄位改為單次綁定</div>

  <h4 class="mt-3">表達式</h4>
  <p>練習不同的表達式</p>
  {{ text + rawHtml }}
  {{ text.split('').reverse().join('') }}
  {{ number1 * number2 }}

  <hr>
  <h4 class="mt-3">HTML 屬性</h4>
  <p :id="htmlId">請綁定上 ID</p>

  <input type="text" :disabled="isDisabled" class="form-control" placeholder="請在此加上動態 disabled">
</div>

<script>
var app = new Vue({
  el: '#app',
  data: {
    text: '這是一段文字',
    rawHtml: `<span class="text-danger">紅色文字</span>`,
    number1: 100,
    number2: 300,
    htmlId: 'HTMLID',
    isDisabled: true
  },
});
</script>
動態切換 ClassName 及 Style 多種方法
切換樣式
- 物件寫法
- 物件寫法 2
- 陣列寫法
- 綁定行內樣式
- 自動加上 Prefix (每個版本結果不同)
介紹怎麼切換樣式。
實際在做的時候,資料狀態建議自己輸入一次,才能比較了解切換狀態的時候,資料邏輯是怎麼去建構的。
不能使用 – 這個符號(Ex:bg-danger),來做為物件選取的名稱,會在 Console 跳出錯誤,雖然可以操作,但不是正確的寫法,正確寫法是改成用中括號的方式來選取 (Ex:[‘bg-danger’])。
CSS屬性 user-select 控制用戶是否可用文本。
template/v_class.html
<div id="app">
  <h4>物件寫法</h4>
  <div class="box" :class="{'rotate': isTransform, 'bg-danger': boxColor}"></div>
  <p>請為此元素加上動態 className</p>
  <hr>
  <button class="btn btn-outline-primary" v-on:click="isTransform = !isTransform">選轉物件</button>
  <div class="form-check">
    <input type="checkbox" class="form-check-input" id="classToggle1" v-model="boxColor">
    <label class="form-check-label" for="classToggle1">切換色彩</label>
  </div>
  <hr>
  <h5>物件寫法 2</h5>
  <div class="box" :class="objectClass"></div>
  <p>請將此範例改為 "物件" 寫法</p>
  <hr>
  <button class="btn btn-outline-primary" @click="objectClass.rotate = !objectClass.rotate">選轉物件</button>
  <div class="form-check">
    <input type="checkbox" class="form-check-input" id="classToggle2" v-model="objectClass['bg-danger']">
    <label class="form-check-label" for="classToggle2">切換色彩</label>
  </div>
  <hr>
  <h4>陣列寫法</h4>
  <button class="btn" :class="['btn-outline-primary','active']">請操作本元件</button>
  <button class="btn" :class="arrayClass">請操作本元件</button>
  <p>請用陣列呈現此元件 className</p>
  <div class="form-check">
    <input type="checkbox" class="form-check-input" id="classToggle3" v-model="arrayClass" value="btn-outline-primary">
    <label class="form-check-label" for="classToggle3">切換樣式</label>
  </div>
  <div class="form-check">
    <input type="checkbox" class="form-check-input" id="classToggle4" v-model="arrayClass" value="active">
    <label class="form-check-label" for="classToggle4">啟用元素狀態</label>
  </div>
  <hr>
  <h4>綁定行內樣式</h4>
  <p>請用不同方式綁定以下行內樣式</p>
  <div class="box" :style="{backgroundColor: 'red'}"></div>
  <div class="box" :style="styleObject"></div>
  <div class="box" :style="[{backgroundColor: 'red', borderWidth: '5px'}]"></div>
  <div class="box" :style="[styleObject, styleObject2]"></div>
  <hr>
  <h5>自動加上 Prefix (每個版本結果不同)</h5>
  <div class="box" :style="styleObject3"></div>
</div>

<script>
var app = new Vue({
  el: '#app',
  data: {
    isTransform: false,
    boxColor: false,
    objectClass: {
      'rotate': false,
      'bg-danger': false,
    },

    // Array 操作
    arrayClass: [],

    // 行內樣式
    // 使用駝峰式命名
    styleObject: {
      backgroundColor: 'red',
      borderWidth: '5px'
    },
    styleObject2: {
      boxShadow: '3px 3px 5px rgba(0, 0, 0, 0.16)'
    },
    styleObject3: {
      userSelect: 'none'
    }
  },
});
</script>

<style>
.box {
  transition: all .5s;
}
.box.rotate {
  transform: rotate(45deg)
}
</style>
v-for 與其使用細節
v-for 迴圈
- 陣列與物件的迴圈
- Key
- Filter
- 不能運作的狀況
- 純數字的迴圈
- Template 的運用
- v-for 與 v-if
- v-for 與 元件
Vue.js Vue.set
注意:現在建議元件使用 v-for 都加上 key。 參考
template/v_for.html
<div id="app">
  <h4>陣列與物件的迴圈</h4>
  <p>請使用 v-for 在陣列與物件上,並且加上索引</p>
  <ul>
    <li v-for="(item, key) in objectData">
      {{ key }} - {{ item.name }} {{ item.age }} 歲
    </li>
  </ul>
  <ul>
    <li v-for="(item, key) in objectData">
      {{ key }} - {{ item.name }} {{ item.age }} 歲
    </li>
  </ul>
  <hr>
  <h4>Key</h4>
  <p>請在範例上補上 key,並觀察其差異</p>
  <ul>
    <li v-for="(item, key) in arrayData" :key="item.age">
      {{ key }} - {{ item.name }} {{ item.age }} 歲 <input type="text">
    </li>
  </ul>
  <button class="btn btn-outline-primary" @click="reverseArray">反轉陣列</button>

  <h4>Filter</h4>
  <p>請製作過濾資料</p>
  <input type="text" class="form-control" v-model="filterText" @keyup.enter="filterData">
  <ul>
    <li v-for="(item, key) in filterArray" :key="item.age">
      {{ key }} - {{ item.name }} {{ item.age }} 歲 <input type="text">
    </li>
  </ul>

  <h4>不能運作的狀況</h4>
  <p>講師說明</p>
  <button class="btn btn-outline-primary" @click="cantWork">無法運行</button>
  <ul>
    <li v-for="(item, key) in arrayData" :key="item.age">
      {{ key }} - {{ item.name }} {{ item.age }} 歲 <input type="text">
    </li>
  </ul>

  <h4>純數字的迴圈</h4>
  <ul>
    <li v-for="item in 10">
      {{ item }}
    </li>
  </ul>

  <h4>Template 的運用</h4>
  <p>請將兩個 tr 一組使用 v-for</p>
  <table class="table">
    <template v-for="item in arrayData">
      <tr>
        <td>{{item.age}}</td>
      </tr>
      <tr>
        <td>{{item.name}}</td>
      </tr>
    </template>
  </table>

  <h4>v-for 與 v-if</h4>
  <p>請加上 v-if 判斷式</p>
  <ul>
    <li v-for="(item, key) in arrayData" v-if="item.age <= 19">
      {{ key }} - {{ item.name }} {{ item.age }} 歲
    </li>
  </ul>

  <h4>v-for 與 元件</h4>
  <p>講師說明</p>
  <ul>
    <list-item :item="item" v-for="(item, key) in arrayData" :key="item.age"></list-item>
  </ul>
  <p>注意:現在建議元件使用 v-for 都加上 key。<a href="https://cn.vuejs.org/v2/guide/list.html#%E4%B8%80%E4%B8%AA%E7%BB%84%E4%BB%B6%E7%9A%84-v-for">參考</a></p>
</div>

<script>
Vue.component('list-item', {
  template: `
    <li>
      {{ item.name }} {{ item.age }} 歲
    </li>
  `,
  props: ['item']
});

var app = new Vue({
  el: '#app',
  data: {
    arrayData: [
      {
        name: '小明',
        age: 16
      },
      {
        name: '漂亮阿姨',
        age: 24
      },
      {
        name: '杰倫',
        age: 20
      }
    ],
    objectData: {
      ming: {
        name: '小明',
        age: 16
      },
      auntie: {
        name: '漂亮阿姨',
        age: 24
      },
      jay: {
        name: '杰倫',
        age: 20
      }
    },
    filterArray: [],
    filterText: ''
  },
  methods: {
    // 請在此練習 JavaScript
    reverseArray: function () {
      this.arrayData.reverse()
      console.log(this.arrayData)
    },
    filterData: function() {
      var vm = this; // (this)
      vm.filterArray = vm.arrayData.filter(function(item) {
        console.log(vm.filterText, item.name, item.name.match(vm.filterText));
        return item.name.match(vm.filterText);
      });

    },
    cantWork: function() {
      // 無法運行一
      // this.arrayData.length = 0;
      // console.log(this.arrayData);

      // 無法運行二
      // this.arrayData[0] = {
      //   name: '小強',
      //   age: 99,
      // }
      // console.log(this.arrayData);

      // 解法
      Vue.set(this.arrayData, 0, {
        name: '小強',
        age: 99,
      })
    }
  }
});
</script>
v-if 與其使用細節
v-if 模板判斷
- v-if, v-else
- template 標籤
- v-else-if
- KEY
- v-if 與 v-show
Conditional Rendering、條件渲染 v-if
v-if, v-else – 成功、失敗範例
// 寫法一
// 成功
v-if="isSuccess == true"
// 失敗
v-if="isSuccess == false"
// 寫法二
// 成功
v-if="isSuccess"
// 失敗
v-if="!isSuccess"
// 寫法三
// 成功
v-if="isSuccess"
// 失敗
v-else
template/v_if.html
<div id="app">
  <h4>v-if, v-else</h4>
  <p>使用 v-if, v-else 切換物件呈現</p>
  <div class="alert alert-success" v-if="isSuccess">成功!</div>
  <div class="alert alert-danger" v-else>失敗!</div>
  <div class="form-check">
    <input type="checkbox" class="form-check-input" id="isSuccess" v-model="isSuccess">
    <label class="form-check-label" for="isSuccess">啟用元素狀態</label>
  </div>

  <h4>template 標籤</h4>
  <p>使用 template 切換多數 DOM 呈現</p>
  <table class="table">
    <thead>
      <th>編號</th>
      <th>姓名</th>
    </thead>
    <template v-if="showTemplate">
      <tr>
        <td>1</td>
        <td>安妮</td>
      </tr>
      <tr>
        <td>2</td>
        <td>小明</td>
      </tr>
    </template>
  </table>
  <div class="form-check">
    <input type="checkbox" class="form-check-input" id="showTemplate" v-model="showTemplate">
    <label class="form-check-label" for="showTemplate">啟用元素狀態</label>
  </div>
  <hr>
  <h4>v-else-if</h4>
  <p>使用 v-else-if 做出分頁頁籤</p>
  <ul class="nav nav-tabs">
    <li class="nav-item">
      <a class="nav-link" href="#" :class="{'active': link == 'a'}" @click.prevent="link = 'a'">標題一</a>
    </li>
    <li class="nav-item">
      <a class="nav-link" href="#" :class="{'active': link == 'b'}" @click.prevent="link = 'b'">標題二</a>
    </li>
    <li class="nav-item">
      <a class="nav-link" href="#" :class="{'active': link == 'c'}" @click.prevent="link = 'c'">標題三</a>
    </li>
  </ul>
  <div class="content">
    <div v-if="link == 'a'">A</div>
    <div v-else-if="link == 'b'">B</div>
    <div v-else-if="link == 'c'">C</div>
  </div>
  <hr>
  <h4>KEY</h4>
  <p>講師說明 Vue 切換狀態可能遇到的問題</p>
  <template v-if="loginType === 'username'">
    <label>Username</label>
    <input class="form-control" placeholder="Enter your username":key="1">
  </template>
  <template v-else>
    <label>Email</label>
    <input class="form-control" placeholder="Enter your email address" :key="2">
  </template>
  <button class="btn btn-outline-primary mt-3" @click="toggleLoginType">切換狀態</button>
  <hr>
  <h4>v-if 與 v-show</h4>
  <p>講師說明 v-if 與 v-show 的差異</p>
  <div class="alert alert-success" v-if="isSuccess">成功!</div>
  <div class="alert alert-danger" v-if="!isSuccess">失敗!</div>
  <div class="form-check">
    <input type="checkbox" class="form-check-input" id="isSuccess2" v-model="isSuccess">
    <label class="form-check-label" for="isSuccess2">啟用元素狀態</label>
  </div>
</div>

<script>
var app = new Vue({
  el: '#app',
  data: {
    isSuccess: true,
    showTemplate: true,

    link: 'a',

    loginType: 'username'
  },
  methods: {
    toggleLoginType: function () {
      return this.loginType = this.loginType === 'username' ? 'email' : 'username'
    }
  }
});
</script>
特別記得的是 key 這個指令,可能是在使用 Vue 常踩到的地雷。
Computed 與 Watch
計算及監聽
- Computed
- Watch
Computed Properties and Watchers、計算屬性和偵聽器
template/computed_watch.html
<div id="app">
  <h4>Computed</h4>
  <p>使用 Computed 來過濾資料。</p>
  <input type="text" class="form-control" v-model="filterText">
  <ul>
    <li v-for="(item, key) in filterArray" :key="item.age">
      {{ key }} - {{ item.name }} {{ item.age }} 歲 <input type="text">
    </li>
  </ul>
  <p>使用 Computed 來呈現時間格式。</p>
  <p>{{ formatTime }}</p>
  <h4>Watch</h4>
  <p>使用 trigger 來觸發旋轉 box、並在三秒後改變回來</p>
  <div class="box" :class="{'rotate': trigger }"></div>
  <hr>
  <button class="btn btn-outline-primary" @click="trigger = true">Counter</button>
</div>

<script>
var app = new Vue({
  el: '#app',
  data: {
    arrayData: [
      {
        name: '小明',
        age: 16
      },
      {
        name: '漂亮阿姨',
        age: 24
      },
      {
        name: '杰倫',
        age: 20
      }
    ],
    filterText: '',
    trigger: false,
    newDate: 0
  },
  computed: {
    filterArray: function() {
      var vm = this;
      return vm.arrayData.filter(function(item) {
        return item.name.match(vm.filterText);
      })
    },
    formatTime: function () {
      console.log(this.newDate);
      var dates = new Date(this.newDate * 1000);
      var year = dates.getFullYear();
      var month = dates.getMonth() + 1;
      var date = dates.getDate();
      var hours = dates.getHours();
      var minutes = dates.getMinutes();
      var seconds = dates.getSeconds();
      return `${year}/${month}/${date} ${hours}:${minutes}:${seconds}`
    }
  },
  watch: {
    trigger: function () {
      var vm = this;
      setTimeout(() => {
        vm.trigger = false
      }, 3000);
    }
  },
  mounted:function () {
    this.newDate = Math.floor(Date.now() / 1000);
  }
});
</script>

<style>
.box {
  transition: all .5s;
}
.box.rotate {
  transform: rotate(45deg)
}
</style>
表單細節操作
template/form.html
<div id="app">
  <h4>Select</h4>
  <select name="" id="" class="form-control" v-model="selected">
    <option disabled value="">請選擇</option>
    <option value="小美">小美</option>
    <option value="可愛小妞">可愛小妞</option>
    <option value="漂亮阿姨">漂亮阿姨</option>
  </select>
  <p>小明喜歡的女生是 {{ selected }}。</p>
  <hr>
  <select name="" id="" class="form-control" v-model="selected2">
    <option disabled value="">請選擇</option>
    <option :value="item" v-for="item in selectData">{{ item }}</option>
  </select>
  <p>小明喜歡的女生是 {{ selected2 }}。</p>
  <hr>
  <h4 class="mt-3">多選</h4>
  <select name="" id="" class="form-control" multiple v-model="multiSelected">
    <option value="小美">小美</option>
    <option value="可愛小妞">可愛小妞</option>
    <option value="漂亮阿姨">漂亮阿姨</option>
  </select>
  <p>小明喜歡的女生是 <span v-for="item in multiSelected">{{ item }} </span>。</p>
  <hr>
  <h4 class="mt-3">複選框</h4>
  <div class="form-check">
    <input type="checkbox" class="form-check-input" id="sex" v-model="sex" true-value="男生" false-value="女生">
    <label class="form-check-label" for="sex">{{ sex }}</label>
  </div>
  <h4 class="mt-3">修飾符</h4>
  {{ lazyMsg }}
  <input type="text" class="form-control" v-model.lazy="lazyMsg">
  <br>
  <pre>{{ typeof(age) }} {{ age }}</pre>
  <input type="number" class="form-control" v-model.number="age">
  <br>
  {{ trimMsg }}緊黏的文字
  <input type="text" class="form-control" v-model.trim="trimMsg">
</div>

<script>
var app = new Vue({
  el: '#app',
  data: {
    singleRadio: '',
    selected: '',
    selectData: ['小美', '可愛小妞', '漂亮阿姨'],
    selected2: '',
    multiSelected: [],
    sex: '男生',

    // 修飾符
    lazyMsg: '',
    age: '',
    trimMsg: ''
  },
});
</script>
補充:可透過 shift 或 cmd 來多選 Windows 則是 shift 或 ctrl
v-on 的頁面操作細節
事件修飾符
- .stop – 調用 event.stopPropagation(),停止由內而外。
- .prevent – 調用 event.preventDefault(),停止事件的默認動作。
- .capture – 添加事件偵聽器時使用 capture 模式,由內而外改成由外而內。
- .self – 只當事件是從偵聽器綁定的元素本身觸發時才觸發回調,只會觸發自己這個元素。
- .once – 指觸發一次回調,事件只觸發一次。
按鍵修飾符
- .{keyCode | keyAlias} – 只當事件是從特定鍵觸發時才觸發回調。
- 別名修飾 – .enter, .tab, .delete, .esc, .space, .up, .down, .left, .right
- 修飾符來實現僅在按下相應按鍵時才觸發鼠標或按鍵事件的監聽器 – .ctrl, .alt, .shift, .meta
template/v_on.html
<div id="app">
  <p>請切換下方 box 的 className</p>
  <div class="box" :class="{'rotate': isRotate }"></div>
  <hr>
  <button class="btn btn-outline-primary" @click="changeRotate">切換 box 樣式</button>
  <hr>
  <h4>帶入參數</h4>
  <ul>
    <li v-for="item in arrayData" class="my-2">
      {{ item.name }} 有 {{ item.cash }} 元
      <button class="btn btn-sm btn-outline-primary" @click="storeMoney(item)">儲值</button>
    </li>
  </ul>
  <h4>修飾符</h4>
  <h5>事件修飾符</h5>
  <ul>
    <li>.stop - 調用 event.stopPropagation()。</li>
    <li>.prevent - 調用 event.preventDefault()。</li>
    <li>.capture - 添加事件偵聽器時使用 capture 模式。</li>
    <li>.self - 只當事件是從偵聽器綁定的元素本身觸發時才觸發回調。</li>
    <li>.once - 只觸發一次回調。</li>
  </ul>
  <h6>將此範例加上 stopPropagation</h6>
  <div class="p-3 bg-primary" @click.stop="trigger('div')">
    <span class="box" @click.stop="trigger('box')"></span>
  </div>

  <h6 class="mt-3">事件偵聽器時使用 capture 模式</h6>
  <div class="p-3 bg-primary" @click.capture="trigger('div')">
    <span class="box d-flex align-items-center justify-content-center" @click.capture="trigger('box')">
      <button class="btn btn-outline-secondary" @click.capture="trigger('button')">按我</button>
    </span>
  </div>

  <h6 class="mt-3">事件偵聽器時使用 self 模式</h6>
  <div class="p-3 bg-primary" @click.self="trigger('div')">
    <span class="box d-flex align-items-center justify-content-center" @click.self="trigger('box')">
      <button class="btn btn-outline-secondary" @click.self="trigger('button')">按我</button>
    </span>
  </div>

  <h6 class="mt-3">事件偵聽器只觸發一次</h6>
  <div class="p-3 bg-primary" @click.once="trigger('div')">
    <span class="box d-flex align-items-center justify-content-center" @click.once="trigger('box')">
      <button class="btn btn-outline-secondary" @click.once="trigger('button')">按我</button>
    </span>
  </div>

  <h5>按鍵修飾符</h5>
  <ul>
    <li>.{keyCode | keyAlias} - 只當事件是從特定鍵觸發時才觸發回調。</li>
    <li>別名修飾 - .enter, .tab, .delete, .esc, .space, .up, .down, .left, .right</li>
    <li>修飾符來實現僅在按下相應按鍵時才觸發鼠標或鍵盤事件的監聽器 - .ctrl, .alt, .shift, .meta</li>
  </ul>
  <h6 class="mt-3">keyCode</h6>
  <input type="text" class="form-control" v-model="text" @keyup.13="trigger(13)">

  <h6 class="mt-3">別名修飾</h6>
  <input type="text" class="form-control" v-model="text" @keyup.space="trigger('space')">

  <h6 class="mt-3">相應按鍵時才觸發的監聽器</h6>
  <input type="text" class="form-control" v-model="text" @keyup.shift.enter="trigger('shift + Enter')">
  <h5>滑鼠修飾符</h5>
  <ul>
    <li>.left - (2.2.0) 只當點擊鼠標左鍵時觸發。</li>
    <li>.right - (2.2.0) 只當點擊鼠標右鍵時觸發。</li>
    <li>.middle - (2.2.0) 只當點擊鼠標中鍵時觸發。</li>
  </ul>
  <h6 class="mt-3">滑鼠修飾符</h6>
  <div class="p-3 bg-primary">
    <span class="box" @click.right="trigger('Right button')">
    </span>
  </div>
</div>

<script>
var app = new Vue({
  el: '#app',
  data: {
    arrayData: [
      {
        name: '小明',
        age: 16,
        cash: 500
      },
      {
        name: '漂亮阿姨',
        age: 24,
        cash: 1000
      },
      {
        name: '杰倫',
        age: 20,
        cash: 5000
      }
    ],
    isRotate: false,
    text: ''
  },
  methods: {
    changeRotate: function() {
      this.isRotate = !this.isRotate;
    },
    storeMoney: function(item) {
      item.cash = item.cash + 500;
    },
    trigger: function(name) {
      console.log(name, '此事件被觸發了')
    }
  }
  // 解答
});
</script>

<style>
.box {
  display: block;
  transition: all .5s;
}
.box.rotate {
  transform: rotate(45deg)
}
</style>
Template 章節作業說明
作業練習:表格排序
模板練習作業:透過點擊 th 方式,反轉表格的排序
僅需要排序價格、到期日。
提示:
- 將資料排序改為使用 computed 輸出
- 使用迴圈的方式,重新依據點擊排序內容,並透過 computed 輸出
- 反轉時,th 指標需給與正確方向
- 加分題:第二次點擊時再次反轉資料
章節作業模板
如果課程中沒有看到章節作業模板
煩請重新下載課程範例
template/homework_sortby.html
<div id="app" class="app">
  <table class="table">
    <thead>
      <tr>
        <th>品名</th>
        <th class="click" :class="{'active': link == 'linkPrice'}"
        @click="sortActive = 'price'; isReverse = !isReverse; link='linkPrice'">價格
          <!-- isReverse 為反轉 className -->
          <span class="icon isReverse" :class="{'inverse': isReverse}"
            v-if="sortActive === 'price'">
            <i class="fas fa-angle-up text-success"></i>
          </span>
        </th>
        <th class="click" :class="{'active': link == 'linkExpiryDate'}"
        @click="sortActive = 'expiryDate'; isReverse = !isReverse; link='linkExpiryDate'">到期日
          <span class="icon isReverse" :class="{'inverse': isReverse}"
            v-if="sortActive === 'expiryDate'">
            <i class="fas fa-angle-up text-success"></i>
          </span>
        </th>
      </tr>
      <tr v-for="(item, key) in sortArray" :key="item.name"  v-if="link == ''">
        <td>{{ item.name }}</td>
        <td>{{ item.price }}</td>
        <td>{{ item.expiryDate }}</td>
      </tr>
      <tr v-for="(item, key) in sortArray" :key="item.name"  v-if="link == 'linkPrice'">
        <td>{{ item.name }}</td>
        <td>{{ item.price }}</td>
        <td>{{ item.expiryDate }}</td>
      </tr>
      <tr v-for="(item, key) in sortArray" :key="item.name"  v-if="link == 'linkExpiryDate'">
        <td>{{ item.name }}</td>
        <td>{{ item.price }}</td>
        <td>{{ item.expiryDate }}</td>
      </tr>
    </thead>
  </table>
</div>

<script>
// 參考語法
// // 使用 Sort 排序資料
// data = data.sort(function (a, b) {
//   // 抓出排序資料的值
//   a = a[欄位]
//   b = b[欄位]

//   // 回傳 1, 0, -1 來進行排列
//   // 詳細規則可參考 https://developer.mozilla.org/zh-TW/docs/Web/JavaScript/Reference/Global_Objects/Array/sort
//   return (a === b ? 0 : a > b ? 1 : -1) * 正反排序數值
// })

var app = new Vue({
  el: '#app',
  data: {
    productData: [
      {
        name: '巧呼呼蘇打水',
        price: 30,
        expiryDate: 90
      },
      {
        name: '心驚膽跳羊肉飯',
        price: 65,
        expiryDate: 2
      },
      {
        name: '郭師傅武功麵包',
        price: 32,
        expiryDate: 1
      },
      {
        name: '不太會過期的新鮮牛奶',
        price: 75,
        expiryDate: 600
      },
      {
        name: '金殺 巧粒粒',
        price: 120,
        expiryDate: 200
      }
    ],
    isReverse: true,
    sortActive: '',
    link: ''
  },
  // 請在此撰寫 JavaScript
  computed: {
    sortArray: function() {
      var vm = this;
      // var sortItem = vm.sortActive;
      // 使用 sort 排序資料
      vm.productData = this.productData.sort(function(a, b) {
        // 抓出排序資料的值
        a = a[vm.sortActive];
        b = b[vm.sortActive];
        // 條件(三元)運算式
        // return a < b ? -1 : a > b ? 1 : 0;
        // 相當於
        if(a<b) { return -1; }
        else if (a>b) { return 1; }
        else { return 0; }
      });
      if(vm.isReverse) {
        return vm.productData;
      } else {
        return vm.productData.reverse();
      }
    }
  }
});
</script>

<style>
.app {
  max-width: 1140px;
  margin: 10px auto;
}

.table th.click {
  cursor: pointer;
}

.table th.click:hover {
  color: #00ffa2;
}

.icon {
  display: inline-block;
}

.icon.inverse {
  transform: rotate(180deg)
}

.active {
  color: #28a745;
}
</style>// 比較函式會是以下形式:
function compare(a, b) {
if (在某排序標準下 a 小於 b) {
return -1;
}
if (在某排序標準下 a 大於 b) {
return 1;
}
// a 必須等於 b
return 0;
}第5節:Vue 的生命週期
實際運行範例 (實例生命週期鉤子)
了解生命週期,對於熟悉 Vue.js 有很大的幫助。
延伸介紹 – Vue 生命週期
- 觀察生命週期
- 加上 keep-alive 讓元件資料狀態不被移除
basic/v_lifecycle.html
<div id="app" class="text-center">
  <h3>Let's check out the lifecycle of this hur' child.</h3>
  <h4>Check the console!</h4>
  <button @click="toggleShow" class="btn btn-primary">
    <span v-if="isShowing">Hide child</span>
    <span v-else>Show child</span>
  </button>
  <hr>
  <keep-alive>
    <app-child v-if="isShowing"></app-child>
  </keep-alive>
</div>

<script type="text/x-template" id="childarea">
  <div>
    <h4>Hello! {{ text }}</h4>
    <input type="text" class="form-control" v-model="text">
  </div>
</script>

<script>
//*** 重要 ***///
const Child = {
  template: '#childarea',
  data: function () {
    return {
      text: 'Vue data 資料狀態'
    }
  },
  beforeCreate() {
    console.log(`beforeCreate! ${this.text}`);
  },
  created() {
    alert(`created! ${this.text}`);
  },
  beforeMount() {
    alert(`beforeMount! ${this.text}`);
  },
  mounted() {
    alert(`mounted! ${this.text}`);
  },
  updated () {
    console.log(`updated! ${this.text}`);
  },
  activated () {
    alert(`activated! ${this.text}`);
  },
  deactivated () {
    alert(`deactivated! ${this.text}`);
  },
  beforeDestroy() {
    console.log(`beforeDestroy! ${this.text}`);
  },
  destroyed() {
    console.log(`destroyed! ${this.text}`);
  }
};

new Vue({
  el: '#app',
  data() {
    return {
      isShowing: false
    }
  },
  methods: {
    toggleShow() {
      this.isShowing = !this.isShowing;
    }
  },
  components: {
    appChild: Child
  }
});
</script>
Instance Lifecycle Hooks、實例生命週期鉤子
Vue 生命週期的簡報說明
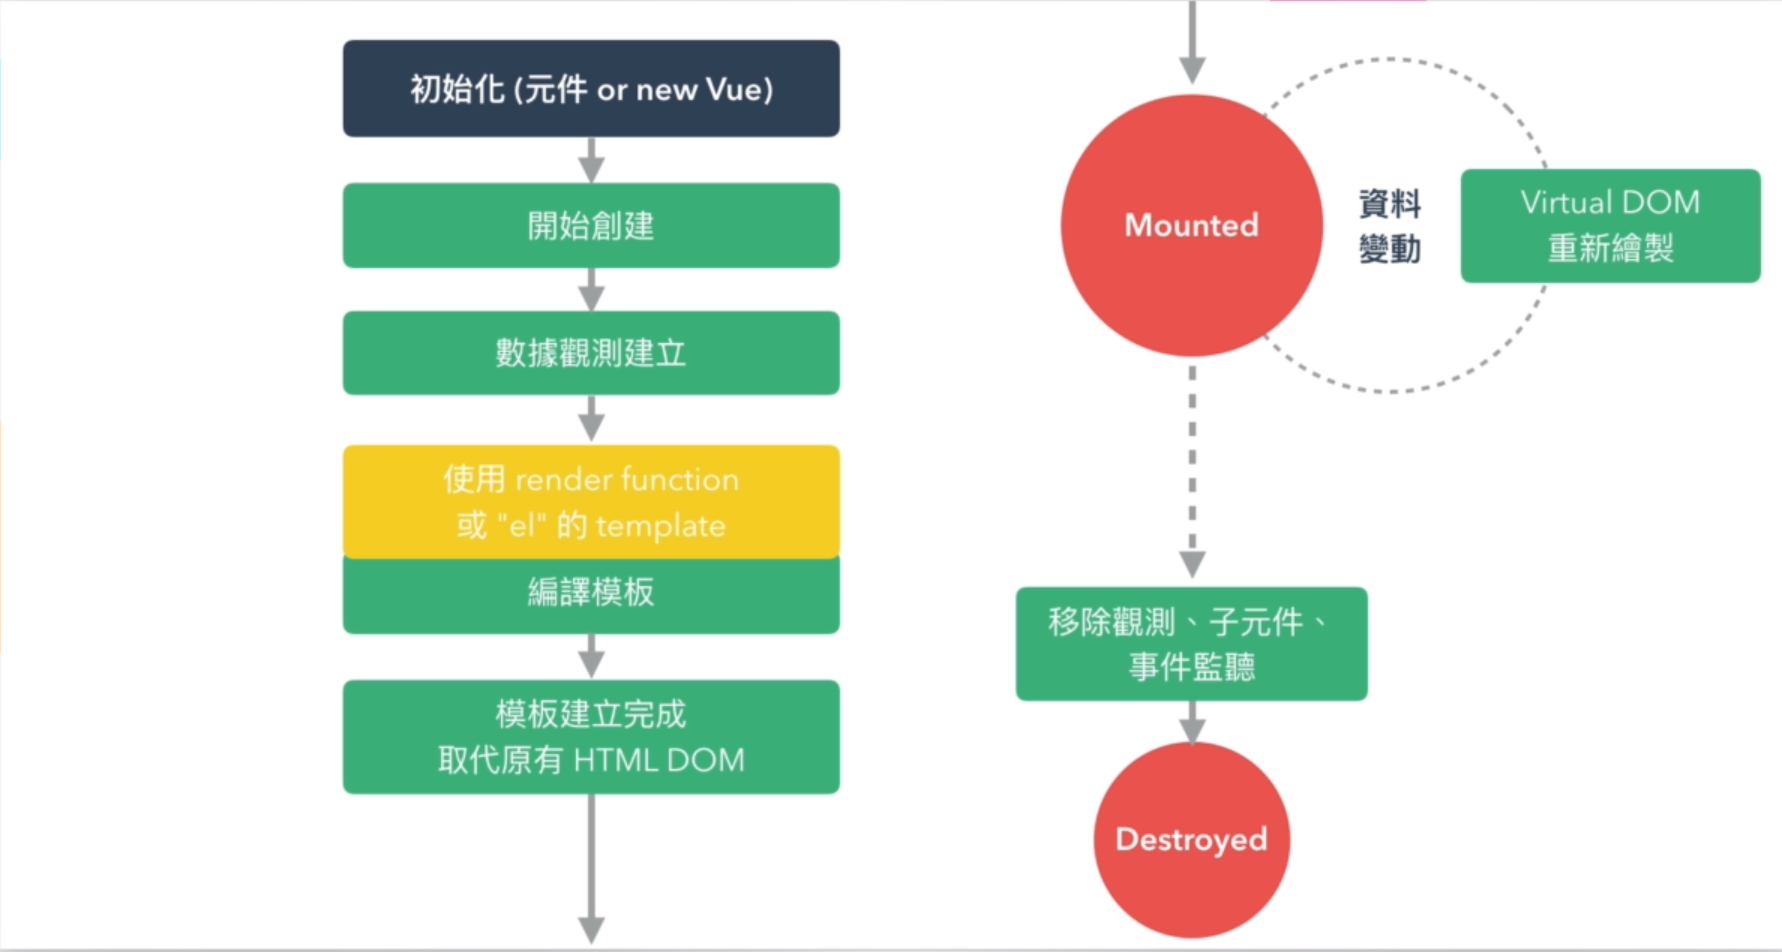
章節重點說明
- 如果要使用 AJAX 至少要到 CREATED 才能用
- 想要維持資料狀態,可以使用 <keep-alive>