
第6節:Vue.js 元件
元件概念介紹
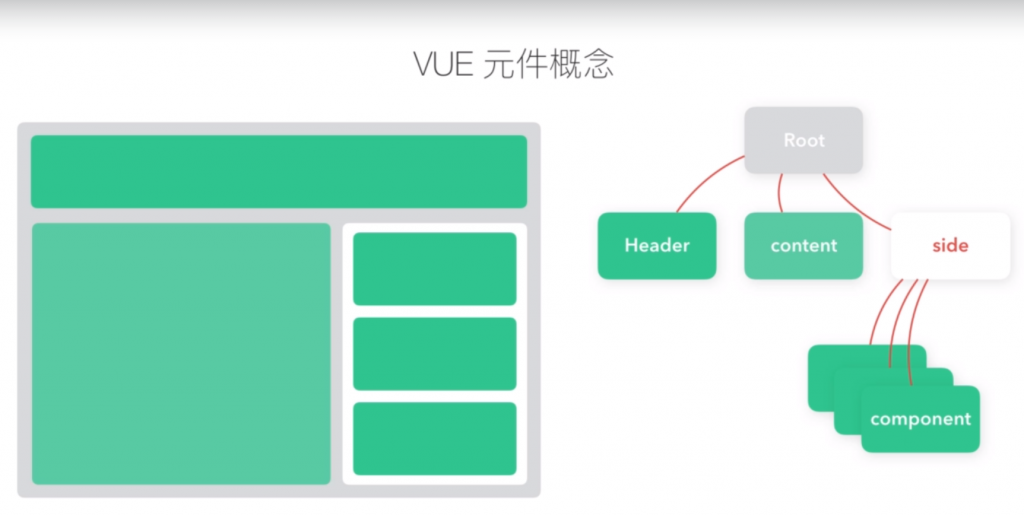
VUE 元件概念
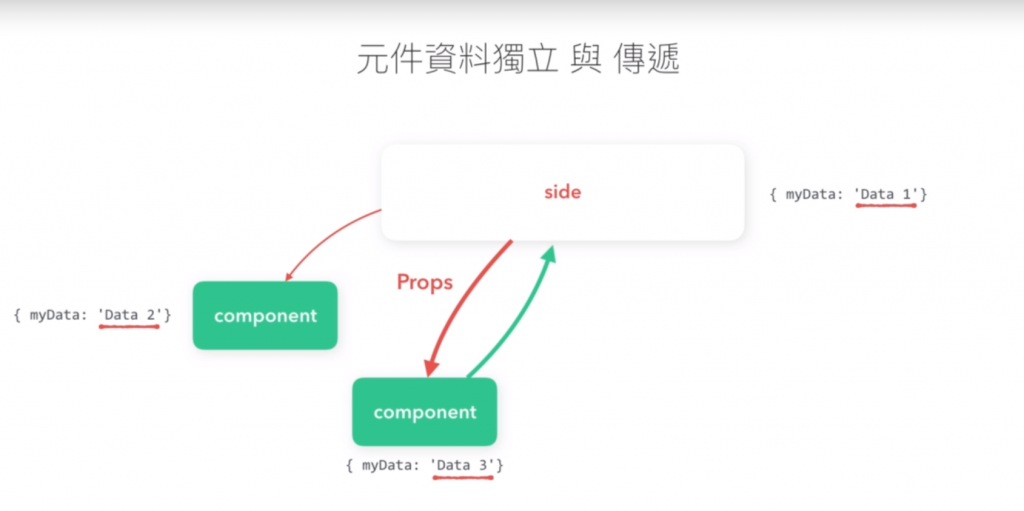
元件資料獨立 與 傳遞
SPA 也是透過元件來製作的喔
由前端所模擬的路由。
https://www.hexschool.com/#/user
// index - User Page...
使用 x-template 建立元件
基礎元件練習
- 使用 x-template 建立表格元件
- 使用 is 掛載 template
- 使用 prop 傳遞資料
- 說明局部註冊及全域註冊
components/basic.html
<div id="app">
  <table class="table">
    <thead>
    </thead>
    <tbody>
      <!-- <row-component v-for="(item, key) in data" :person="item" :key="key"></row-component> -->
      <tr is="row-component" v-for="(item, key) in data" :person="item" :key="key"></tr>
      <!-- <tr v-for="(item, key) in data" :item="item" :key="key">
        <td>{{ item.name }}</td>
        <td>{{ item.cash }}</td>
        <td>{{ item.icash }}</td>
      </tr> -->
    </tbody>
  </table>
</div>

<script type="text/x-template" id="rowComponentTemplate">
  <tr>
    <td>{{ person.name }}</td>
    <td>{{ person.cash }}</td>
    <td>{{ person.icash }}</td>
  </tr>
</script>

<script>
// 全域註冊
// Vue.component('row-component', {
//   props: ['person'],
//   template: '#rowComponentTemplate'
// })

// 局部註冊
var child = {
  props: ['person'],
  template: '#rowComponentTemplate'
}

var app = new Vue({
  el: '#app',
  data: {
    data: [
      {
        name: '小明',
        cash: 100,
        icash: 500,
      },
      {
        name: '杰倫',
        cash: 10000,
        icash: 5000,
      },
      {
        name: '漂亮阿姨',
        cash: 500,
        icash: 500,
      },
      {
        name: '老媽',
        cash: 10000,
        icash: 100,
      },
    ]
  },
  components: {
    "row-component": child
  }
});
</script>
使用 function return 建構資料格式
元件必須使用 function return
- 修正計數器所產生的錯誤
components/function_return.html
<div id="app">
  <counter-component></counter-component>
  <counter-component></counter-component>
  <counter-component></counter-component>
</div>

<script type="text/x-template" id="counter-component">
<div>
  你已經點擊 <button class="btn btn-outline-secondary btn-sm" @click="counter += 1">{{ counter }}</button> 下。
</div>
</script>

<script>
Vue.component('counter-component', {
  data: function(){
    return {
    counter: 0
    }
  },
  template: '#counter-component'
})

var app = new Vue({
  el: '#app',
});
</script>
props 基本觀念
由外到內的資料傳遞
components/prop_basic.html
<div id="app">
  <h2>靜態傳遞</h2>
  <photo img-url="https://images.unsplash.com/photo-1522204538344-922f76ecc041?ixlib=rb-0.3.5&ixid=eyJhcHBfaWQiOjEyMDd9&s=50e38600a12d623a878983fc5524423f&auto=format&fit=crop&w=1351&q=80"></photo>
  <h2>動態傳遞</h2>
  <photo :img-url="url"></photo>
</div>

<script type="text/x-template" id="photo">
<div>
  <img :src="imgUrl" class="img-fluid" alt="" />
  <p>風景照</p>
</div>
</script>

<script>
Vue.component('photo', {
  // 同學請依據課程內容,自行填寫 Props 的寫法
  props: ['imgUrl'],
  template: '#photo'
})

var app = new Vue({
  el: '#app',
  data: {
    url: 'https://images.unsplash.com/photo-1522204538344-922f76ecc041?ixlib=rb-0.3.5&ixid=eyJhcHBfaWQiOjEyMDd9&s=50e38600a12d623a878983fc5524423f&auto=format&fit=crop&w=1351&q=80'
  }
});
</script>
// props: ['imgUrl'] 是用小駝峰的寫法,但是轉到HTML上的時候,這樣是不符合規範的,必須在遇到大寫的時候改成小寫,<photo img-url="網址"></photo>,這段資料就會透過props把它傳進來。props 屬性非常重要。
props 使用上的注意事項
Props 注意事項
- 單向數據流
- 物件傳參考特性及尚未宣告的變數
- 維持狀態與生命週期
處理 props 的時候盡量維持單向數據流的觀念。
如果資料匯入有時間差,就可以用 v-if 讓元件的產生時間往後移,讓他與資料完成一起同步繪製。
JavaScript 的一個特性:物件在傳遞的時候是傳參考
// 用 Google Console 解釋物件傳參考特性
> var a = { user: '小明' }
< undefined
> var b = a;
< undefined
> b.user = "小強";
< "小強"
> console.log(a.user);
  小強
< undefined
>
components/prop_adv.html
<div id="app">
  <h2>單向數據流</h2>
  <photo :img-url="url"></photo>
  <p>修正單向數據流所造成的錯誤</p>

  <h2 class="mt-3">物件傳參考特性 及 尚未宣告的變數</h2>
  <div class="row">
    <div class="col-sm-4">
      <card :user-data="user" v-if="user.phone"></card>
    </div>
  </div>

  <h2 class="mt-3">維持狀態與生命週期</h2>
  <div class="form-check">
    <input type="checkbox" class="form-check-input" id="isShow" v-model="isShow">
    <label class="form-check-label" for="isShow">Check me out</label>
  </div>
  <div class="row">
    <div class="col-sm-4">
      <keep-alive>
        <keep-card  v-if="isShow">
        </keep-card>
      </keep-alive>
    </div>
  </div>
</div>

<script type="text/x-template" id="photo">
<div>
  <img :src="imgUrl" class="img-fluid" alt="" />
  <input type="text" class="form-control" v-model="newUrl">
</div>
</script>


<script type="text/x-template" id="card">
<div class="card">
  <img class="card-img-top" :src="user.picture.large" v-if="user.picture" alt="Card image cap">
  <div class="card-body">
    <h5 class="card-title" v-if="user.name">{{ user.name.first }} {{ user.name.last }}</h5>
    <p class="card-text">{{ user.email }}</p>
  </div>
  <div class="card-footer">
    <input type="email" class="form-control" v-model="user.email">
  </div>
</div>
</script>

<script>
Vue.component('photo', {
  props: ['imgUrl'],
  template: '#photo',
  data: function() {
    return {
      newUrl: this.imgUrl
    }
  }
})

Vue.component('card', {
  props: ['userData'],
  template: '#card',
  data: function () {
    return {
      user: this.userData
    }
  }
});

Vue.component('keepCard', {
  template: '#card',
  data: function() {
    return {
      user: {}
    }
  },
  created: function() {
    var vm = this;
    $.ajax({
      url: 'https://randomuser.me/api/',
      dataType: 'json',
      success: function(data) {
        vm.user = data.results[0];
      }
    });
  }
});

var app = new Vue({
  el: '#app',
  data: {
    user: {},
    url: 'https://images.unsplash.com/photo-1522204538344-922f76ecc041?ixlib=rb-0.3.5&ixid=eyJhcHBfaWQiOjEyMDd9&s=50e38600a12d623a878983fc5524423f&auto=format&fit=crop&w=1351&q=80',
    isShow: true
  },
  created: function() {
    var vm = this;
    $.ajax({
      url: 'https://randomuser.me/api/',
      dataType: 'json',
      success: function(data) {
        vm.user = data.results[0];
      }
    });
  }
});
</script>
props 型別及預設值
這個型別的定義有助於開發的時候就找到錯誤。
靜態與動態傳入數值差異
- 靜態:string
- 動態:number
components/prop_type.html
<div id="app">
  <h2>Props 的型別</h2>
  <prop-type></prop-type>

  <h2 class="mt-3">靜態與動態傳入數值差異</h2>
  <prop-type :cash="300"></prop-type>
</div>

<script type="text/x-template" id="propType">
<div>
  <input type="number" class="form-control" v-model="newCash">
  {{ typeof(cash)}}
</div>
</script>

<script>
Vue.component('prop-type', {
  // props: ['cash'],
  props: {
    cash: {
      type: Number,
      default: 300
    }
  },

  // 解答:
  // props: {
  //   cash: {
  //     type: Number,
  //     default: 100
  //   }
  // },
  template: '#propType',
  data: function() {
    return {
      newCash: this.cash
    }
  }
});

var app = new Vue({
  el: '#app',
  data: {
    cash: 300
  }
});
</script>
emit 向外層傳遞事件
components/emit.html
<div id="app">
  <h2>透過 emit 向外傳遞資訊</h2>
  我透過元件儲值了 {{ cash }} 元
  <button class="btn btn-primary" v-on:click="incrementTotal">按我</button>
  <button-counter v-on:increment="incrementTotal"></button-counter>
  <hr>
  <button-counter></button-counter>
</div>

<script>
Vue.component('buttonCounter', {
  template: `<div>
    <button @click="incrementCounter" class="btn btn-outline-primary">增加 {{ counter }} 元</button>
    <input type="number" class="form-control mt-2" v-model="counter">
  </div>`,
  data: function() {
    return {
      counter: 1
    }
  },
  methods: {
    incrementCounter: function() {
      this.$emit('increment', Number(this.counter))
    }
  }
});

var app = new Vue({
  el: '#app',
  data: {
    cash: 300
  },
  methods: {
    incrementTotal: function(newNumber) {
      this.cash = this.cash + newNumber;
    }
  }
});
</script>
觸發事件名稱可以自訂。
emit 可以用來觸發實體上的事件。
此章節比較複雜,建議自行重頭寫一次,比較容易了解這段的邏輯。
元件插槽
Slot 插槽替換
- 沒有插槽可替換的狀態
- 單一個插槽的元件
- 具名插槽的元件
components/slot.html
<div id="app">
  <h2>沒有插槽可替換的狀態</h2>
  <no-slot-component>
    <p>這是一段另外插入的內容</p>
  </no-slot-component>

  <h2>Slot 基礎範例</h2>
  <single-slot-component>
  </single-slot-component>
  <single-slot-component>
    <p>使用這段取代原本的 Slot。</p>
  </single-slot-component>

  <h2>具名插槽</h2>
  <named-slot-component>
  </named-slot-component>

  <named-slot-component>
    <header slot="header">替換的 Header</header>
    <template>替換的 Footer</template>
    <template slot="btn">按鈕內容</template>
    <p>其餘的內容</p>
  </named-slot-component>
</div>

<script type="text/x-template" id="noSlotComponent">
<div class="alert alert-warning">
  <h6>我是一個元件</h6>
  <p>
    這沒有插槽。
  </p>
</div>
</script>

<script type="text/x-template" id="singleSlotComponent">
<div class="alert alert-warning">
  <h6>我是一個元件</h6>
  <slot>
    如果沒有內容,則會顯示此段落。
  </slot>
</div>
</script>

<script type="text/x-template" id="namedSlotComponent">
<div class="card my-3">
  <div class="card-header">
    <slot name="header">這段是預設的文字</slot>
  </div>
  <div class="card-body">
    <slot>
      <h5 class="card-title">Special title treatment</h5>
      <p class="card-text">With supporting text below as a natural lead-in to additional content.</p>
    </slot>
    <a href="#" class="btn btn-primary">
      <slot name="btn">spanGo somewhere</slot>
    </a>
  </div>
  <div class="card-footer">
    <div>這是預設的 Footer</div>
  </div>
</div>
</script>

<script>
Vue.component('no-slot-component', {
  template: '#noSlotComponent',
});

Vue.component('single-slot-component', {
  template: '#singleSlotComponent',
});

Vue.component('named-slot-component', {
  template: '#namedSlotComponent',
});

var app = new Vue({
  el: '#app',
  data: {}
});
</script>
使用 is 動態切換元件
components/is.html
<div id="app">
  <h2>使用 is 顯示單一組件</h2>
  <primary-component :data="item"></primary-component>
  <div is="primary-component" :data="item"></div>

  <h2 class="mt-3">使用 is 動態切換組件</h2>
  <ul class="nav nav-pills">
    <li class="nav-item">
      <a class="nav-link" :class="{'active': current == 'primary-component'}" href="#" @click.prevent="current = 'primary-component'">藍綠色元件</a>
    </li>
    <li class="nav-item">
      <a class="nav-link" :class="{'active': current == 'danger-component'}" href="#" @click.prevent="current = 'danger-component'">紅色元件</a>
    </li>
  </ul>
  <div class="mt-3">
    <!-- <primary-component :data="item" v-if="current === 'primary-component'"></primary-component>
    <danger-component :data="item" v-if="current === 'danger-component'"></danger-component> -->
    <div :is="current" :data="item"></div>
  </div>
</div>

<script type="text/x-template" id="primaryComponent">
<div class="card text-white bg-primary mb-3" style="max-width: 18rem;">
  <div class="card-header">{{ data.header }}</div>
  <div class="card-body">
    <h5 class="card-title">{{ data.title }}</h5>
    <p class="card-text">{{ data.text }}</p>
  </div>
</div>
</script>
<script type="text/x-template" id="dangerComponent">
<div class="card text-white bg-danger mb-3" style="max-width: 18rem;">
  <div class="card-header">{{ data.header }}</div>
  <div class="card-body">
    <h5 class="card-title">{{ data.title }}</h5>
    <p class="card-text">{{ data.text }}</p>
  </div>
</div>
</script>

<script>
Vue.component('primary-component', {
  props: ['data'],
  template: '#primaryComponent',
});
Vue.component('danger-component', {
  props: ['data'],
  template: '#dangerComponent',
});

var app = new Vue({
  el: '#app',
  data: {
    item: {
      header: '這裡是 header',
      title: '這裡是 title',
      text: 'Lorem ipsum dolor sit amet consectetur adipisicing elit. Enim perferendis illo reprehenderit ex natus earum explicabo modi voluptas cupiditate aperiam, quasi quisquam mollitia velit ut odio vitae atque incidunt minus?'
    },
    current: 'primary-component'
  }
});
</script>
元件 章節作業說明
作業練習:元件變換
模板練習作業:Ajax 資料內容呈現
本作業一定要用到元件。
提示:
- 將資料內容透過 “元件” 呈現
- 製作城市過濾選項
- 將內層資料透過 emit 傳遞到外層 (作為另一個關注城市的呈現)
- 依據不同汙染呈現不同色彩
- 加分題:透過 localStorage 儲存上次關注的城市
元件作業程式碼參考:Codepen – Alysa Chan、Codepen – jasmjazz
元件作業筆記參考:各地空氣質素監察
components/homework_component.html
<div id="app" class="container-fluid">
  <select name="" id="" class="form-control mb-3" v-model="filter">
    <option value="" disabled>--- 請選擇城市 ---</option>
    <option v-for="item in countyList" :value="item">{{ item }}</option>
  </select>
  <h4>關注城市</h4>
  <div class="row">
    <card-component
    v-for="(item, key) in starCounty"
    :star="starList"
    :place="item"
    :key="item.SiteId"
    @change-icon="clickStar">
    </card-component>
  </div>
  <hr>
  <h4>所有測站</h4>
  <div class="row">
    <card-component
    v-for="(item, key) in filterCounty"
    :star="starList"
    :place="item"
    :key="item.SiteId"
    @change-icon="clickStar">
    </card-component>
  </div>
</div>

<script type="text/x-template" id="cardComponentTemplate">
  <div class="col-md-4 mt-3">
    <div class="card">
      <div class="card-header">
        {{ place.County }} - {{ place.SiteName }}
        <a href="#" class="float-right" @click.prevent="clickIcon">
          <i :class="iconStyle"></i>
        </a>
      </div>
      <div class="card-body" :class="aqiColor">
        <ul class="list-unstyled">
          <li>AQI 指數:{{ place.AQI }}</li>
          <li>PM2.5:{{ place['PM2.5'] }}</li>
          <li>說明:{{ place.Status }}</li>
        </ul>
        {{ place.PublishTime }}
      </div>
    </div>
  </div>
</script>

<script>
Vue.component('card-component', {
  props: ['place', 'star'],
  template: '#cardComponentTemplate',
  methods: {
    clickIcon: function() {
      this.$emit('change-icon', this.place.SiteName);
    }
  },
  computed: {
    aqiColor() {
      switch(this.place.Status){
        case '良好':
          return 'status-aqi1';
          break;
        case '普通':
          return 'status-aqi2';
          break;
        case '對敏感族群不健康':
          return 'status-aqi3';
          break;
        case '對所有族群不健康':
          return 'status-aqi4';
          break;
        case '非常不健康':
          return 'status-aqi5';
          break;
        case '危害':
          return 'status-aqi6';
          break;
      }
    },
    iconStyle() {
      return (this.star.indexOf(this.place.SiteName) === -1) ? 'far fa-star' : 'fas fa-star';
    }
  }
});
// API 來源
// https://opendata.epa.gov.tw/Data/Contents/AQI/
// http://opendata2.epa.gov.tw/AQI.json
// https://opendata.epa.gov.tw/api/v1/AQI?%24skip=0&%24top=1000&%24format=json

var app = new Vue({
  el: '#app',
  data: {
    aqiData: [],
    filter: '',
    starList: JSON.parse(localStorage.getItem('starList')) || []
  },
  // 請在此撰寫 JavaScript
  methods: {
    clickStar: function(item) {
      // 判斷是否有重複的site name,如沒有就加入,如有就刪除該筆城市資料
      if(this.starList.indexOf(item) === -1) {
        this.starList.push(item);
      } else {
        this.starList.splice(this.starList.indexOf(item, 1));
      }
      localStorage.setItem('starList', JSON.stringify(this.starList));
    }
  },
  computed: {
    countyList() {
      let county = this.aqiData.map(item => item.County);
      // Set 物件只會容許儲存單一值
      // 用展開運算子,把Set物件轉為陣列
      // return new Set([...county]);
      return [...new Set(county)]; // 過濾重複的county
    },
    filterCounty() {
      let vm = this;
      // 剛載入畫面後,預設顯示所有資料
      if(this.filter === '') {
        // 不顯示已被加進關注城市的城市
        return this.aqiData.filter(item => vm.starList.indexOf(item.SiteName) === -1);
        // 案filter的地區名稱去撈資料
      } else {
        let filterList = this.aqiData.filter(item => item.County === vm.filter);
        // 不顯示已被加進關注城市的城市
        return filterList.filter(item => vm.starList.indexOf(item.SiteName) === -1);
      }
    },
    starCounty() {
      let vm = this;
      // 如果該筆資料的SiteName是存在starList裡,就回傳該筆資料
      return vm.aqiData.filter(item => vm.starList.indexOf(item.SiteName) !== -1);
    }
  },
  mounted: function() {
      const vm = this;
      const api = 'https://opendata.epa.gov.tw/api/v1/AQI?%24skip=0&%24top=1000&%24format=json';

      // 使用 jQuery ajax
      $.get(api).then(function(response) {
        vm.aqiData = response;
        console.log(response);
      }).catch(function(error) {
        // 請求失敗
        alert("請求失敗");
        console.log(error);
      });
  }
});
</script>
<!--
狀態對應表
'status-aqi1' '良好',
'status-aqi2' '普通',
'status-aqi3' '對敏感族群不健康',
'status-aqi4' '對所有族群不健康',
'status-aqi5' '非常不健康',
'status-aqi6' '危害'
-->
<style>
.status-aqi1 {
  background-color: #97d077;
}
.status-aqi2 {
  background-color: #ffff00;
}
.status-aqi3 {
  background-color: #ff7e00;
}
.status-aqi4 {
  background-color: #ff0000;
}
.status-aqi5 {
  background-color: #8f3f97;
}
.status-aqi6 {
  background-color: #7e0023;
}
</style>
第7節:JavaScript ES6
使用 let 與 const 宣告變數
let, const ES6 基礎教學
es6/let_const.html
// #1
// 修改 var → let
// console.log(mom);
// var mom = '老媽';
// (function () { // 立即函式
//   console.log(mom);
// })();

// undefined 記憶體準備位置
// not defined 沒有準備空間
// var 有hoisting的特性

// #2
// 修改 var → let
// var 作用域 是 function scope
// let 作用域 是 block
// function varMing () {
//   let ming = '小明';
//   if (true) {
//     let ming = '杰哥';
//     // 這裡的 ming 依然是外層的小明,所以小明即將被取代
//   }
//   console.log(ming); // '杰哥'
//   }
//   varMing();

// #3
// 修改 var → let
// for (let i = 0; i < 10; i++) { // var i = 全域
//   console.log(i);
//   setTimeout(function) () {
//     console.log('這執行第' + i + '次');
//   }, 10);
// }

// #4
// const
// const 是一個宣告常數,這個常數是不能被更換的
// 使用 const 宣告一個變數後,是不能被更改的
// const ming = '鐵錚錚男子漢';
// ming = '不是男子漢';

// #5
// const 與 物件
// const family = {
//   mom: '老媽',
//   me: '小明',
//   sister: '小橙'
// };
// family.father = '爸爸';
// console.log(family);
// family = {};
// 物件,本身是傳參考

// #6
// 額外問題,不使用 let、上述答案如何解答
for (var i = 0; i < 10; i++) {
  console.log(i);
  (function(i) {
    setTimeout(function () {
    console.log('這執行第' + i + '次');
  }, 10);
  })(i);
}
展開與其餘參數
es6/spread_operator.html
// #1 使用展開語法,合併以下陣列
// let groupA = ['小明', '杰倫', '阿姨'];
// let groupB = ['老媽', '老爸'];
// 方法一
// let groupAll = groupA.concat(groupB);
//方法二
// let groupAll = [...groupA, ...groupB];
// console.log(groupAll);
// console.log(...groupA);
// console.log(...groupB);

// #2 淺複製觀念說明 (shallow copy)
// 陣列與物件都是傳參考,當兩個的參考是一樣的時候,裡面的值會同時變動
// let groupA = ['小明', '杰倫', '阿姨'];
// let groupB = groupA;
// groupB.push('阿明');
// console.log(groupA); // 請問此時的 groupA 值為何

// 為了A與B明顯不同,可以使用展開的方法
// let groupA = ['小明', '杰倫', '阿姨'];
// let groupB = [...groupA];
// groupB.push('阿明');
// console.log(groupA); // 請問此時的 groupA 值為何

// #3 類陣列觀念說明一
// 很像陣列,但其實不是
// 類陣列 __proto__ 方法很少,陣列方法比較多
// let doms = document.querySelectorAll('li');
// let newDoms = [...doms];
// console.log(newDoms, doms);

// #4 類陣列觀念說明二
// 使用展開的方式來解決類陣列產生的錯誤
// var originCash = 1000;
// function updateEasyCard() {
//   // let arg = arguments;
//   let arg = [...arguments];
//   // console.log(arguments);
//   console.log(arg);
//   let sum = arg.reduce(function (accumulator, currentValue) {
//     return accumulator + currentValue;
//    }, 0);
//    console.log('我有 ' + sum + ' 元');
// }
// updateEasyCard(0); // 我有 1000 元
// updateEasyCard(10, 50, 100, 50, 5, 1, 1, 1, 500); // 我有 718 元

// #5 其餘參數
// function moreMoney(ming, ...money) {
//   console.log(ming, money);
// }
// moreMoney('小明', 100, 200, 300, 400, 500);
解構
解構賦值
將右方的資料鏡射到另一方。
(不是完全的鏡射、左右顛倒,排列順序不會因此而改變)
// #1 陣列解構
// 1. 請將 family 的值,一一賦予到變數上
// 2. 請將後面三個名字賦予到另一個陣列上
// let family = ['小明', '杰倫', '阿姨', '老媽', '老爸'];
// let ming = family[0];
// let jay = family[1];
// let auntie = family[2];

// 01
// let [ming, jay, auntie, mom, father] = family;
// console.log(ming, jay, auntie, mom, father);
// 02
// let [ming, jay, auntie] = family;
// console.log(ming, jay, auntie);
// 03
// let [ming, jay, , mom, father] = family;
// console.log(ming, jay, mom, father);

// #2 請交換以下兩個變數
// let Goku = '悟空';
// let Ginyu = '基紐';
// [Goku, Ginyu] = [Ginyu, Goku];
// console.log(Goku, Ginyu);

// #3 請拆解以下字元到單一變數上
// let str = '基紐特攻隊';
// let [q, a, z, w, s] = str;
// console.log(q, a, z, w, s);

// #4 物件解構
// 請取出物件內的兩個值到單一變數上
// let family = {
//   ming: '小明',
//   jay: '杰倫',
// };
// let familyAll = {...family};
// console.log(familyAll);

// #5
// 取出其中一個值,並附在新的變數名稱上
// let GinyuTeam = {
//   Ginyu: '基紐',
//   Jeice: '吉斯',
//   Burter: '巴特',
//   //...
// }
// let { Ginyu: Goku } = GinyuTeam;
// console.log(Goku);

// #6 延伸問題
// let { ming: Goku, family: [, mom] } = { ming: '小明', family: ['阿姨', '老媽', '老爸'] }
// console.log(Goku, mom); // 請問答案是什麼?
// 小明, 老媽

// #7 預設值
// let [ming = '小明', jay = '杰倫'] = ['阿明']
// // 第一個會被賦值,第二個會用預設
// // ming: '阿明'
// // jay: '杰倫'
// console.log(ming, jay);

// let { family: ming = '小明' } = {}
// // ming: '小明'
// console.log(ming);
縮寫
es6/shorthand.html
// #1 物件縮寫
// 請將以下兩個合併至一個物件上
// const Frieza = '弗利沙'
// const GinyuTeam = {
//   Ginyu: '基紐',
//   Jeice: '吉斯',
//   burter: '巴特',
//   // ...
// }
// 物件合併至一個物件上
// const newTeam = {
//   GinyuTeam: GinyuTeam,
//   Frieza: Frieza
// }
// console.log(newTeam);
// 縮寫
// const newTeam = {
//   GinyuTeam,
//   Frieza
// }
// console.log(newTeam);

// #2 案例
// 在 Vue.js CLI 常見情境
// import Vue from 'vue'
// import App from './App'
// import router from './router'
// // 將套件由 './App' 路徑載入,並使用 App 這個變數名稱
// new Vue({
//   el: '#app',
//   router,
//   template: '<App/>',
//   components: { App }
// });
// // 縮寫方式載入及使用

// #3 物件函式縮寫
// 縮寫以下 showPosture Function
// const newTeam = {
//   // ...
//   showPosture: function () {
//     console.log('我們是 基紐特戰隊')
//   }
// }
// console.log(newTeam.showPosture());
// 縮寫
// 與箭頭函式結果是不一致
// const newTeam = {
//   // ...
//   showPosture () {
//     console.log('我們是 基紐特戰隊');
//   }
// }
// console.log(newTeam.showPosture());

// #4 搭配解構使用
// 將以下物件指向賦予到另一個物件上,並且避免參考
// const GinyuTeam = {
//   Ginyu: {
//     name: '基紐'
//   },
//   Jeice: {
//     name: '吉斯'
//   },
//   burter: {
//     name: '巴特'
//   },
//   // ...
// }
// const newTeam = GinyuTeam;
// newTeam.ming = '小明';
// console.log(newTeam, GinyuTeam);
// 縮寫
// const newTeam = {
//   ...GinyuTeam
// };
// newTeam.ming = '小明';
// console.log(newTeam, GinyuTeam);
箭頭函式與傳統函式
es6/arrow_function.html
// #1 改寫傳統函式
// 將以下改寫成 Arrow Function,並嘗試縮寫形式
// var callSomeone = function (someone) {
//   return someone + '吃飯了'
// }
// console.log(callSomeone('小明'))
// 最常使用的箭頭函式
// var callSomeone = (someone) => {
//   return someone + '吃飯了'
// }
// console.log(callSomeone('小明'));
// 只有一行的情況下,可以省略括號,並且也把return拿掉,括號也可以省略
// var callSomeone = someone => someone + '吃飯了';
// console.log(callSomeone('小明'));
// 沒有傳入參數的情況下,需要括號
// var callSomeone = () => '小明' + '吃飯了';
// console.log(callSomeone());

// #2 沒有 arguments 參數
// 將以下改寫成 Arrow Function,並觀察差異
// const updateEasyCard = function () {
//   let cash = 0;
//   console.log(arguments); // arguments is not defined
// }
// updateEasyCard(10, 50, 100, 50, 5, 1, 1, 1, 500);
// 箭頭縮寫
// 其餘參數
// const updateEasyCard = (...arg) => {
//   let cash = 0;
//   console.log(arg); // arguments is not defined
// }
// updateEasyCard(10, 50, 100, 50, 5, 1, 1, 1, 500);

// #3 this 綁定的差異
// var name = '全域阿婆'
// var auntie = {
//   name: '漂亮阿姨',
//   callName: function () {
//     console.log('1', this.name, this); // 1 漂亮阿姨
//     setTimeout(function () {
//       console.log('2', this.name); // 2 漂亮阿姨
//       console.log('3', this); // 3 auntie 這個物件
//     }, 10);
//   },
//   callName2: () => {
//     console.log('1 arrow', this.name, this); // 1 漂亮阿姨
//     setTimeout(() => {
//       console.log('2 arrow', this.name); // 2 漂亮阿姨
//       console.log('3 arrow', this); // 3 auntie 這個物件
//     }, 10);
//   },
// }
// auntie.callName();
// auntie.callName2();
// setTimeout = window.setTimeout
// 傳統this = 函式的呼叫方式
// 物件內使用arrow function指向的可能是全域
// 並不一定綁定在window上,可能會綁定在其他物件上
// 原因就是因為他是綁定在他定義時的物件上
// 特別注意的是,不是所有的情境都適合arrow function
// 舉例
// 建議在Vue的methods裡面,使用的是傳統函式,並且使用縮寫的方式呈現
// var name = '全域阿婆'
// var auntie = {
//   name: '漂亮阿姨',
//   callName () {
//     console.log('1', this.name, this);
//     window.setTimeout(function () {
//       console.log('2', this.name);
//       console.log('3', this);
//     }, 10);
//   },
// }
// auntie.callName();

// #4 善用的方式
// 請將內層的 console.log 能夠指向 auntie 這個物件
// var auntie = {
//   name: '漂亮阿姨',
//   callName () {
//     var vm = this;
//     setTimeout(() => {
//       console.log(vm, vm.name);
//     }, 10);
//   }
// }
// auntie.callName();
字串模板 Template String
es6/template_string.html
<div id="app"></div>
<script>
// #1 樣板字串
// 將以下改寫成 Template String 寫法
const people = [
  {
    name: '小明',
    friends: 2
  },
  {
    name: '阿姨',
    friends: 999
  },
  {
    name: '杰倫',
    friends: 0
  }
]
let originString = '我叫做 ' + people[0].name;
let originUl = '<ul>\
  <li>我叫做 ' + people[0].name + '</li>\
  <li>我叫做 ' + people[1].name + '</li>\
  <li>我叫做 ' + people[2].name + '</li>\
</ul>';

console.log(originString, originUl);

let newString = `我叫做 ${people[0].name}`
let newUl = `
  <ul>
    <li>我叫做 ${people[0].name}</li>
    <li>我叫做 ${people[1].name}</li>
    <li>我叫做 ${people[2].name}</li>
  </ul>
`
newUl = `
  <ul>
    ${people.map(person => `<li>我叫做 ${person.name}</li>`).join('')}
  </ul>
`

console.log(newString, newUl);
$('#app').html(newUl);
</script>
常用陣列方法 (上)
es6/array_function.html
// #1 樣板字串
// 將以下改寫成 Template String 寫法
const people = [
  {
    name: '小明',
    money: 500
  },
  {
    name: '漂亮阿姨',
    money: 3000
  },
  {
    name: '杰倫',
    money: 60000
  },
  {
    name: '老媽',
    money: Infinity
  }
];

// forEach 與 map
// 將所有物件增加 icash 有多少金額的欄位
// 使用for迴圈
// for (let i = 0; i < people.length; i++) {
//   console.log(people[i]);
// }
// 使用forEach
// people.forEach(function(item, index, array) {
//   console.log(item, index, array);
// })
// 增加金額500
// people.forEach(function(item, index, array) {
//   item.icash = item.money + 500;
//   console.log(item);
// })
// map
// const newpeople = people.map(function(item, index, array){
//   // item.icash = item.money + 500;
//   // console.log(item);
//   return {
//     ...item,
//     icash: item.money + 500
//   }
// });
// console.log(newpeople);
// 不適合用map來過濾
// const newpeople = people.map(function (item, index, array) {
//   // item.icash = item.money + 500;
//   // console.log(item);
//   if (item.money > 2000) {
//     return {
//       ...item,
//       icash: item.money + 500
//     }
//   }
// });
// console.log(newpeople);

// filter
// 挑出金額少於 5000 的物件
// true
// const filterPeople = people.filter(function(item, index) {
//   return true;
// })
// console.log(filterPeople);
// false
// const filterPeople = people.filter(function(item, index) {
//   return false;
// })
// console.log(filterPeople);
// filter過濾方法
// const filterPeople = people.filter(function(item, index) {
//   if (item.money < 5000) {
//     return true;
//   }
// })
// console.log(filterPeople);

// find
// 1. 找到金額 = 500 的物件
// 2. 找到 > 5000 的物件
// find只會把找到的資料只回傳一次,會回傳本身的值
// filter是把所有的資料都回傳,本身回傳的結果是陣列
// const findPeople = people.find(function(item, index) {
//   if (item.money == 500) {
//     return true;
//   }
// })
// console.log(findPeople);
常用陣列方法 (下)
es6/array_function.html
// every
// every、some是用來取得一個true、false的結果
// every - 所有結果都為 true, return 才會是 true
// 1. 所有物件是否都超過 10000 元
// 2. 是否所有物件超過 300 元
// const ans = people.every(function(item, i) {
//   return item.money > 300;
// });
// console.log(ans);

// some
// 1. 是否有物件超過 10000 元
// 2. 是否有物件持有金額少於 300元
// some - 部分為 true, return 是 true
// const ans = people.some(function (item, i) {
//   return item.money > 10000;
// });
// console.log(ans);

// reduce
// 去除掉老媽,請問剩下的人有多少錢?
// 01
// const newNumber = people.reduce(function(prev, item, index){
//   console.log(prev);
//   return prev + 500
// }, 100)
// 02
// const newNumber = people.reduce(function(prev, item, index){
//   console.log(prev);
//   return prev + item.money
// }, 0)
// console.log(newNumber);
// 03 比大小
// 物件順序做調整
const newNumber = people.reduce(function(prev, item, index){
  console.log(prev);
  return Math.max(prev, item.money)
}, 0)
console.log('newNumber', newNumber);
第8節:Vue 常用 API
使用 Extend 避免重複造輪子
情境:假設有兩個元件、或是數個元件差異非常小,只有少部分不同的話,該怎麼去處理,我們該怎麼樣把重複的地方先抓取出來,在套用的時候更為快速。
extends,雖然有加s,但我們只能用一個。
api/extend.html
<div id="app">
  <table class="table">
    <tbody>
      <tr is="row-component-one" v-for="(item, key) in data"
        v-if="key % 2"
        :item="item" :key="key"></tr>
      <tr is="row-component-two" v-for="(item, key) in data"
        v-if="(key - 1) % 2"
        :item="item" :key="key"></tr>
    </tbody>
  </table>
</div>

<script type="text/x-template" id="row-component">
  <tr>
    <td>{{ item.name }}</td>
    <td>{{ item.cash | currency | dollarSign }}</td>
    <td>{{ item.icash | currency | dollarSign }}</td>
  </tr>
</script>

<script type="text/x-template" id="row-component-two">
  <tr class="bg-primary text-white">
    <td>{{ item.name }}</td>
    <td>{{ item.cash | currency | dollarSign }}</td>
    <td>{{ item.icash | currency | dollarSign }}</td>
  </tr>
</script>

<script>
// extend 是基礎建構的概念
var newExtend = Vue.extend({
  data: function() {
    return {
      data: {},
      extendData: '這段文字是 extend 得到'
    }
  },
  template: '#row-component',
  filters: {
    dollarSign: function (n) {
      return `$ ${n}`
    },
    currency: function(n) {
      return n.toFixed(2).replace(/./g, function(c, i, a) {
          return i && c !== "." && ((a.length - i) % 3 === 0) ? ',' + c : c;
      });
    }
  },
  mounted: function() {
    console.log('Extend:', this)
  }
})

var childOne = {
  props: ['item'],
  extends: newExtend,
  // data: function() {
  //   return {
  //     data: {},
  //     extendData: '這段文字是 extend 得到'
  //   }
  // },
  // template: '#row-component',
  // filters: {
  //   dollarSign: function (n) {
  //     return `$ ${n}`
  //   },
  //   currency: function(n) {
  //     return n.toFixed(2).replace(/./g, function(c, i, a) {
  //         return i && c !== "." && ((a.length - i) % 3 === 0) ? ',' + c : c;
  //     });
  //   }
  // },
  // mounted: function() {
  //   console.log('Extend:', this)
  // }
}

var childTwo = {
  props: ['item'],
  data: function() {
    return {childTwo: '元件 2', extendData: '這段文字是 元件 得到'}
  },
  // 刪掉
  // data: function() {
  //   return {
  //     data: {},
  //     extendData: '這段文字是 extend 得到'
  //   }
  // },
  template: '#row-component-two',
  extends: newExtend,
  mounted: function() {
    console.log('childTwo');
  }
  // 刪掉
  // filters: {
  //   dollarSign: function (n) {
  //     return `$ ${n}`
  //   },
  //   currency: function(n) {
  //     return n.toFixed(2).replace(/./g, function(c, i, a) {
  //         return i && c !== "." && ((a.length - i) % 3 === 0) ? ',' + c : c;
  //     });
  //   }
  // },
  // mounted: function() {
  //   console.log('Extend:', this)
  // }
}

var app = new Vue({
  el: '#app',
  data: {
    data: [
      {
        name: '小明',
        cash: 100,
        icash: 500,
      },
      {
        name: '杰倫',
        cash: 10000,
        icash: 5000,
      },
      {
        name: '漂亮阿姨',
        cash: 500,
        icash: 500,
      },
      {
        name: '老媽',
        cash: 10000,
        icash: 100,
      },
    ]
  },
  components: {
    "row-component-one": childOne,
    "row-component-two": childTwo,
  },
  mounted: function() {
    console.log('Vue init:', this)
  }
});
</script>
Filter 自訂畫面資料呈現格式
Google 搜尋 javascript currency format 查詢貨幣轉換的格式。
api/filter.html
<div id="app">
  <table class="table">
    <tbody>
      <tr is="row-component" v-for="(item, key) in data" :item="item" :key="key"></tr>
    </tbody>
  </table>
  {{ data[1].cash | currency | dollarSign }}
</div>

<script type="text/x-template" id="row-component">
  <tr>
    <td>{{ item.name }}</td>
    <td>{{ item.cash | currency | dollarSign }}</td>
    <td>{{ item.icash | currency | dollarSign }}</td>
  </tr>
</script>

<script>
Vue.filter('dollarSign' , function(n) {
  return `$ ${n}`
})
Vue.filter('currency' , function(n) {
  return n.toFixed(2).replace(/./g, function(c, i, a) {
    return i > 0 && c !== "." && (a.length - i) % 3 === 0 ? "," + c : c;
  });
})


var child = {
  props: ['item'],
  template: '#row-component',
  data: function() {
    return {
      data: {}
    }
  },
  // filters: {
  //   dollarSign: function(n) {
  //     return `$ ${n}`
  //   },
  //   currency: function(n) {
  //     return n.toFixed(2).replace(/./g, function(c, i, a) {
  //       return i > 0 && c !== "." && (a.length - i) % 3 === 0 ? "," + c : c;
  //     });
  //   }
  // },
  mounted: function() {
    console.log('Component:', this)
  }
}

var app = new Vue({
  el: '#app',
  data: {
    data: [
      {
        name: '小明',
        cash: 100,
        icash: 500,
      },
      {
        name: '杰倫',
        cash: 10000,
        icash: 5000,
      },
      {
        name: '漂亮阿姨',
        cash: 500,
        icash: 500,
      },
      {
        name: '老媽',
        cash: 10000,
        icash: 100,
      },
    ]
  },
  components: {
    "row-component": child
  },
  mounted: function() {
    console.log('Vue init:', this)
  }
});
</script>
無法寫入的資料,用 set 搞定他
api/vue_set.html
<div id="app">
  <table class="table">
    <tbody>
      <tr is="row-component" v-for="(item, key) in data" :item="item" :key="key"></tr>
    </tbody>
  </table>
</div>

<script type="text/x-template" id="row-component">
  <tr>
    <td>{{ item.name }}</td>
    <td>{{ item.cash }}</td>
    <td>{{ item.icash }}</td>
    <td>
      <span v-if="data.item">{{ data.item.name }}</span>
      <button class="btn btn-sm btn-primary" @click="addData()">寫入資料</button>
    </td>
  </tr>
</script>

<script>
var child = {
  props: ['item'],
  template: '#row-component',
  data: function() {
    return {
      data: {}
    }
  },
  methods: {
    addData: function() {
    //   this.data.item = {
    //     name: this.item.name
    //   }
    //   console.log(this.data, this);

    this.$set(this.data, 'item', {
      name: this.item.name
    })
    console.log(this.data, this);

      // this.$set(this.data, 'item', {
      //   name: this.item.name
      // });
      // console.log(this.data, this);
    }
  },
  mounted: function() {
    console.log('Component:', this)
  }
}

var app = new Vue({
  el: '#app',
  data: {
    data: [
      {
        name: '小明',
        cash: 100,
        icash: 500,
      },
      {
        name: '杰倫',
        cash: 10000,
        icash: 5000,
      },
      {
        name: '漂亮阿姨',
        cash: 500,
        icash: 500,
      },
      {
        name: '老媽',
        cash: 10000,
        icash: 100,
      },
    ]
  },
  components: {
    "row-component": child
  },
  mounted: function() {
    console.log('Vue init:', this)
  }
});
</script>
Vue.set 蠻重要的。
Mixin 混合其他的元件內容
Extend由單一元件來做延伸,但Mixin可以混合多個元件的行為。
api/mixin.html
<div id="app">
  <table class="table">
    <tbody>
      <tr is="row-component" v-for="(item, key) in data"
        :item="item" :key="key"></tr>
      <tr is="row-component-two" v-for="(item, key) in data"
        :item="item"></tr>
    </tbody>
  </table>
</div>

<script type="text/x-template" id="row-component">
  <tr>
    <td>{{ item.name }}</td>
    <td>{{ item.cash | currency | dollarSign }}</td>
    <td>{{ item.icash | currency | dollarSign }}</td>
  </tr>
</script>

<script>
// mixin 是多個混合的概念

var mixinFilter = {
  template: '#row-component',
  filters: {
    dollarSign: function (n) {
      return `$ ${n}`
    },
    currency: function(n) {
      return n.toFixed(2).replace(/./g, function(c, i, a) {
          return i && c !== "." && ((a.length - i) % 3 === 0) ? ',' + c : c;
      });
    }
  },
}

var mixinMounted = {
  mounted () {
    console.log('這段是 Mixin 產生')
  }
}

Vue.component('row-component', {
  props: ['item'],
  data: function() {
    return {
      data: {},
    }
  },
  mixins: [mixinFilter, mixinMounted],
  // template: '#row-component',
  // filters: {
  //   dollarSign: function (n) {
  //     return `$ ${n}`
  //   },
  //   currency: function(n) {
  //     return n.toFixed(2).replace(/./g, function(c, i, a) {
  //         return i && c !== "." && ((a.length - i) % 3 === 0) ? ',' + c : c;
  //     });
  //   }
  // },
  // mounted () {
  //   console.log('這段是 Mixin 產生')
  // }
});

Vue.component('row-component-two', {
  props: ['item'],
  data: function() {
    return {
      data: {
        data: 'Two'
      },
    }
  },
  mixins: [mixinFilter, mixinMounted],

})


var app = new Vue({
  el: '#app',
  data: {
    data: [
      {
        name: '小明',
        cash: 100,
        icash: 500,
      },
      {
        name: '杰倫',
        cash: 10000,
        icash: 5000,
      },
      {
        name: '漂亮阿姨',
        cash: 500,
        icash: 500,
      },
      {
        name: '老媽',
        cash: 10000,
        icash: 100,
      },
    ]
  },
  mounted: function() {
    console.log('Vue init:', this)
  }
});
</script>
使用 Directive 開發自己的互動 UI
透過 directive 來做 email 的驗證。
api/directive.html
<div id="app">
  <input type="email" v-model="email" v-focus v-validation>
</div>

<script>
// 官方文件 https://cn.vuejs.org/v2/guide/custom-directive.html

// 註冊一個全局自定義指令 `v-focus`
Vue.directive('focus', {
  // 當被綁定的元素插入到 DOM 中時...
  inserted: function (el) {
    // 聚焦元素
    el.focus()
  }
});

Vue.directive('validation', {
  update: function(el, binding, vnode) {
    console.log('update', el, binding, vnode);
    var value = el.value;
    console.log(value);
    // 驗證email的方式,會使用正規式
    // email結構的正規式
    var re = /^(([^<>()\[\]\.,;:\s@\"]+(\.[^<>()\[\]\.,;:\s@\"]+)*)|(\".+\"))@(([^<>()[\]\.,;:\s@\"]+\.)+[^<>()[\]\.,;:\s@\"]{2,})$/i;
    console.log(value, re.test(value));
    if (!re.test(value)) {
      el.className = 'form-control is-invalid'
    } else {
      el.className = 'form-control is-valid'
    }

  },
  bind: function(el, binding, vnode) {
    console.log('binding', el, binding, vnode);
    el.className = 'form-control';
  }
});

var app = new Vue({
  el: '#app',
  data: {
    email: '',
  },
  mounted: function() {
    console.log('Vue init:', this)
  }
});
</script>
Directive 細節說明
api/directive.html
<div id="app">
  <input type="email" v-model="email" v-focus v-validation="{ className: 'form-control'}">
</div>

<script>
// 官方文件 https://cn.vuejs.org/v2/guide/custom-directive.html

// 註冊一個全局自定義指令 `v-focus`
Vue.directive('focus', {
  // 當被綁定的元素插入到 DOM 中時...
  inserted: function (el) {
    // 聚焦元素
    el.focus()
  }
});

Vue.directive('validation', {
  update: function(el, binding, vnode) {
    console.log('update', el, binding, vnode);
    var value = el.value;
    console.log(value);
    // 驗證email的方式,會使用正規式
    // email結構的正規式
    var re = /^(([^<>()\[\]\.,;:\s@\"]+(\.[^<>()\[\]\.,;:\s@\"]+)*)|(\".+\"))@(([^<>()[\]\.,;:\s@\"]+\.)+[^<>()[\]\.,;:\s@\"]{2,})$/i;
    console.log(value, re.test(value));
    if (!re.test(value)) {
      el.className = 'form-control is-invalid'
    } else {
      el.className = 'form-control is-valid'
    }

  },
  bind: function(el, binding, vnode) {
    console.log('binding', el, binding, vnode);
    el.className = binding.value.className;

    // v-model
    // v-model 值

    // 尋找當前的model名稱
    var vModel = vnode.data.directives.find(function(item) {
      return item.name === 'model'
    }).expression;
    // 從當前的model取值
    var value = vnode.context[vModel];
    console.log('vModel', vModel, value);
  }
});

var app = new Vue({
  el: '#app',
  data: {
    email: 'example@gmail.com',
  },
  mounted: function() {
    console.log('Vue init:', this)
  }
});
</script>Google關鍵字:vue directive bootstrap
使用外部載入的套件
Vue 使用外部套件
- 請嘗試將 Vue Bootstrap 的 Modal 元件載入
使用額外套件的時候,一定要特別注意他的版本。
api/use.html
<div id="app">
  <!-- Using value -->
  <b-button v-b-modal="'my-modal'">Show Modal</b-button>

  <!-- The modal -->
  <b-modal id="my-modal">Hello From My Modal!</b-modal>
</div>

<link type="text/css" rel="stylesheet" href="//unpkg.com/bootstrap-vue@latest/dist/bootstrap-vue.min.css" />
<!-- Load Vue followed by BootstrapVue -->
<script src="//unpkg.com/vue@latest/dist/vue.min.js"></script>
<script src="//unpkg.com/bootstrap-vue@latest/dist/bootstrap-vue.min.js"></script>
<script>
// 使用 CDN 與 CLI 載入套件的結果是一樣
// CLI 版本請加入以下套用 BootstrapVue
// import BootstrapVue from 'bootstrap-vue'
// Vue.use(BootstrapVue);

var app = new Vue({
  el: '#app',
  data: {},
});
</script>
第9節:Vue Cli 的建置與運作原理
為什麼要學 Vue Cli
VUE CLI 是什麼?
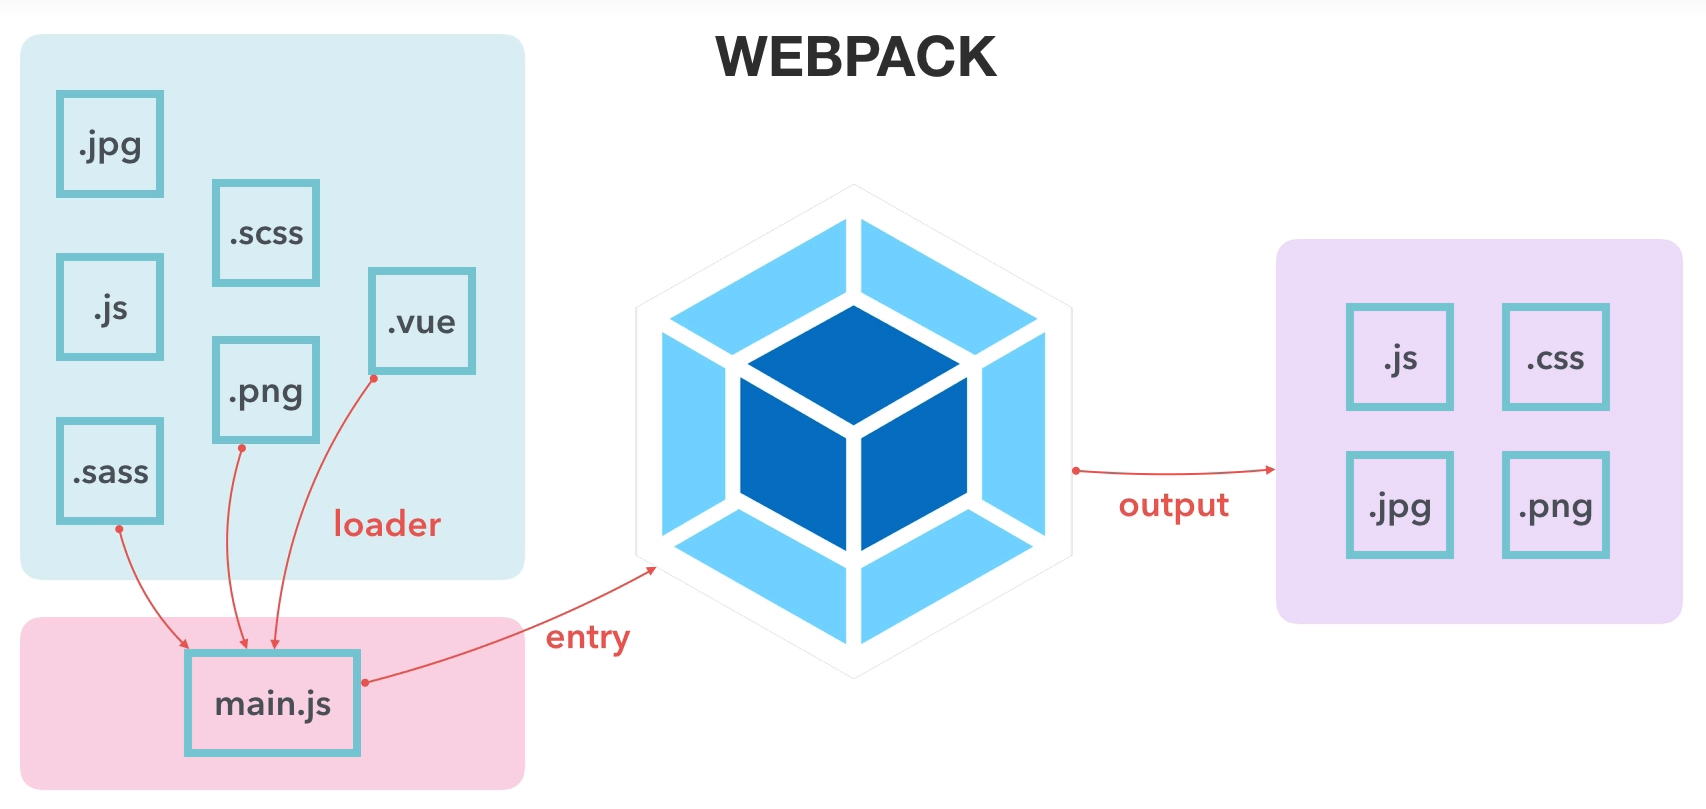
- 基於 Webpack 所建置的開發工具
- 便於使用各種第三方套件 (BS4, Vue Router…)
- 可運行 Sass, Babel 等編譯工具
- 便於開發 SPA 的網頁工具
- 靠簡單設定,就能搭建開發時常用的環境
WEBPACK
- bundle your assets, scripts, images, styles
連結:WEBPACK
Vue Cli 是一個scaffolding (鷹架) 的工具,可以透過 Vue Cli 搭建 Webpack 環境,像是它的資料夾、相關檔案,透過簡單的指令就可以完整的生成。
雖然這麼多的資料夾,交付出去的時候只需要交付 dist 資料夾給後端就算完成。
Webpack 是一個打包工具,所以可以載入非常多的內容,像是 Sass、Bootstrap、Vue 都可以輕鬆的載入。
使用 npm 做套件的管理。
SPA 是由前端所模擬的路由。
- #/user
- #/product
使用 SPA 的概念在製作網頁的時候,同時意謂著前端網頁與後端 Web Server 是分開的。
當如果需要取得資料的時候,後端 Web Server 會提供 API 的接口,前端網頁會使用 Ajax 的方法來做串接。
當畫面上頁面做切換的時候,前端網頁就會透過 API 再從後端 Web Server 取得所需要的資料內容。
VUE CLI 的限制
- 不便於開發 SPA 的網頁
(此需求可用先前教的 CDN 模式)
Vue Cli 2.x 與 Vue Cli 3.x 課程說明
注意!!
課程中已經加入 Vue Cli 3.0
但在主要課程規劃目前還是 Cli 2.0 為主
所以課程可先依據規畫學習 2.0,之後再補足 3.0 的觀念
而兩者觀念差異並不大
所以在後面都可以銜接回來喔~
(目前補充在電商課程後方)
如何使用 Vue Cli
請先安裝 NODE.JS
可參考本章節後方的附錄內容
vue-cli
A simple CLI for scaffolding Vue.js projects.
Installation
Prerequisites: Node.js (>=6.x, 8.x preferred), npm version 3+ and Git.
$ npm install -g vue-cliUsage
$ vue init <template-name> <project-name>Example:
$ vue init webpack my-project操作步驟
- 查詢 node 版本:node -v
v6.9.4 - 安裝 vue-cli :npm install -g vue-cli
-g,安裝在全域上面。 - 輸入 vue 顯示有哪些指令可以用:vue
- 列出官方樣本:vue list
我們主要會使用 webpack 這個樣本 - 用法:vue init webpack vuewebpack
- Project name vuewebpack
- Project description
- Author
- Vue build – 選擇 Runtime + Compiler: recommended for most users
- Install vue-router – n,這個地方先不要裝
- Use ESLint to lint your code? – n,這個地方先不要使用 ESLint
JavaScript 沒有符合規範是無法編譯的 - Set up unit tests – n
- Setup e2e tests with Nightwatch – n
- Should we run `npm install` for you after the project has been created? (recommended) – No, I will handle that myself,這個地方先不要,等下再自己手動使用。
# Project initialization finished!
To get started:
cd vuewebpack
npm install (or if using yarn: yarn)
npm run dev
操作步驟:
- 移動到資料夾:cd vuewebpack
- 打開資料夾:open .
- 安裝:npm install
- Vue環境執行:npm run dev
使用 VSCode 終端機來執行。
課程後續的範例老師會使用 ESLint 做課程說明
屆時再慢慢熟悉 ESLint 的使用方式
Vue Cli 安裝相關資源
安裝 Node.js
參考 Gulp 課程
Gulp 環境 (Windows 安裝 Nodejs 篇)
Gulp 環境 (Mac 安裝 Nodejs 篇)
Vue Cli 其實是一個指令工具
用來讓我們安裝 Vue + Webpack 的環境 (另有其他幾種官方模板)
目前依然還有在更新,課程中使用的是 2.x 版本
測試中的版本為 3.0 beta
安裝時也請注意版本上的差異
其他相關連結
以下為課程中會用到的相關連結
課程中運用到的指令
- 檢視 Vue Cli 可用版型:vue list
- Vue 模板安裝:vue init {{模板名稱}} {{資料夾名稱}}
- 安裝所需套件 (在目標資料夾下,每個專案只有第一次需要執行):npm install
- 運行 Vue + Webpack:npm run dev
- 編譯 Production 版本:npm run build
解決方法:系統上已停用指令碼執行
Vue Cli 所產生的資料夾結構說明
使用 VSCode ,打開終端機 (Ctrl + `)
輸入 npm run dev 開發中環境運行起來
README.md
# vuewebpack

> A Vue.js project

## Build Setup

``` bash
# install dependencies
npm install

# serve with hot reload at localhost:8080
npm run dev

# build for production with minification
npm run build

# build for production and view the bundle analyzer report
npm run build -- report
```
For a detailed explanation on how things work, check out the [guide](http://vuejs-templates.github.io/webpack/) and [docs for vue-loader](http://vuejs.github.io/vue-loader).- npm install
安裝所有套件用到的指令 - npm run dev
將開發的環境運行起來 - npm run build
將正式版環境運行建立起來
停止終端機指令:停止可同時按下 Ctrl + c
(Window 與 Mac OS 相同)
npm run build
產生 dist 資料夾,裡面的網頁需要使用 web server 執行才能開啟內容。
Tip: built files are meant to be served over an HTTP server.
Opening index.html over file:// won’t work.
static 資料夾是放入不會被編譯的檔案。
assets 資料夾是放入會被編譯的檔案。
src 是整個 Cli 最重要的資料夾,所有的內容都在這裡。
裡面比較重要的檔案叫 main.js,指的是所有Vue.js的進入點。
Vue Cli 基本上都是用元件。
App.vue有以下內容,xtemplate、javascript、style。
node_modules 就是剛透過 npm install 所安裝的一些相依套件。
dist 是透過 npm run build 最後生成的檔案,一定要運行在 HTTP server 才能執行,無法直接用 file 執行。
config 寫 Vue 的應用程式會使用的設定檔。
build 是 webpack 的原始碼。
Webpack 腳本介紹 及自定義環境變數
build 資料夾下 webpack 腳本介紹
- webpack.base.conf.js
為最主要的webpack腳本 - webpack.dev.conf.js
開發中版本
預覽使用 - webpack.prod.conf.js
正式版版本
比較重視輸出結果
dev、prod 比較不會去修改,整個核心在 webpack base 腳本下。
resolve 是可以省略一些副檔名、路徑使用的。
config 資料夾下
- index.js 針對整個運行環境所使用的。
- dev、prod 是我們在寫 Vue 可以用到環境變數,可輸出到 Vue 檔裡面。
dev.env.js
module.exports = merge(prodEnv, {
  NODE_ENV: '"development"',
  HTTP_PATH: '"http://localhost/"'
})
// Ajax
HelloWorld.vue
<script>
export default {
  name: 'HelloWorld',
  data () {
    return {
      msg: process.env.NODE_ENV,
      http: process.env.HTTP_PATH
    }
  }
}
</script>
prod.env.js
module.exports = {
  NODE_ENV: '"production"',
  HTTP_PATH: '"http://localhost/"'
}
安裝套件在 Vue Webpack 中
透過 Vue Cli 的 webpack 來載入外部的套件
- Bootstrap – 透過 Sass 的方式來載入
- vue-axios – 是一個 Ajax 的工具,透過它使用 Ajax 的行為,就很像我們在使用 jQuery 一樣,是使用非同步的 promise 去製作的
操作步驟
- 前往 Bootstrap 4 download
- 找到 npm 並使用以下指令
Sass 在 Vue Cli 沒有安裝完整的 loader,會再加入 node-sass sass-loader 的套件
$ npm install bootstrap node-sass sass-loader –save - 因為以上指令會出錯,需要安裝指定版本
$ npm install bootstrap node-sass@4 sass-loader@7 –save - 安裝完後,整個 Vue Cli 是需要重新運行的
npm run dev - 重新啟動後,打開 App.vue,測試 Sass 是否可以運行
在 <style> 修改成 <style lang=”scss”>
把原本的內容註解掉,改成以下 - 清除掉之後就可以使用 import 的方式把 Bootstrap 載進來
- 可以載入Bootstrap 其中的元件,來了解是否有正確的載入
cards - @import “~bootstrap/scss/bootstrap”; 路徑是哪裡來的
可以把 node_modules 打開裡面會有 bootstrap,再裡面會有 scss,在裡面找會有 bootstrap
// 5.
<style lang="scss">
$color: black;

body {
  background-color: $color;
}
</style>
// 6.
<style lang="scss">
@import "~bootstrap/scss/bootstrap";
</style>// 7.
<template>
<div id="app">
<img src="./assets/logo.png" />
<HelloWorld />
<div class="card" style="width: 18rem">
<div class="card-body">
<h5 class="card-title">Card title</h5>
<p class="card-text">
Some quick example text to build on the card title and make up the
bulk of the card's content.
</p>
<a href="#" class="btn btn-primary">Go somewhere</a>
</div>
</div>
</div>
</template>
<script>
import HelloWorld from "./components/HelloWorld";
export default {
name: "App",
components: {
HelloWorld,
},
};
</script>
<style lang="scss">
@import "~bootstrap/scss/bootstrap";
</style>小技巧:元件components 裡面有個 HelloWorld.vue,
在 HelloWorld.vue 裡面有個 <h1>,
然後下方 <style scoped>,scoped 的意思是這邊的樣式是被限制在這個元件內才能運行。
在下方 <style scoped> <h1> 新增 color: red 樣式。
在 App.vue 新增一個 <h1> 這是 APP 的 H1,
就會維持是黑色,並不會受到 HelloWorld.vue 裡面的 style 影響。這是 Vue style 的一個特色。
vue-axios 是 Ajax 的一個套件。
操作步驟
- 把終端機停下來
- 輸入 npm install –save axios vue-axios
- vue-axios
- 把以下程式碼加到 entry file ,也就是 main.js 這支檔案
- 使用 random user api
- 開啟 App.vue 檔案,這支檔案加入 created 的 hook,就是當這個元件創立的時候,同時執行裡面的函式
使用方法在 vue-axios 網站上有寫到,並把 random user api 的 URL 貼進來
// 4. 把程式碼加到 main.js
import axios from 'axios' // 主要 AJAX 套件
import VueAxios from 'vue-axios' // 將它轉為 Vue 的套件
// Usage in Vue 2:
Vue.use(VueAxios, axios)
// 6.
created() {
this.$http.get('https://randomuser.me/api/')
.then((response) => {
console.log(response.data);
})
}第10節:Vue Router
本章節以後,提問的注意事項
由於本章節以後,問題相對會複雜很多
很難從單一片段了解問題點
如:部分程式碼無法運作
實際卻是 main.js @import 的大小寫錯誤
所以本章節以後
為了加速回復同學們問題的效率
請上傳完整程式碼至 Github 或個人雲端空間 ( 不需要包含
node_modules )
好讓我可以運行完整環境來仔細檢視喔
如果僅上傳部分程式碼或程式碼的截圖
還是會請你重新上傳完整程式碼喔
使用 Vue Router 及配置路由文件
SPA 也是透過元件來製作的喔
由前端所模擬的路由
- 進入點:main.js
- Router 配置檔案 (前端路由):router/index.js
- 分頁內容:Vue Components (**.vue)
操作步驟
- 前往 Vue Router 查看安裝的方法
- 終端機輸入 npm install vue-router –save
記得要加上 –save - 在 src 資料夾下建立新資料夾叫 router
- 在 router 資料夾下建立 index.js 檔案
- 在 index.js 配置檔案下加上
- 在 main.js 加上
- 執行 npm run dev,路徑會自動加上#,#以後就是虛擬的路由器
- 到 router/index.js 下定義路徑
- 到 App.vue 把<HelloWorld/>標籤註解掉,會使用 <router-view><router-view>
- 把 routes 陣列底下物件 path 修改成 path: ‘/index’,
- 網址必須對應到 /index 網址,畫面才會出現
// 5. index.js
// 官方的元件
import Vue from 'vue';
import VueRouter from 'vue-router';

// 自訂的分頁元件
import Home from '@/components/HelloWorld';

// 啟用的方式
Vue.use(VueRouter);

// 匯出給 Entry 使用
export default new VueRouter({

});
// 6. main.js
import router from './router';
new Vue({
// 加上
router,
});有使用 ESLint 嚴謹度會提高不少,當有出現多於程式碼則會跳錯。
// 8. index.js
export default new VueRouter({
  routes: [
    {
      name: '首頁',  // 元件呈現的名稱
      path: '/',  // 對應的虛擬路徑
      component: Home,  // 對應的元件
    },
  ],
});
新增路由路徑及連結
操作步驟
- 在 index.js 檔案下新增 routes 陣列底下的物件
因為還沒啟用,先註解起來 - 在 index.html 先偷懶加入使用 Bootstrap Cdn
主要是會使用到 Bootstrap 一些元件來加速開發 - 在 components 資料夾下方新增 pages 資料夾
這是管理分頁使用的 - 將 HelloWorld.vue 另存新檔,在 pages 資料夾下叫做 page.vue
- 把 page.vue 裡面的 div 的內容全部刪掉,也將 style 部分也都全部刪掉,<script> 裡面的 export default 裡面的 name 也可刪掉、data 留空也沒關係
- 到 Bootstrap 4 官網搜尋 cards 複製一個卡片的模組,貼到 page.vue 裡面的 div 做練習就可以了,圖檔部分因為 src會出錯就先把 src 路徑刪除
- 到配置的路徑 index.js,用相同的方式將新的頁面載進來
- 到 Bootstrap 4 官網搜勳 navbar 複製一個導覽列的模組,並且貼到 App.vue,在圖檔的上方,先刪除多餘的部分,留下一個 <li> 就可以了,下面的表單也移除掉,下方的 CSS 也可以先直接移除
- 製作分頁的切換,把 Home 這個的 <li> 複製一份,並把上方 class 的 active 移除掉,裡面多餘的程式碼也先移除,留下一個 Home,另外一個改成 Page
- 把 Home 的 <a> 標籤替換成 <router-link> 標籤,Page 的 <a> 標籤替換成 <router-link> 標籤,並且把 href 換成 to,to 是針對 router-view 在切換分頁的一個方法,Home 是 to=”/index”,Page 是 to=”/page”
- 分頁的切換的另一個方法,index.js 檔案的 routes 裡面的 name 屬性也可以用在 path 上面,使用的方式是把 to 改成動態連結、把原本的 path 換成一個物件
Home 的是 :to=”{ name: ‘首頁’ }”
Page 的是 :to=”{ name: ‘分頁’ }”
// 1.
  //  {
  //    name: '首頁', // 元件呈現的名稱
  //    path: '/新路徑', // 對應的虛擬路徑
  //    component: 新元件, // 對應的元件
  //  },
// 7.
import Page from '@/components/pages/page';
{
name: '分頁', // 元件呈現的名稱
path: '/page', // 對應的虛擬路徑
component: Page, // 對應的元件
}切換頁面的方式有
- 直接透過 path
- 透過 name
兩種方式可以混合運用。
index.html
<!DOCTYPE html>
<html>
  <head>
    <meta charset="utf-8">
    <meta name="viewport" content="width=device-width,initial-scale=1.0">
    <title>vuewebpack-router</title>
    <link rel="stylesheet" href="https://cdn.jsdelivr.net/npm/bootstrap@4.6.0/dist/css/bootstrap.min.css">
  </head>
  <body>
    <div id="app"></div>
    <!-- built files will be auto injected -->
  </body>
</html>
index.js
// 官方的文件
import Vue from 'vue';
import VueRouter from 'vue-router';

// 自訂的分頁元件
import Home from '@/components/HelloWorld';
import Page from '@/components/pages/page';

// 啟用的方式
Vue.use(VueRouter);

// 匯出給 Entry 使用
export default new VueRouter({
    routes: [
        {
          name: '首頁',  // 元件呈現的名稱
          path: '/index',  // 對應的虛擬路徑
          component: Home,  // 對應的原件
        },
        {
          name: '分頁',  // 元件呈現的名稱
          path: '/page',  // 對應的虛擬路徑
          component: Page,  // 對應的原件
        },
    ],
});
App.vue
<template>
  <div id="app">
    <nav class="navbar navbar-expand-lg navbar-light bg-light">
      <a class="navbar-brand" href="#">Navbar</a>
      <div class="collapse navbar-collapse" id="navbarSupportedContent">
        <ul class="navbar-nav mr-auto">
          <li class="nav-item">
            <router-link class="nav-link" :to="{ name: '首頁' }">Home</router-link>
          </li>
          <li class="nav-item">
            <router-link class="nav-link" to="/page">Page</router-link>
          </li>
        </ul>
      </div>
    </nav>
    <img src="./assets/logo.png" />
    <!-- <HelloWorld/> -->
    <router-view></router-view>
  </div>
</template>

<script>
import HelloWorld from "./components/HelloWorld";

export default {
  name: "App",
  components: {
    HelloWorld,
  },
};
</script>
page.vue
<template>
  <div class="hello">
    <div class="card" style="width: 18rem">
      <img src="" class="card-img-top" alt="Card img cap" />
      <div class="card-body">
        <h5 class="card-title">Card title</h5>
        <p class="card-text">
          Some quick example text to build on the card title and make up the
          bulk of the card's content.
        </p>
        <a href="#" class="btn btn-primary">Go somewhere</a>
      </div>
    </div>
  </div>
</template>

<script>
export default {
  data() {
    return {};
  },
};
</script>
製作巢狀路由頁面
假設切換到 child 頁面下,希望外層維持原本的卡片,裡面的內容會依據 child1、child2、child3 來切換裡面的內容。
操作步驟
- 另存 child.vue 檔案
不需要 class card 的部分,謹記外層要留一層 div - 另存 child2.vue、child3.vue
總共會有三個子元件 - 三個子元件的三個子元件的內容給予不同的名稱
child.vue 標題使用 Card 1
child2.vue 標題使用 Card 2
child3.vue 標題使用 Card 3 - page.vue card的內容先移除,會透過 router 的方式來切換 card 裡面的內容,card 裡面會加上 <router-view> 標籤,和外層一樣的 <router-view> 標籤, router-veiw 的部分就會切換 child、child2、child3
- router 配置檔 index.js 加上子元件的路徑
- 在 page.vue 使用 <router-link> 來切換這三個子分頁
// 5.
// 自訂的分頁元件
// 載入卡片元件
import child from '@/components/pages/child';
import child2 from '@/components/pages/child2;
import child3 from '@/components/pages/child3;

children: [
  {
    name: '卡片 1', // 元件呈現的名稱
    path: '' , //對應的虛擬路徑
    component: Home, // 對應的元件
  },
  {
    name: '卡片 1', // 元件呈現的名稱
    path: 'child2', // 對應的虛擬路徑
    component: child2, // 對應的元件
  },
  {
    name: '卡片 1', // 元件呈現的名稱
    path: 'child3', // 對應的虛擬路徑
    component: child3, // 對應的元件
  },
],
// 6.
<router-link to="/page/">卡片 1</router-link>
<router-link to="/page/child2">卡片 2</router-link>
<router-link to="/page/child3">卡片 3</router-link>使用動態路由切換頁面 Ajax 結果
透過蘋果日報的網頁來介紹。
動態路由的用處是使用相同的版型,透過 id 來決定這裡面要載入什麼樣的內容。
操作步驟
- 在 index.js 有三個子元件,這個子元件都是使用相同的版型、內容,調整其中一個版型試看看,使用的是 child3 來做調整,改成 path: ‘child/:id’,回到網頁把url 改成 …/#/page/child/ffff
- 取到 id 的方式是在 child3.vue,使用一個 created,這個 created 就是在這個元件生成的時候,同時執行這個方法,這個就是可以存取動態路由的方式
- 了解有什麼樣的用處,使用 vue-axios 載進來了解一下
- 停止終端機,安裝 vue-axios 套件,把套件內容加到 entry (main.js) 裡面來,就可以去啟用它
- 重新執行 npm run dev
- 回到 child3.vue 元件,使用 axios 來取得遠端資料
RANDOM USER GENERATOR,試著把它資料讀進來 - 動態路由的使用方式就是我們可以固定取到同一筆資料,
在 RANDOM USER 文件裡面有個 Seeds 的方法,可以取到同一個人的資料,接下來使用動態路由的方式去存取同一路由的方式去存取同一份資料 - 這個就是動態路由的使用方式,我們可以用這個來決定 Ajax 所讀入的資料
// 1. index.js
path: 'child/:id'
// 2. child3.vue
created() {
console.log(this.$route.params.id);
},// 4.
npm install --save axios vue-axios
// Import libraries in entry file
import axios from 'axios';
import VueAxios from 'vue-axios';
// Usage in Vue 2
Vue.use(VueAxios, axios);// 6.
created() {
console.log(this.$route.params.id);
this.$http.get('https://randomuser.me/api/').then((response) => {
console.log(response);
});
},// 7.
created() {
console.log(this.$route.params.id);
const id = this.$route.params.id;
this.$http.get(`https://randomuser.me/api/?seed=${id}`).then((response) => {
console.log(response);
});
},命名路由,同一個路徑載入兩個頁面元件
調整介紹
- 在 App.vue 的 <router-view> 標籤外層加上 .container,限制最大的寬度
- 在 child3.vue 的部分,原本是採用 id 的方式直接載入路徑,現在是改載入隨機的圖片,child3.vue id已經被拿掉、router 的 index.js 也沒有呈現 id
- 在每個卡片的部分使用一些假圖
主要調整的部分,美化的設計、加上圖片、外層加上 .container,以及卡片3的 id 拿掉。
同一個畫面下,直接執行兩個 router-view
操作步驟
- 在 App.vue 的地方,主要呈現的下方區塊就是在這個 <router-view> 上面,但有些時候在載入時會需要同時載入不同的區塊,在 container 的外層想要另外加入一個選單,就可以新增一個 <router-view> 上來,下面那個 <router-view> 就是預設的 <router-view>,上面這個就是另外設定的 <router-view>,給予名稱 name=”menu”,存檔後畫面並不會有太大的調整。因為當沒有使用 name 的部分,另外一個,另外一個則是使用預設的狀態,所以目前所設定都跑在預設的 <router-view> 上面,上面另外設定的 <router-view> 並沒有使用到
- 新增一個 menu.vue,從現有的元件使用 page.vue 另存 menu.vue,把卡片拿掉,留下上面連結的地方
- 在 page.vue 上方的連結拿掉,把它移動 menu.vue 裡面來,menu 裡面的連結稍做美化,使用 Bootstrap 4 裡面的 Navs 的元件,複製貼到 menu.vue,並把現有的 <router-link> 替換進去,同時記得 class 也要加回去,多餘的連結就清掉。現在的狀態就是把原本 page.vue 裡面的 nav-link 移動到 menu 上面,然後存檔。現在畫面上就沒有 nav-link,可以在 menu.vue 裡面 div 加上間距 .my-3
- 在 Home 這頁就不要加入上方的選單,在 Page 頁面才要加入上方的選單
- 到路由的配置文件 (router 裡面的 index.js),把 menu.vue 載進來
- 到 index.js 分頁的地方,原本是使用 component 在渲染下面這個區塊,把 component 改成 components,裡面使用是一個物件,物件裡面第一個是 default、第二個是自定義的 <router-view> 的名稱,使用 menu 名稱,default 的部分就採用、渲染原來的 Page,menu 就渲染剛所載入的 Menu 的元件
- 回到畫面上,重新整理,按下 Page 分頁後, 上方就出現自定義的 menu,下方的部分一樣是 Page 的元件,點選的時候一樣可以做畫面的切換
- 回到 App.vue 可以看到這兩個 <router-view> 可以渲染在不同的標籤上面
- 小問題修正,回到畫面上右鍵打開檢查、點選 Console 有跳出一些錯誤
- 到 index.js,這裡的 name 是不能用相同的 name,替換成卡片 1 、卡片 2、卡片 3
- 另外一個問題則是在 children 的部分,這裡沒有設定路徑,當沒有設定路徑的時候,就是在上層的部分預設值項目,所以下面的 name 名稱會取代上面的 name 名稱,所以要把上面的 name 註解掉,讓他進入這個連結的時候,直接使用 children 裡面 name 的名稱
// 1. 上面的 <router-view>
<router-view name="menu"></router-view>
// 3.
// page.vue
<template>
<div class="hello">
<div class="card" style="width: 18rem">
<router-view></router-view>
</div>
</div>
</template>
// menu.vue
<template>
<div class="hello">
<ul class="nav">
<li class="nav-item">
<router-link class="nav-link" to="/page/">卡片 1</router-link>
</li>
<li class="nav-item">
<router-link class="nav-link" to="/page/child2">卡片 2</router-link>
</li>
<li class="nav-item">
<router-link class="nav-link" to="/page/child3">卡片 3</router-link>
</li>
</ul>
</div>
</template>// 5. 載入選單元件
import Menu from '@/components/pages/menu';// 6.
components: {
default: Page,
menu: Menu,
},
// 講解
// components 可以載入多個元件,依據定義的名稱依序把元件載入
// default 載入預設沒有使用 name 的 <router-view>
// 其他部分則會對應到有自定義名稱的 <router-view>Vue Router 參數設定
介紹 Vue Router 的配置文件。
API 文檔
- Router 構造配置
- Router 實例
主要這個小節會先介紹 Router 構造配置的部分,指的是 Vue router 配置文件,在 router 下的 index.js 這支檔案。
Router 構造配置的文件,就是介紹除了我們介紹這些,還有哪些方法及屬性可以使用。
以 routes 來說針對 routes 下的其中一個物件還有哪些方法可以去做設定,像 router 下的 index.js 有設定的 name、path,以及 component,也就是對應到 Router 構造配置的 routes 的方法可以做一些運用。其他的設置會在實戰課程有更詳盡的介紹,會搭配一些情境來做使用。
mode 這個的地方則是路徑配置的方法,現在的路徑配置方法是#後面帶上連結 (#/連結),當切換頁面的時候,這個#會不斷的保留,就算切換其他頁面,他都是存在的。
這個 mode 的設定就可以將路徑替換成 HTML5 的模式,也就是說不需要#也可以正確的切換路徑。先把 mode 切換成 history 的模式,存檔之後回到畫面上把路徑都去掉,去掉之後在切換頁面的時候,他的#是不需要的,然後可以正確的切換頁面的內容。
在此特別注意的是當沒有#的時候代表他所使用的是後端伺服器的路由,他不是指使用前端的路由,因此當我們使用 history 這個模式的時候,它必須前後端的搭配,也就是不是 index.js 做調整即可,因為現在是在 webpack 的環境下,webpack 有支援這個模式,當開啟 history 模式,也就是伺服器也要對應此模式,在此比較不推薦直接把它打開,可以用預設的模式即可,也就是有帶上#這個路徑。
// mode 切換成 history 的模式
mode: 'history',
base 則是說你的路徑並不是直接在根目錄下,而你是掛載在其他目錄下的時候,可以加入這個 base 的設定。
linkActiveClass、linkExactActiveClass,這兩個是比較相近的,前者是模糊比對,後者是絕對比對,也就是說,當我們觸發特定路徑的時候,它會在你的標籤上加上 class 的名稱。
回到畫面上,直接透過開發者工具,來看特定的標籤,像我們現在所啟用的是 Home 路徑,這個路徑下它就會加上 router-link-active 這個 class name 在這個標籤上。
接下來點擊另外一個 Page,點擊另外一個 Page 之後,上方這個 Home 的 class name 就被移除了,它會移到下方的標籤上,這個名稱是可以做替換的,預設是 “router-link-active”,當我們要做替換的話,就可把這個屬性加上來,把它換成 ‘active’,存檔之後回到畫面上,接下來它在啟用的狀態下,它就會替換成 “active”,這個就是針對於標籤的 class name 的替換。
// 把這個屬性加上來,把它換成 'active'
linkActiveClass: 'active',
自定義切換路由方法
介紹路由的一些方法,在切換頁面的時候常常不能只依靠 <router-link> 去做切換,有些時候必須透過方法去做切換,比如說有些行為必須在 Ajax 結束之後再去切換畫面,那麼這個 <router-link> 就不一定適用。所以在這個章節,我們要自定義一些事件來切換這些 router。
到達 Vue Router 文件下方有個 Router 實例,在這個地方有個 Methods,Methods 的這個地方就有一些方法可以使用,像這裡有 push、replace、go、back、forward、replace、go、back、forward,這幾個都是切換路由的方法,在這個章節我們就來介紹這個部分。
打開 menu.vue打開 menu.vue,這裡已經有一些連結,在這個部分我們新增一個路徑,但是這個路徑的觸發,我們要把它改成使用 a 連結,並且自定義一些事件。我們的事件把它改成先使用 class=”nav-link” 先把樣式加上去,接下來我們使用 @click,在這個地方建議先補上 prevent 避免他被預設的事件給取代掉,然後 .prevent=”updatePath”,我們透過這個自定義的事件來更新路徑,我們把 updatePath 加到下面來,補上 methods。
// menu.vue 新增一個路徑,改成使用 a 連結,並且自定義一些事件
<li class="nav-item">
  <router-link class="nav-link" to="/page/child3">卡片 3</router-link>
  <a href="#" class="nav-link" @click.prevent="updatePath"></a>
</li>

// 把 updatePath 加到下面來,補上 methods
methods: {
  updatePath() {

  },
},
回到文件這個地方,這個文件就有提供這些取代路徑的方式,我們先使用 push,把 router push 加上來,router push 如果你直接放在這個地方是沒有辦法直接使用,如果我們要取用它的話,我們必須要加上 this.$router.push,這個意思就是我們直接來操作這個文件所提到 router 的方法,他會直接透過 main.js 直接把這個掛載進來,所以在這個部分我們就可以使用 push 的方法。接下來我們再加上路徑,先直接切換成卡片 2 /page/child2,a 連結上方的那行先消掉,在 <a> 標籤裡面輸入切換到指定頁面,然後存檔,當我們把 updatePath、push 加上去之後,我們就可以透過這個切換到指定頁面的連結來切換頁面,當我們按下去之後就會切換到卡片 2按下去之後就會切換到卡片 2。
// updatePath
<li class="nav-item">
  <a href="#" class="nav-link" @click.prevent="updatePath">切換到指定頁面</a>
</li>

// push
methods: {
  updatePath() {
    this.$router.push('/page/child2');
  },
},
除了這個方法之外,還可以回到上一頁,在此先把切換到指定頁面的 <li> 複製起來,在加上 beforePath 的方法,<a> 標籤改成回到前頁,在下面這部分先複製 updatePath 這一段,把 beforePath 替換過來,回到前頁我們可以參考文件裡面它所使用的是 back 這個方法,就可以把 back 加上去,裡面是不需要加入其他參數的,重新整理後,我們先按下卡片 1、2、3,接下來就可以透過回到前頁連結往前切換。
// beforePath
<li class="nav-item">
  <a href="#" class="nav-link" @click.prevent="beforePath">回到上頁</a>
</li>

// back
beforePath() {
  this.$router.back();
},
另外一個 forward 就是指下一頁,還有一個與它比較相近的是 go,go 的話就是可以基於目前所在的位置往前或往後做切換,在此輸入 -1 的話,跟 back 的行為是一模一樣的。重新整理之後,按下卡片1、2、3,接下來按下回到前頁,它一樣會3、2、1的回去。
// goPath
<li class="nav-item">
  <a href="#" class="nav-link" @click.prevent="goPath">使用go回到上頁</a>
</li>

// go
goPath() {
  this.$router.go(-1);
},
除此之外還有一個是 replace,replace 是與 push 蠻接近的,像我們剛剛回到前一頁是因為它在瀏覽器有個紀錄,當我們使用 replace 的時候,它則不會把這個紀錄加進去,它是直接取代目前的頁面。
// replacePath
<li class="nav-item">
  <a href="#" class="nav-link" @click.prevent="replacePath">使用replace切換到卡片 2</a>
</li>

// replace
replacePath() {
  this.$router.replace('/page/child2');
},
重新整理之後,先在卡片 1、按下卡片 3、最後我們按下使用replace切換到卡片 2,現在我們的順序應該是1→3→2,但是我們在這個時候按下回到前頁,會直接跳到卡片 1,因為卡片 3跳到卡片 2的紀錄並不存在,所以它會直接跳到卡片 1,這些就是透過 methods 來操作 router 的方法,讓我們 router 的介紹基本上就到這邊,比較複雜的部份,我們則會到實戰演練的時候,來跟大家介紹其它的使用案例。