
Learn Vue JS 3 & Firebase by creating & deploying dynamic web apps (including Authentication).
建立者: The Net Ninja (Shaun Pelling)
您會學到
- Learn how to create Vue 3 applications from the ground-up
- Get in-depth knowledge of Vue features like the Vue Router, Vue CLI, Options API, Composition API, Teleport etc
- Get hands-on & in-depth experience using the latest Vue 3 features (such as the Composition API)
- Learn how to use Firebase as a back-end to your Vue applications (as a database, authentication service, hosting etc)
- Build & deploy 4 real-word web apps with Vue & Firebase
- Learn how to implement an authentication system into your Vue js apps using Firebase Auth
- Become a Vue 3 ninja!
第1節:Introduction & Setup
What is Vue?
What is Vue?
- Front-end, JavaScript / TypeScript framework
- Used to create dynamic & data-driven websites (SPA’s)
- Can also be used to create stand-alone widgets
Vue Widgets
Vue Websites
- Vue is used to create a whole website with multiple pages & components
- These websites are normally called Single Page Applications
- All routing is done in the browser & not on the server
Typical non-Vue Websites
Vue Websites
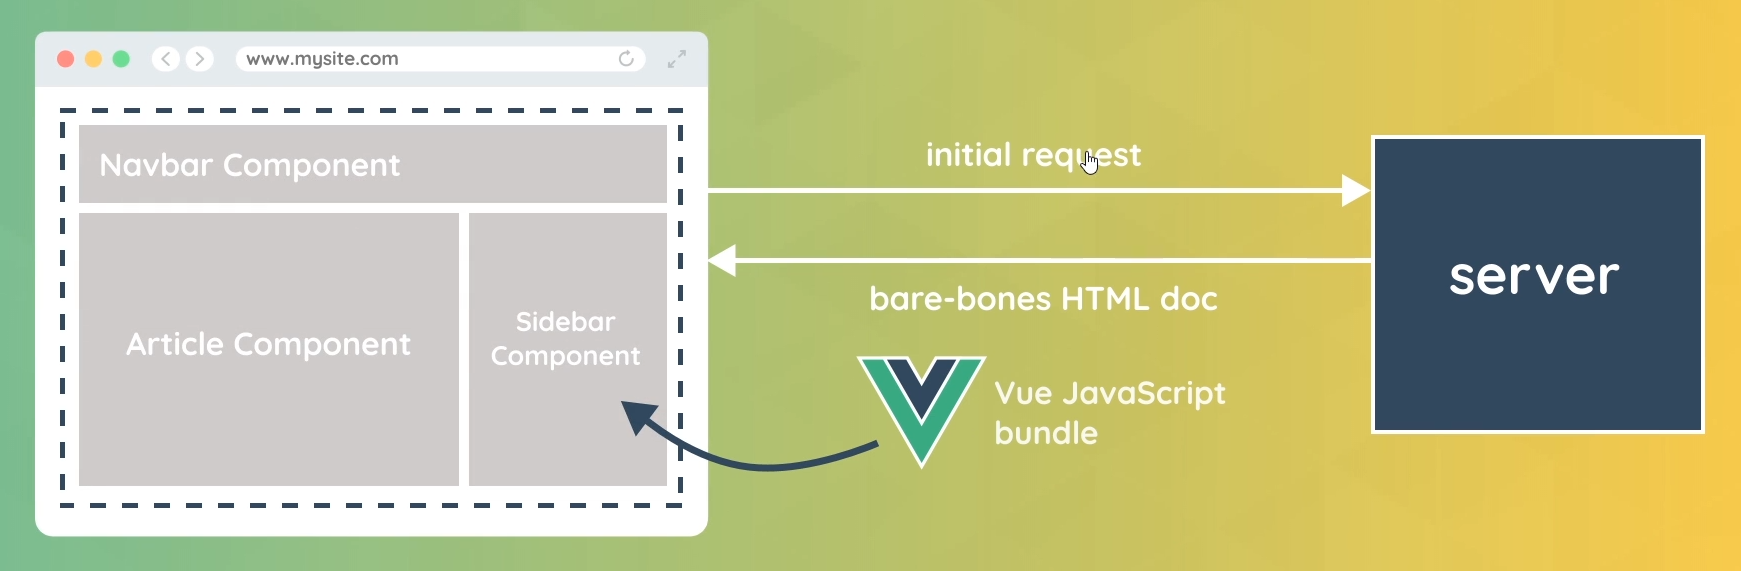
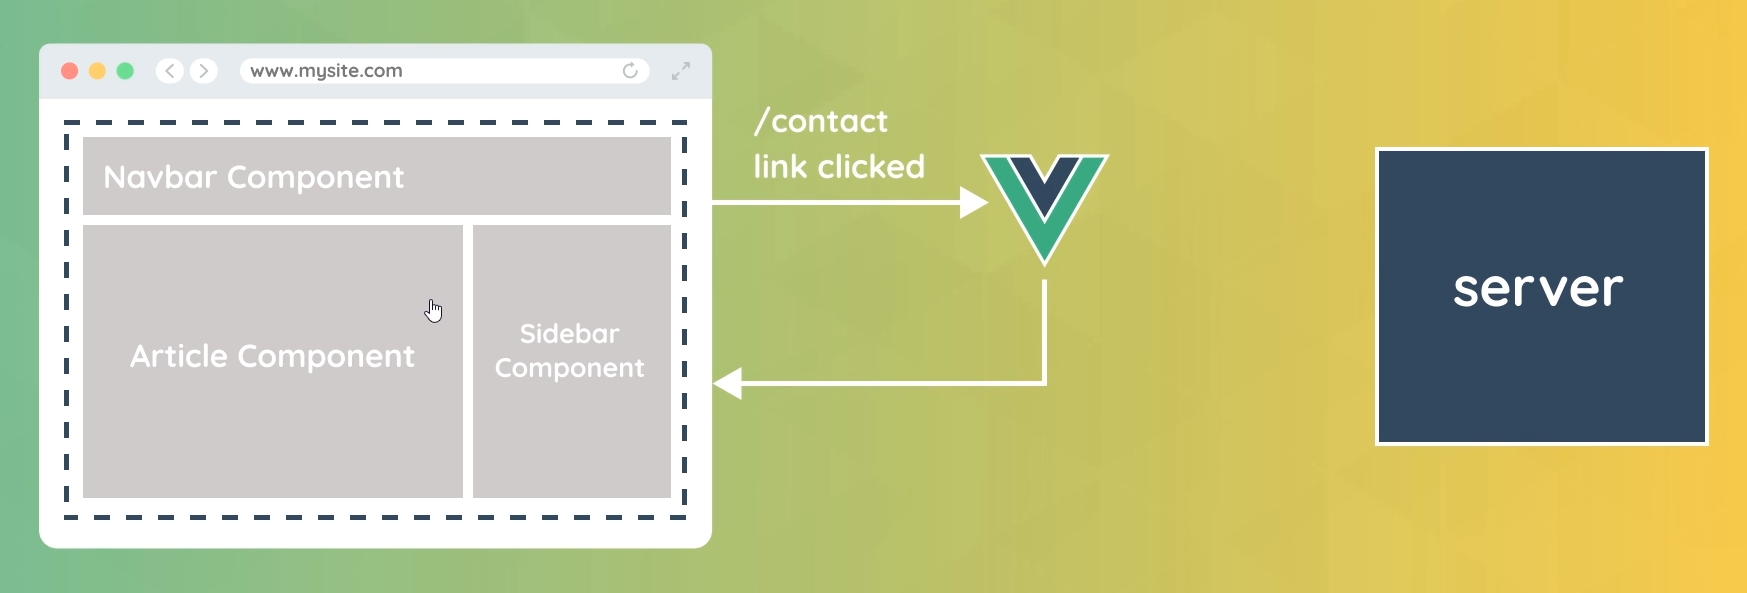
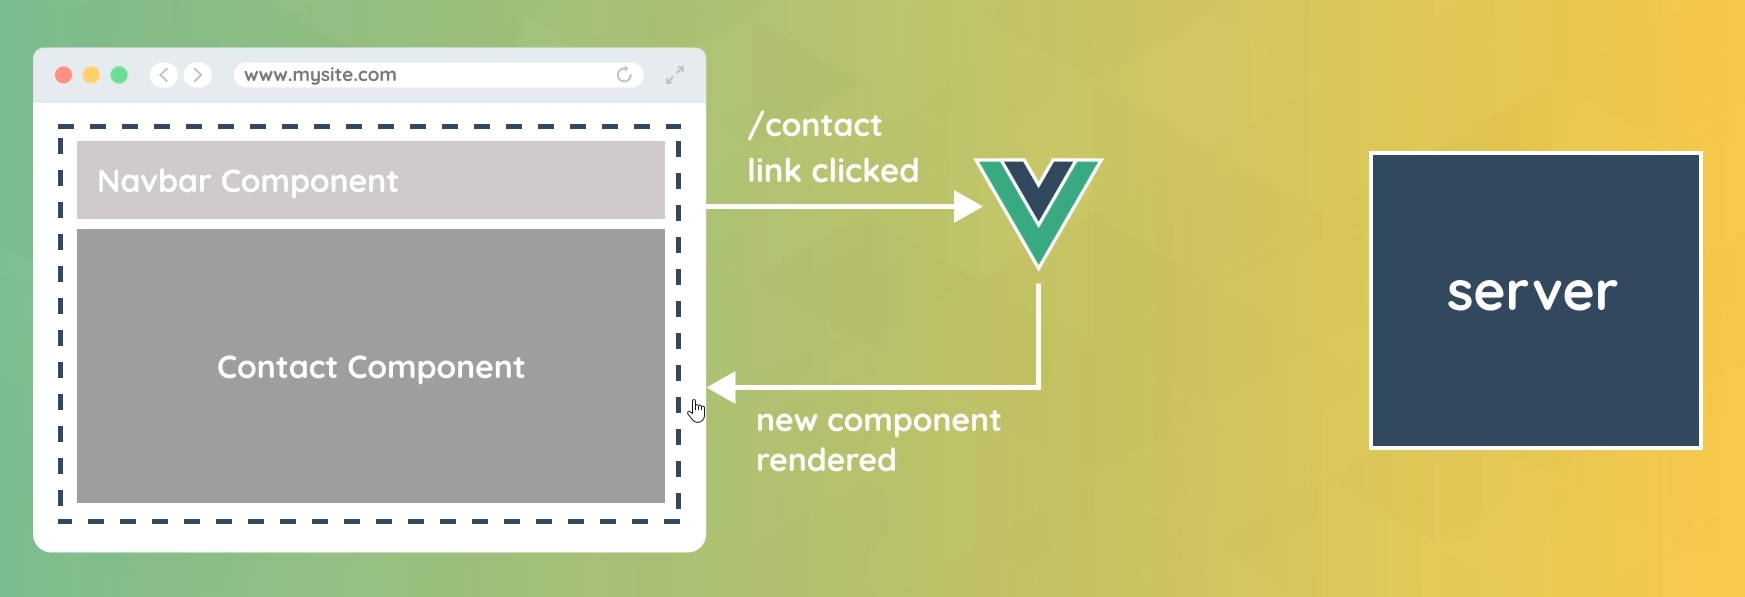
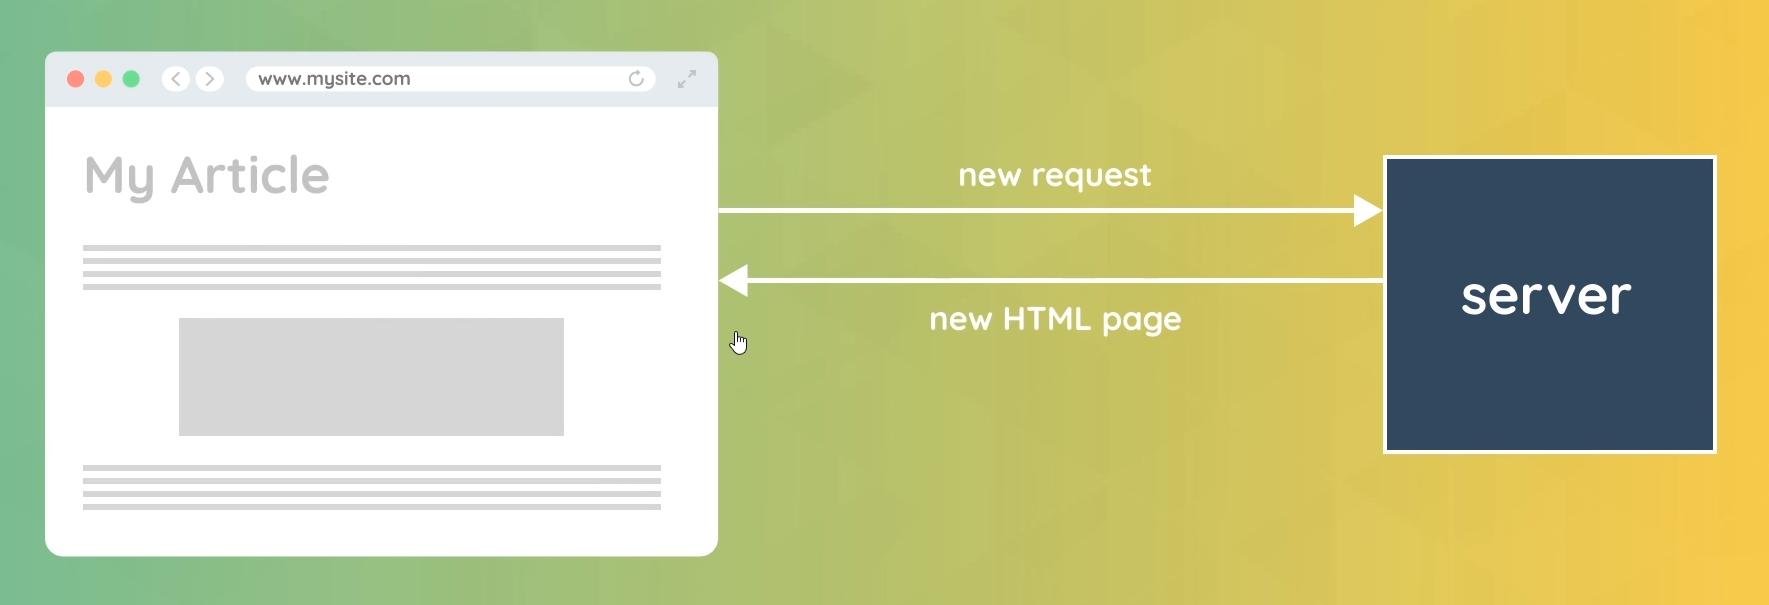
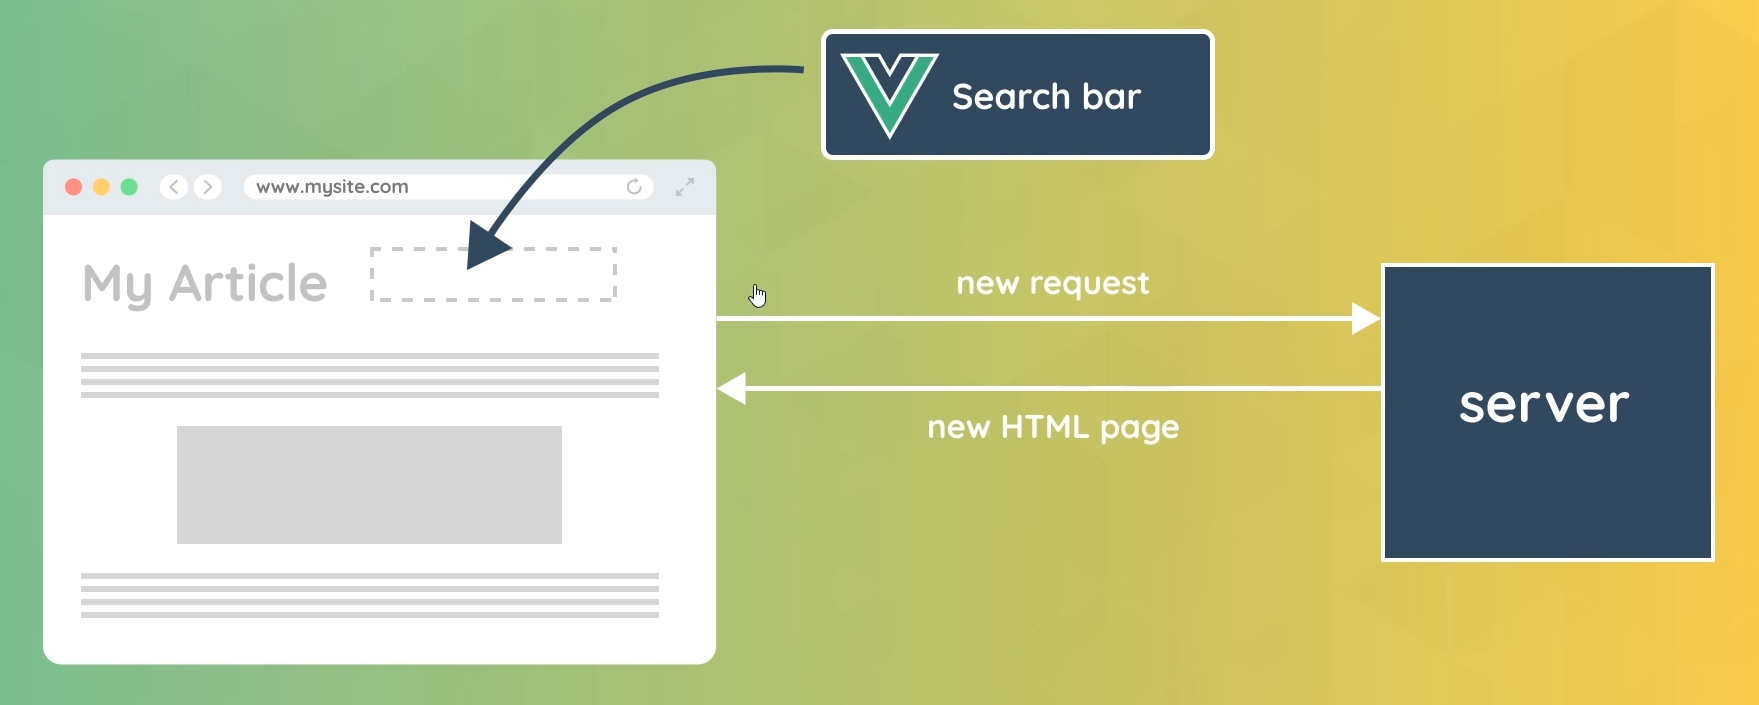
Single Page Application (SPA)
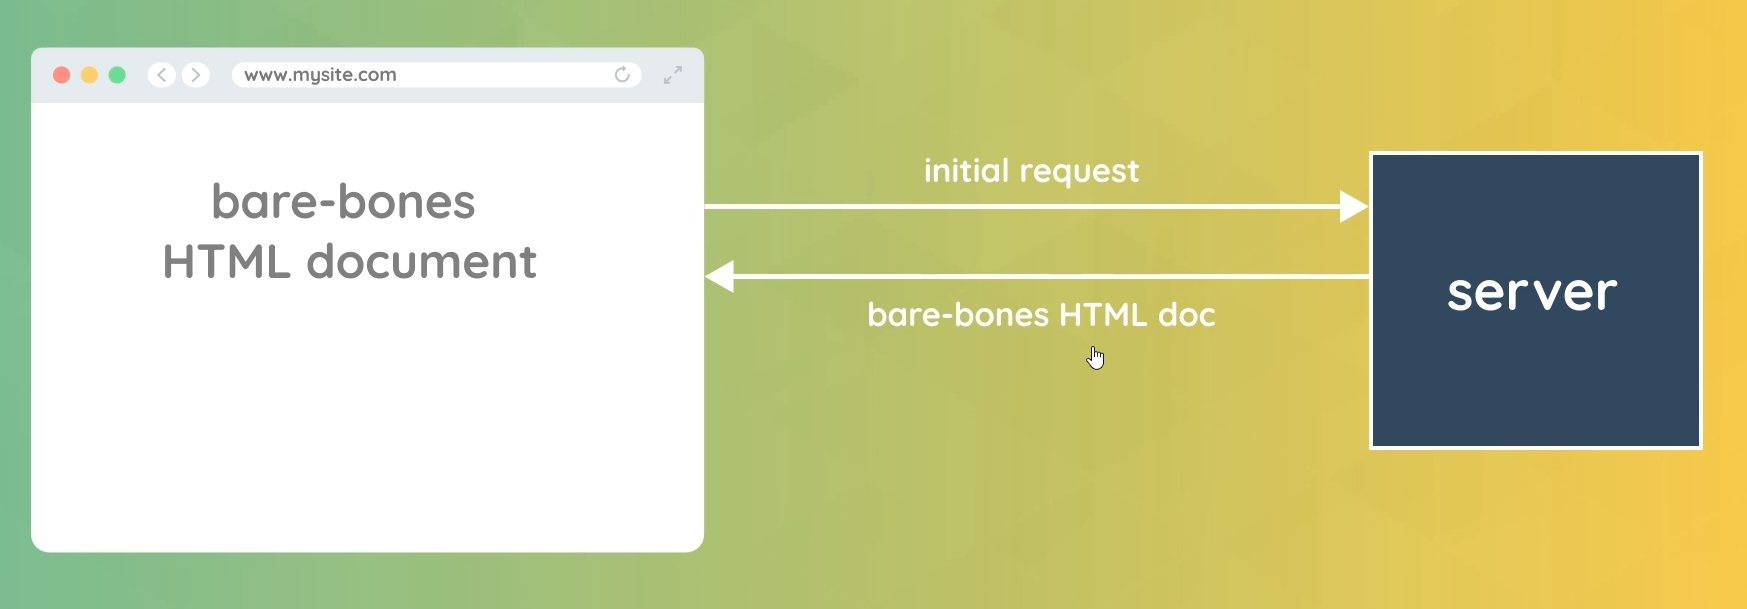
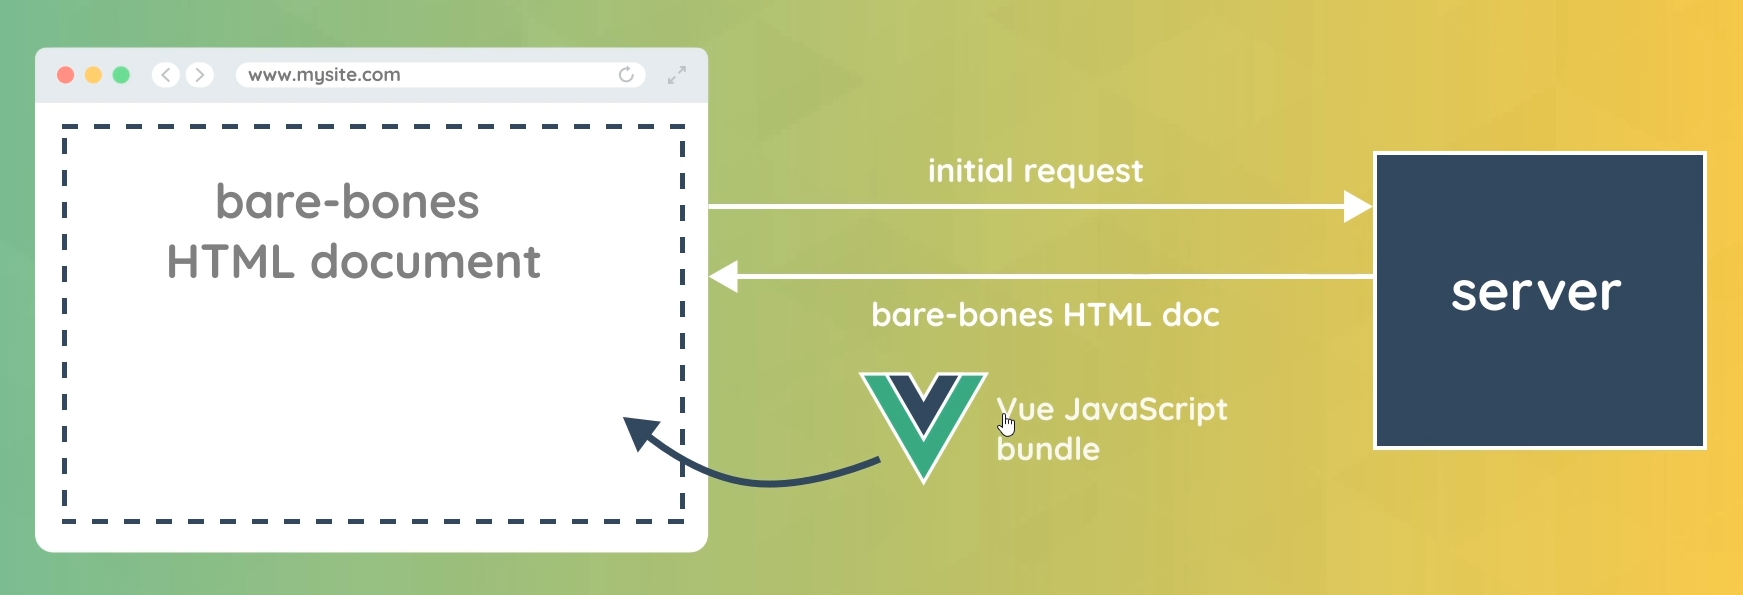
- Only a single HTML page sent (initially) to the browser
- Vue intercepts subsequent requests and handles “page” changes in the browser by swapping what components are shown on the page
- Results in a much faster and smoother website experience
New Features in Vue 3
Vue 3 New Features
The Composition API
- Improves on reusablility, organization & readability
- It does this by giving us a new setup( ) function
Multiple Root Elements
- Can have many root elements side-by-side in a component
<template>
  <div>
    <p>Hello, World!</p>
  </div>
  <div>
    <p>Hello, again!</p>
  </div>
</template>
Teleport Component
- Render content from one component in a different place in the DOM
- Useful for things like modals
Suspense Component
- Used to handle asynchronous components easily
- Can provide fall-back content (e.g. a spinner) until data is loaded
TypeScript Support
- Can now write Vue applications using TypeScript
More Changes
- Multiple v-models for custom components
- Improved Reactivity
- Performance gains
What You Should Already Know
資源
- Net Ninja Youtube Channel (more free tutorials)
- Modern JavaScript Course
- HTML & CSS Free Crash Course
Before You Start…
- Understand the foundations of JavaScript
- functions, objects, arrays, etc
- HTML & (some) CSS
Environment Setup
- 網頁編輯器:VSCode
- 擴充套件(Extensions):Live Server、Vetur、Material Icon Theme
Course Files
資源
Vue Basics
How to use Vue (using the CDN)
資源
Vue CDN
- 使用以下版本
<script src="https://unpkg.com/vue@3.0.2"></script>操作步驟
- <script> 載入 Vue CDN vue@3.0.2 版本
- 新增 app.js 檔案
- <script> 載入 app.js
// index.html

<!DOCTYPE html>
<html lang="en">
<head>
  <meta charset="UTF-8">
  <meta http-equiv="X-UA-Compatible" content="IE=edge">
  <meta name="viewport" content="width=device-width, initial-scale=1.0">
  <title>Learning Vue</title>
  <script src="https://unpkg.com/vue@3.0.2"></script>
</head>
<body>
  <h1>Hello, Vue :)</h1>

  <script src="app.js"></script>
</body>
</html>
// app.js
console.log('hello, vue')Creating a Vue App
// index.html

<!DOCTYPE html>
<html lang="en">
<head>
  <meta charset="UTF-8">
  <meta http-equiv="X-UA-Compatible" content="IE=edge">
  <meta name="viewport" content="width=device-width, initial-scale=1.0">
  <title>Learning Vue</title>
  <script src="https://unpkg.com/vue@3.0.2"></script>
</head>
<body>
  <h1>Hello, Vue :)</h1>

  <div id="app">
    <h2>I am the template now</h2>
  </div>


  <script src="app.js"></script>
</body>
</html>
// app.js
const app = Vue.createApp({
// data, functions
// template: '<h2>I am the template</h2>'
})
app.mount('#app')Templates & Data
// index.html

<!DOCTYPE html>
<html lang="en">
<head>
  <meta charset="UTF-8">
  <meta http-equiv="X-UA-Compatible" content="IE=edge">
  <meta name="viewport" content="width=device-width, initial-scale=1.0">
  <title>Learning Vue</title>
  <script src="https://unpkg.com/vue@3.0.2"></script>
</head>
<body>
  <h1>Hello, Vue :)</h1>

  <div id="app">
    <p>{{ title }} - {{ author }} - {{ age }}</p>
  </div>


  <script src="app.js"></script>
</body>
</html>
// app.js
const app = Vue.createApp({
data() {
return {
title: 'The Final Empire',
author: 'Brandon Sanderson',
age: 45
}
}
})
app.mount('#app')Methods & Click Events
// index.html

<!DOCTYPE html>
<html lang="en">
<head>
  <meta charset="UTF-8">
  <meta http-equiv="X-UA-Compatible" content="IE=edge">
  <meta name="viewport" content="width=device-width, initial-scale=1.0">
  <title>Learning Vue</title>
  <script src="https://unpkg.com/vue@3.0.2"></script>
</head>
<body>
  <h1>Hello, Vue :)</h1>

  <div id="app">
    <p>{{ title }} - {{ author }} - {{ age }}</p>

    <button v-on:click="age++">Increase age</button>
    <button v-on:click="age--">Decrease age</button>
    <div @click="changeTitle('Oathbringer')">Change book title</div>
  </div>


  <script src="app.js"></script>
</body>
</html>
// app.js
const app = Vue.createApp({
data() {
return {
title: 'The Final Empire',
author: 'Brandon Sanderson',
age: 45
}
},
methods: {
changeTitle(title) {
// this.title = 'Words of Randiance'
this.title = title
}
}
})
app.mount('#app')Conditional Rendering (條件渲染)
// index.html

<!DOCTYPE html>
<html lang="en">
<head>
  <meta charset="UTF-8">
  <meta http-equiv="X-UA-Compatible" content="IE=edge">
  <meta name="viewport" content="width=device-width, initial-scale=1.0">
  <title>Learning Vue</title>
  <script src="https://unpkg.com/vue@3.0.2"></script>
</head>
<body>
  <h1>Hello, Vue :)</h1>

  <div id="app">
    <div v-if="showBooks">
      <p>{{ title }} - {{ author }} - {{ age }}</p>
    </div>

    <button @click="toggleShowBooks">
      <span v-if="showBooks">Hide Books</span>
      <span v-else>Show Books</span>
    </button>

    <div v-show="showBooks">currently showing books</div>
  </div>


  <script src="app.js"></script>
</body>
</html>
// app.js
const app = Vue.createApp({
data() {
return {
showBooks: true,
title: 'The Final Empire',
author: 'Brandon Sanderson',
age: 45
}
},
methods: {
toggleShowBooks() {
this.showBooks = !this.showBooks
}
}
})
app.mount('#app')Other Mouse Events
// index.html

<!DOCTYPE html>
<html lang="en">
<head>
  <meta charset="UTF-8">
  <meta http-equiv="X-UA-Compatible" content="IE=edge">
  <meta name="viewport" content="width=device-width, initial-scale=1.0">
  <title>Learning Vue</title>
  <script src="https://unpkg.com/vue@3.0.2"></script>
  <style>
    .box {
      padding: 100px 0;
      width: 400px;
      text-align: center;
      background: #ddd;
      margin: 20px;
      display: inline-block;
    }
  </style>
</head>
<body>
  <h1>Hello, Vue :)</h1>

  <div id="app">
    <div v-if="showBooks">
      <p>{{ title }} - {{ author }} - {{ age }}</p>
    </div>

    <button @click="toggleShowBooks">
      <span v-if="showBooks">Hide Books</span>
      <span v-else>Show Books</span>
    </button>

    <br>
    <!-- mouse events -->
    <div class="box" @mouseover="handleEvent($event, 5)">mouseover (enter)</div>
    <div class="box" @mouseleave="handleEvent">mouseleave</div>
    <div class="box" @dblclick="handleEvent">double click</div>
    <div class="box" @mousemove="handleMousemove">position - {{ x }} {{ y }}</div>

  </div>

  <script src="app.js"></script>
</body>
</html>
// app.js
const app = Vue.createApp({
data() {
return {
showBooks: true,
title: 'The Final Empire',
author: 'Brandon Sanderson',
age: 45,
x: 0,
y: 0
}
},
methods: {
toggleShowBooks() {
this.showBooks = !this.showBooks
},
handleEvent(e, data) {
console.log(e, e.type)
if (data) {
console.log(data)
}
},
handleMousemove(e) {
this.x = e.offsetX
this.y = e.offsetY
}
}
})
app.mount('#app')Outputting Lists (v-for)
// index.html

<!DOCTYPE html>
<html lang="en">
<head>
  <meta charset="UTF-8">
  <meta http-equiv="X-UA-Compatible" content="IE=edge">
  <meta name="viewport" content="width=device-width, initial-scale=1.0">
  <title>Learning Vue</title>
  <script src="https://unpkg.com/vue@3.0.2"></script>
  <style>
    .box {
      padding: 100px 0;
      width: 400px;
      text-align: center;
      background: #ddd;
      margin: 20px;
      display: inline-block;
    }
  </style>
</head>
<body>
  <h1>Hello, Vue :)</h1>

  <div id="app">
    <div v-if="showBooks">
      <ul>
        <li v-for="book in books">
          <h3>{{ book.title }}</h3>
          <p>{{ book.author }}</p>
        </li>
      </ul>
    </div>

    <button @click="toggleShowBooks">
      <span v-if="showBooks">Hide Books</span>
      <span v-else>Show Books</span>
    </button>


  </div>

  <script src="app.js"></script>
</body>
</html>
// app.js
const app = Vue.createApp({
data() {
return {
showBooks: true,
books: [
{ title: 'name of the wind', author: 'patrick rothfuss'},
{ title: 'the way of kings', author: 'brandon sanderson'},
{ title: 'the final empire', author: 'brandon sanderson'},
]
}
},
methods: {
toggleShowBooks() {
this.showBooks = !this.showBooks
},
}
})
app.mount('#app')Attribute Binding
// index.html

<!DOCTYPE html>
<html lang="en">
<head>
  <meta charset="UTF-8">
  <meta http-equiv="X-UA-Compatible" content="IE=edge">
  <meta name="viewport" content="width=device-width, initial-scale=1.0">
  <title>Learning Vue</title>
  <script src="https://unpkg.com/vue@3.0.2"></script>
  <style>
    .box {
      padding: 100px 0;
      width: 400px;
      text-align: center;
      background: #ddd;
      margin: 20px;
      display: inline-block;
    }
  </style>
</head>
<body>
  <h1>Hello, Vue :)</h1>

  <div id="app">
    <!-- attribute binding -->
    <!-- <a :href="url">Best website ever</a> -->

    <div v-if="showBooks">
      <ul>
        <li v-for="book in books">
          <img :src="book.img" :alt="book.title">
          <h3>{{ book.title }}</h3>
          <p>{{ book.author }}</p>
        </li>
      </ul>
    </div>

    <button @click="toggleShowBooks">
      <span v-if="showBooks">Hide Books</span>
      <span v-else>Show Books</span>
    </button>


  </div>

  <script src="app.js"></script>
</body>
</html>
// app.js
const app = Vue.createApp({
data() {
return {
url: 'http://www.thenetninja.co.uk',
showBooks: true,
books: [
{ title: 'name of the wind', author: 'patrick rothfuss', img: 'assets/1.jpg'},
{ title: 'the way of kings', author: 'brandon sanderson', img: 'assets/2.jpg'},
{ title: 'the final empire', author: 'brandon sanderson', img: 'assets/3.jpg'},
]
}
},
methods: {
toggleShowBooks() {
this.showBooks = !this.showBooks
},
}
})
app.mount('#app')縮寫
v-on = @
v-bind = :
Dynamic Classes
資源
// index.html

<!DOCTYPE html>
<html lang="en">
<head>
  <meta charset="UTF-8">
  <meta http-equiv="X-UA-Compatible" content="IE=edge">
  <meta name="viewport" content="width=device-width, initial-scale=1.0">
  <title>Learning Vue</title>
  <script src="https://unpkg.com/vue@3.0.2"></script>
  <style>
    body {
      background: #eee;
      max-width: 960px;
      margin: 20px auto;
    }
    p, h3, ul {
      margin: 0;
      padding: 0;
    }
    li {
      list-style-type: none;
      background: #fff;
      margin: 20px auto;
      padding: 10px 20px;
      border-radius: 10px;
      display: flex;
      align-items: center;
      justify-content: space-between;
    }
    li.fav {
      background: #ff9ed2;
      color: #fff;
    }
  </style>
</head>
<body>
  <h1>Hello, Vue :)</h1>

  <div id="app">
    <!-- attribute binding -->
    <!-- <a :href="url">Best website ever</a> -->

    <div v-if="showBooks">
      <ul>
        <li v-for="book in books" :class="{ fav: book.isFav }">
          <img :src="book.img" :alt="book.title">
          <h3>{{ book.title }}</h3>
          <p>{{ book.author }}</p>
        </li>
      </ul>
    </div>

    <button @click="toggleShowBooks">
      <span v-if="showBooks">Hide Books</span>
      <span v-else>Show Books</span>
    </button>

  </div>

  <script src="app.js"></script>
</body>
</html>
// app.js
const app = Vue.createApp({
data() {
return {
url: 'http://www.thenetninja.co.uk',
showBooks: true,
books: [
{ title: 'name of the wind', author: 'patrick rothfuss', img: 'assets/1.jpg', isFav: true },
{ title: 'the way of kings', author: 'brandon sanderson', img: 'assets/2.jpg', isFav: false },
{ title: 'the final empire', author: 'brandon sanderson', img: 'assets/3.jpg', isFav: true },
]
}
},
methods: {
toggleShowBooks() {
this.showBooks = !this.showBooks
},
}
})
app.mount('#app')CHALLENGE – Add to Favs
// index.html

<!DOCTYPE html>
<html lang="en">
<head>
  <meta charset="UTF-8">
  <meta http-equiv="X-UA-Compatible" content="IE=edge">
  <meta name="viewport" content="width=device-width, initial-scale=1.0">
  <title>Learning Vue</title>
  <script src="https://unpkg.com/vue@3.0.2"></script>
  <style>
    body {
      background: #eee;
      max-width: 960px;
      margin: 20px auto;
    }
    p, h3, ul {
      margin: 0;
      padding: 0;
    }
    li {
      list-style-type: none;
      background: #fff;
      margin: 20px auto;
      padding: 10px 20px;
      border-radius: 10px;
      display: flex;
      align-items: center;
      justify-content: space-between;
    }
    li.fav {
      background: #ff9ed2;
      color: #fff;
    }
  </style>
</head>
<body>
  <h1>Hello, Vue :)</h1>

  <div id="app">
    <!-- attribute binding -->
    <!-- <a :href="url">Best website ever</a> -->

    <div v-if="showBooks">
      <ul>
        <li v-for="book in books" :class="{ fav: book.isFav }">
          <img :src="book.img" :alt="book.title">
          <h3>{{ book.title }}</h3>
          <p>{{ book.author }}</p>
        </li>
      </ul>
    </div>

    <button @click="toggleShowBooks">
      <span v-if="showBooks">Hide Books</span>
      <span v-else>Show Books</span>
    </button>


  </div>

  <script src="app.js"></script>
</body>
</html>
// app.js
const app = Vue.createApp({
data() {
return {
url: 'http://www.thenetninja.co.uk',
showBooks: true,
books: [
{ title: 'name of the wind', author: 'patrick rothfuss', img: 'assets/1.jpg', isFav: true },
{ title: 'the way of kings', author: 'brandon sanderson', img: 'assets/2.jpg', isFav: false },
{ title: 'the final empire', author: 'brandon sanderson', img: 'assets/3.jpg', isFav: true },
]
}
},
methods: {
toggleShowBooks() {
this.showBooks = !this.showBooks
},
}
})
app.mount('#app')
// Challenge - Add to Favs
// - attach a click event to each li tag (for each book)
// - when a user clicks an li, toggle the 'isFav' property of that bookSOLUTION – Add to Favs
// index.html

<!DOCTYPE html>
<html lang="en">
<head>
  <meta charset="UTF-8">
  <meta http-equiv="X-UA-Compatible" content="IE=edge">
  <meta name="viewport" content="width=device-width, initial-scale=1.0">
  <title>Learning Vue</title>
  <script src="https://unpkg.com/vue@3.0.2"></script>
  <style>
    body {
      background: #eee;
      max-width: 960px;
      margin: 20px auto;
    }
    p, h3, ul {
      margin: 0;
      padding: 0;
    }
    li {
      list-style-type: none;
      background: #fff;
      margin: 20px auto;
      padding: 10px 20px;
      border-radius: 10px;
      display: flex;
      align-items: center;
      justify-content: space-between;
    }
    li.fav {
      background: #ff9ed2;
      color: #fff;
    }
  </style>
</head>
<body>
  <h1>Hello, Vue :)</h1>

  <div id="app">
    <!-- attribute binding -->
    <!-- <a :href="url">Best website ever</a> -->

    <div v-if="showBooks">
      <ul>
        <li v-for="book in books" :class="{ fav: book.isFav }" @click="toggleFav(book)">
          <img :src="book.img" :alt="book.title">
          <h3>{{ book.title }}</h3>
          <p>{{ book.author }}</p>
        </li>
      </ul>
    </div>

    <button @click="toggleShowBooks">
      <span v-if="showBooks">Hide Books</span>
      <span v-else>Show Books</span>
    </button>

  </div>

  <script src="app.js"></script>
</body>
</html>
// app.js
const app = Vue.createApp({
data() {
return {
url: 'http://www.thenetninja.co.uk',
showBooks: true,
books: [
{ title: 'name of the wind', author: 'patrick rothfuss', img: 'assets/1.jpg', isFav: true },
{ title: 'the way of kings', author: 'brandon sanderson', img: 'assets/2.jpg', isFav: false },
{ title: 'the final empire', author: 'brandon sanderson', img: 'assets/3.jpg', isFav: true },
]
}
},
methods: {
toggleShowBooks() {
this.showBooks = !this.showBooks
},
toggleFav(book) {
book.isFav = !book.isFav
}
}
})
app.mount('#app')
// Challenge - Add to Favs
// - attach a click event to each li tag (for each book)
// - when a user clicks an li, toggle the 'isFav' property of that bookComputes Properties
// index.html

<!DOCTYPE html>
<html lang="en">
<head>
  <meta charset="UTF-8">
  <meta http-equiv="X-UA-Compatible" content="IE=edge">
  <meta name="viewport" content="width=device-width, initial-scale=1.0">
  <title>Learning Vue</title>
  <script src="https://unpkg.com/vue@3.0.2"></script>
  <style>
    body {
      background: #eee;
      max-width: 960px;
      margin: 20px auto;
    }
    p, h3, ul {
      margin: 0;
      padding: 0;
    }
    li {
      list-style-type: none;
      background: #fff;
      margin: 20px auto;
      padding: 10px 20px;
      border-radius: 10px;
      display: flex;
      align-items: center;
      justify-content: space-between;
    }
    li.fav {
      background: #ff9ed2;
      color: #fff;
    }
  </style>
</head>
<body>
  <h1>Hello, Vue :)</h1>

  <div id="app">
    <!-- attribute binding -->
    <!-- <a :href="url">Best website ever</a> -->

    <div v-if="showBooks">
      <ul>
        <li v-for="book in filteredBooks" :class="{ fav: book.isFav }" @click="toggleFav(book)">
          <img :src="book.img" :alt="book.title">
          <h3>{{ book.title }}</h3>
          <p>{{ book.author }}</p>
        </li>
      </ul>
    </div>

    <button @click="toggleShowBooks">
      <span v-if="showBooks">Hide Books</span>
      <span v-else>Show Books</span>
    </button>

  </div>

  <script src="app.js"></script>
</body>
</html>
// app.js
const app = Vue.createApp({
data() {
return {
url: 'http://www.thenetninja.co.uk',
showBooks: true,
books: [
{ title: 'name of the wind', author: 'patrick rothfuss', img: 'assets/1.jpg', isFav: true },
{ title: 'the way of kings', author: 'brandon sanderson', img: 'assets/2.jpg', isFav: false },
{ title: 'the final empire', author: 'brandon sanderson', img: 'assets/3.jpg', isFav: true },
]
}
},
methods: {
toggleShowBooks() {
this.showBooks = !this.showBooks
},
toggleFav(book) {
book.isFav = !book.isFav
}
},
computed: {
filteredBooks() {
return this.books.filter((book) => book.isFav)
}
}
})
app.mount('#app')
第3節:The Vue CLI (for Bigger Projects)
Why Use the Vue CLI?
Vue Websites
- Use modern JavaScript features
- Provides us with a live-reload dev server
- Optimize our code for production
How to Use the Vue CLI
- Node.js – 必要
- Command line – 必要,Node.js command prompt、終端機、命令提示字元
- Node.js 版本查詢 node -v
- Vue CLI,npm install -g @vue/cli
- 移動到專案位置,cd 專案名稱位置
- 執行指令 vue create modal-project
關於舊版本
Vue CLI 的包名稱由 vue-cli 改成了@vue/cli。如果你已經全局安裝了舊版本的vue-cli(1.x 或2.x),你需要先通過 npm uninstall vue-cli -g 或 yarn global remove vue-cli 卸載它。
執行指令步驟 vue create modal-project
- Manually select features
- Check the features needed for your project:
- Choose Vue version
- Babel
- Choose a version of Vue.js that you want to start the project with
- 3.x
- Where do you prefer placing config for Babel, ESLint, etc.?
- In dedicated config files
- Save this as a preset for future projects
- N
安裝完成後指令
- cd 專案名稱
- 使用 code . 打開 VSCode 編輯器
New Project Walkthrough
Vue Files & Templates
打開 VSCode 終端機
- 執行指令:npm run serve
// App.vue

<template>
  <h1>{{ title }}</h1>
</template>

<script>
export default {
  name: 'App',
  data() {
    return {
      title: 'My First Vue App :)'
    }
  }
}
</script>

<style>
#app {
  font-family: Avenir, Helvetica, Arial, sans-serif;
  -webkit-font-smoothing: antialiased;
  -moz-osx-font-smoothing: grayscale;
  text-align: center;
  color: #2c3e50;
  margin-top: 60px;
}
h1 {
  border-bottom: 1px solid #ddd;
  display: inline-block;
  padding-bottom: 10px;
}
</style>
下載 GitHub Course Files 須知
- 安裝 node_modules
- 開啟 Terminal
- 執行指令 npm install
Template Refs (模板引用)
// App.vue

<template>
  <h1>{{ title }}</h1>
  <input type="text" ref="name">
  <button @click="handleClick">click me</button>
</template>

<script>
export default {
  name: 'App',
  data() {
    return {
      title: 'My First Vue App :)'
    }
  },
  methods: {
    handleClick() {
      console.log(this.$refs.name)
      this.$refs.name.classList.add('active')
      this.$refs.name.focus()
    }
  }
}
</script>

<style>
#app {
  font-family: Avenir, Helvetica, Arial, sans-serif;
  -webkit-font-smoothing: antialiased;
  -moz-osx-font-smoothing: grayscale;
  text-align: center;
  color: #2c3e50;
  margin-top: 60px;
}
h1 {
  border-bottom: 1px solid #ddd;
  display: inline-block;
  padding-bottom: 10px;
}
</style>
Multiple Components
Multiple Components
- App.vue – root component
- Header.vue
- Article.vue
- Content.vue
- Comments.vue
- Footer.vue
Terminology
- Article.vue – parent component
- Content.vue, Comments.vue – child components
- App.vue – parent component
- Header.vue, Article.vue, Footer.vue- child components
Component Tree,App.vue, Header.vue, Article.vue, Footer,vue, Content.vue, Comments.vue。
操作步驟
- 移除 Components 裡面的 HelloWorld.vue
- 在 Components 裡面新增 Modal.vue
// Modal.vue

<template>
  <div class="backdrop">
    <div class="modal">
      <p>modal content</p>
    </div>
  </div>
</template>

<style>
  .modal {
    width: 400px;
    padding: 20px;
    margin: 100px auto;
    background: white;
    border-radius: 10px;
  }
  .backdrop {
    top: 0;
    position: fixed;
    background: rgba(0,0,0,0.5);
    width: 100%;
    height: 100%;
  }
</style>
// App.vue
<template>
<h1>{{ title }}</h1>
<Modal />
</template>
<script>
import Modal from './components/Modal.vue'
export default {
name: 'App',
components: { Modal },
data() {
return {
title: 'My First Vue App :)'
}
}
}
</script>
<style>
#app {
font-family: Avenir, Helvetica, Arial, sans-serif;
-webkit-font-smoothing: antialiased;
-moz-osx-font-smoothing: grayscale;
text-align: center;
color: #2c3e50;
margin-top: 60px;
}
h1 {
border-bottom: 1px solid #ddd;
display: inline-block;
padding-bottom: 10px;
}
</style>
Component Styles & Global Styles
Modal.vue style 設定方式
- <style> 加上 scoped
- make the selector more specific
// Modal.vue - 1

<template>
  <div class="backdrop">
    <div class="modal">
      <h1>Modal Title</h1>
      <p>modal content</p>
    </div>
  </div>
</template>

<style scoped>
  .modal {
    width: 400px;
    padding: 20px;
    margin: 100px auto;
    background: white;
    border-radius: 10px;
  }
  .backdrop {
    top: 0;
    position: fixed;
    background: rgba(0,0,0,0.5);
    width: 100%;
    height: 100%;
  }
  h1 {
    color: #03cfb4;
    border: none;
    padding: 0;
  }
</style>
// Modal.vue - 2
<template>
<div class="backdrop">
<div class="modal">
<h1>Modal Title</h1>
<p>modal content</p>
</div>
</div>
</template>
<style>
.modal {
width: 400px;
padding: 20px;
margin: 100px auto;
background: white;
border-radius: 10px;
}
.backdrop {
top: 0;
position: fixed;
background: rgba(0,0,0,0.5);
width: 100%;
height: 100%;
}
.modal h1 {
color: #03cfb4;
border: none;
padding: 0;
}
</style>global styles
- 新增 global.css 在 assets 資料夾裡面
- 設定進入點 main.js import 匯入 global.css 檔案
- 覆蓋 global.css 樣式,在 Modal.vue 修改樣式
// assets/global.css

body {
  margin: 0;
}
p {
  font-style: italic;
}
// src/main.js
import { createApp } from 'vue'
import App from './App.vue'
import './assets/global.css'
createApp(App).mount('#app')
// components/Modal.vue

<template>
  <div class="backdrop">
    <div class="modal">
      <h1>Modal Title</h1>
      <p>modal content</p>
    </div>
  </div>
</template>

<style>
  .modal {
    width: 400px;
    padding: 20px;
    margin: 100px auto;
    background: white;
    border-radius: 10px;
  }
  .backdrop {
    top: 0;
    position: fixed;
    background: rgba(0,0,0,0.5);
    width: 100%;
    height: 100%;
  }
  .modal h1 {
    color: #03cfb4;
    border: none;
    padding: 0;
  }
  .modal p {
    font-style: normal;
  }
</style>
Passing Data with Props (使用 Props 傳遞資料)
we do this by using what’s known as props in vue, and we can pass props from a parent component to a child component
為什麼我們要這樣做,兩個原因
- more dynamic and more reusable(可重複使用的)
- multiple components and they all use the same data
// App.vue - 1

<template>
  <h1>{{ title }}</h1>
  <Modal header="Sign up for the Giveway!" text="Grab your ninja swag for half price!" />
</template>

<script>
import Modal from './components/Modal.vue'

export default {
  name: 'App',
  components: { Modal },
  data() {
    return {
      title: 'My First Vue App :)'
    }
  }
}
</script>

<style>
#app {
  font-family: Avenir, Helvetica, Arial, sans-serif;
  -webkit-font-smoothing: antialiased;
  -moz-osx-font-smoothing: grayscale;
  text-align: center;
  color: #2c3e50;
  margin-top: 60px;
}
h1 {
  border-bottom: 1px solid #ddd;
  display: inline-block;
  padding-bottom: 10px;
}
</style>
// Modal.vue - 1

<template>
  <div class="backdrop">
    <div class="modal">
      <h1>{{ header }}</h1>
      <p>{{ text }}</p>
    </div>
  </div>
</template>

<script>
export default {
  props: ['header', 'text']
}
</script>

<style>
  .modal {
    width: 400px;
    padding: 20px;
    margin: 100px auto;
    background: white;
    border-radius: 10px;
  }
  .backdrop {
    top: 0;
    position: fixed;
    background: rgba(0,0,0,0.5);
    width: 100%;
    height: 100%;
  }
  .modal h1 {
    color: #03cfb4;
    border: none;
    padding: 0;
  }
  .modal p {
    font-style: normal;
  }
</style>
// App.vue - 2
<template>
<h1>{{ title }}</h1>
<Modal :header="header" :text="text" />
</template>
<script>
import Modal from './components/Modal.vue'
export default {
name: 'App',
components: { Modal },
data() {
return {
title: 'My First Vue App :)',
header: 'Sign up for the Giveway',
text: 'Grab your ninja swag for half price!'
}
}
}
</script>
<style>
#app {
font-family: Avenir, Helvetica, Arial, sans-serif;
-webkit-font-smoothing: antialiased;
-moz-osx-font-smoothing: grayscale;
text-align: center;
color: #2c3e50;
margin-top: 60px;
}
h1 {
border-bottom: 1px solid #ddd;
display: inline-block;
padding-bottom: 10px;
}
</style>
// Modal.vue - 2

<template>
  <div class="backdrop">
    <div class="modal">
      <h1>{{ header }}</h1>
      <p>{{ text }}</p>
    </div>
  </div>
</template>

<script>
export default {
  props: ['header', 'text']
}
</script>

<style>
  .modal {
    width: 400px;
    padding: 20px;
    margin: 100px auto;
    background: white;
    border-radius: 10px;
  }
  .backdrop {
    top: 0;
    position: fixed;
    background: rgba(0,0,0,0.5);
    width: 100%;
    height: 100%;
  }
  .modal h1 {
    color: #03cfb4;
    border: none;
    padding: 0;
  }
  .modal p {
    font-style: normal;
  }
</style>
// App.vue - 3
<template>
<h1>{{ title }}</h1>
<Modal :header="header" :text="text" theme="sale" />
</template>
<script>
import Modal from './components/Modal.vue'
export default {
name: 'App',
components: { Modal },
data() {
return {
title: 'My First Vue App :)',
header: 'Sign up for the Giveway',
text: 'Grab your ninja swag for half price!'
}
}
}
</script>
<style>
#app {
font-family: Avenir, Helvetica, Arial, sans-serif;
-webkit-font-smoothing: antialiased;
-moz-osx-font-smoothing: grayscale;
text-align: center;
color: #2c3e50;
margin-top: 60px;
}
h1 {
border-bottom: 1px solid #ddd;
display: inline-block;
padding-bottom: 10px;
}
</style>
// Modal.vue - 3

<template>
  <div class="backdrop">
    <div class="modal" :class="{ sale: theme === 'sale'}">
      <h1>{{ header }}</h1>
      <p>{{ text }}</p>
    </div>
  </div>
</template>

<script>
export default {
  props: ['header', 'text', 'theme']
}
</script>

<style>
  .modal {
    width: 400px;
    padding: 20px;
    margin: 100px auto;
    background: white;
    border-radius: 10px;
  }
  .backdrop {
    top: 0;
    position: fixed;
    background: rgba(0,0,0,0.5);
    width: 100%;
    height: 100%;
  }
  .modal h1 {
    color: #03cfb4;
    border: none;
    padding: 0;
  }
  .modal p {
    font-style: normal;
  }

  .modal.sale {
    background: crimson;
    color: white;
  }
  .modal.sale h1 {
    color: white;
  }
</style>
And this is how we pass data as props into components, which A makes them more reusable, B makes them customizable, and C allows us to have a single source of truth when it comes to data.
Emitting Custom Events
show / hide Modal
// App.vue

<template>
  <h1>{{ title }}</h1>
  <p>Welcome...</p>
  <div v-if="showModal">
    <Modal :header="header" :text="text" theme="sale" @close="toggleModal" />
  </div>
  <button @click="toggleModal">open modal</button>
</template>

<script>
import Modal from './components/Modal.vue'

export default {
  name: 'App',
  components: { Modal },
  data() {
    return {
      title: 'My First Vue App :)',
      header: 'Sign up for the Giveway',
      text: 'Grab your ninja swag for half price!',
      showModal: false
    }
  },
  methods: {
    toggleModal() {
      this.showModal = !this.showModal
    }
  }
}
</script>

<style>
#app {
  font-family: Avenir, Helvetica, Arial, sans-serif;
  -webkit-font-smoothing: antialiased;
  -moz-osx-font-smoothing: grayscale;
  text-align: center;
  color: #2c3e50;
  margin-top: 60px;
}
h1 {
  border-bottom: 1px solid #ddd;
  display: inline-block;
  padding-bottom: 10px;
}
</style>
// Modal.vue

<template>
  <div class="backdrop" @click="closeModal">
    <div class="modal" :class="{ sale: theme === 'sale'}">
      <h1>{{ header }}</h1>
      <p>{{ text }}</p>
    </div>
  </div>
</template>

<script>
export default {
  props: ['header', 'text', 'theme'],
  methods: {
    closeModal() {
      this.$emit('close')
    }
  }
}
</script>

<style>
  .modal {
    width: 400px;
    padding: 20px;
    margin: 100px auto;
    background: white;
    border-radius: 10px;
  }
  .backdrop {
    top: 0;
    position: fixed;
    background: rgba(0,0,0,0.5);
    width: 100%;
    height: 100%;
  }
  .modal h1 {
    color: #03cfb4;
    border: none;
    padding: 0;
  }
  .modal p {
    font-style: normal;
  }

  .modal.sale {
    background: crimson;
    color: white;
  }
  .modal.sale h1 {
    color: white;
  }
</style>
Click Event Modifiers
open modal
- @click.right=”toggleModal”
- @click.shift=”toggleModal”
- @click.alt=”toggleModal”
close modal
- @click.self=”closeModal”
// App.vue

<template>
  <h1>{{ title }}</h1>
  <p>Welcome...</p>
  <div v-if="showModal">
    <Modal :header="header" :text="text" theme="sale" @close="toggleModal" />
  </div>
  <button @click.alt="toggleModal">open modal (alt)</button>
</template>

<script>
import Modal from './components/Modal.vue'

export default {
  name: 'App',
  components: { Modal },
  data() {
    return {
      title: 'My First Vue App :)',
      header: 'Sign up for the Giveway',
      text: 'Grab your ninja swag for half price!',
      showModal: false
    }
  },
  methods: {
    toggleModal() {
      this.showModal = !this.showModal
    }
  }
}
</script>

<style>
#app {
  font-family: Avenir, Helvetica, Arial, sans-serif;
  -webkit-font-smoothing: antialiased;
  -moz-osx-font-smoothing: grayscale;
  text-align: center;
  color: #2c3e50;
  margin-top: 60px;
}
h1 {
  border-bottom: 1px solid #ddd;
  display: inline-block;
  padding-bottom: 10px;
}
</style>
// Modal.vue
<template>
<div class="backdrop" @click.self="closeModal">
<div class="modal" :class="{ sale: theme === 'sale'}">
<h1>{{ header }}</h1>
<p>{{ text }}</p>
</div>
</div>
</template>
<script>
export default {
props: ['header', 'text', 'theme'],
methods: {
closeModal() {
this.$emit('close')
}
}
}
</script>
<style>
.modal {
width: 400px;
padding: 20px;
margin: 100px auto;
background: white;
border-radius: 10px;
}
.backdrop {
top: 0;
position: fixed;
background: rgba(0,0,0,0.5);
width: 100%;
height: 100%;
}
.modal h1 {
color: #03cfb4;
border: none;
padding: 0;
}
.modal p {
font-style: normal;
}
.modal.sale {
background: crimson;
color: white;
}
.modal.sale h1 {
color: white;
}
</style>Slots(插槽)
// App.vue - 1

<template>
  <h1>{{ title }}</h1>
  <p>Welcome...</p>
  <div v-if="showModal">
    <Modal  theme="sale" @close="toggleModal">
      <template v-slot:links>
        <a href="#">sign up now</a>
        <a href="#">more info</a>
      </template>
      <h1>Ninja Givaway</h1>
      <p>Grab your ninja swag for half price!</p>
    </Modal>
  </div>
  <button @click.alt="toggleModal">open modal (alt)</button>
</template>

<script>
import Modal from './components/Modal.vue'

export default {
  name: 'App',
  components: { Modal },
  data() {
    return {
      title: 'My First Vue App :)',
      header: 'Sign up for the Giveway',
      text: 'Grab your ninja swag for half price!',
      showModal: false
    }
  },
  methods: {
    toggleModal() {
      this.showModal = !this.showModal
    }
  }
}
</script>

<style>
#app {
  font-family: Avenir, Helvetica, Arial, sans-serif;
  -webkit-font-smoothing: antialiased;
  -moz-osx-font-smoothing: grayscale;
  text-align: center;
  color: #2c3e50;
  margin-top: 60px;
}
h1 {
  border-bottom: 1px solid #ddd;
  display: inline-block;
  padding-bottom: 10px;
}
</style>
// Modal.vue - 1
<template>
<div class="backdrop" @click.self="closeModal">
<div class="modal" :class="{ sale: theme === 'sale'}">
<slot></slot>
<div class="actions">
<slot name="links"></slot>
</div>
</div>
</div>
</template>
<script>
export default {
props: ['theme'],
methods: {
closeModal() {
this.$emit('close')
}
}
}
</script>
<style>
.modal {
width: 400px;
padding: 20px;
margin: 100px auto;
background: white;
border-radius: 10px;
}
.backdrop {
top: 0;
position: fixed;
background: rgba(0,0,0,0.5);
width: 100%;
height: 100%;
}
.modal h1 {
color: #03cfb4;
border: none;
padding: 0;
}
.modal p {
font-style: normal;
}
.modal .actions {
text-align: center;
margin: 30px 0 10px 0;
}
.modal .actions a {
color: #333;
padding: 8px;
border: 1px solid #eee;
border-radius: 4px;
text-decoration: none;
margin: 10px;
}
.modal.sale {
background: crimson;
color: white;
}
.modal.sale h1 {
color: white;
}
.modal.sale .actions {
color: white;
}
.modal.sale .actions a {
color: white;
}
</style>// App.vue - 2
<template>
<h1>{{ title }}</h1>
<p>Welcome...</p>
<div v-if="showModal">
<Modal theme="sale" @close="toggleModal">
<template v-slot:links>
<a href="#">sign up now</a>
<a href="#">more info</a>
</template>
</Modal>
</div>
<button @click.alt="toggleModal">open modal (alt)</button>
</template>
<script>
import Modal from './components/Modal.vue'
export default {
name: 'App',
components: { Modal },
data() {
return {
title: 'My First Vue App :)',
header: 'Sign up for the Giveway',
text: 'Grab your ninja swag for half price!',
showModal: false
}
},
methods: {
toggleModal() {
this.showModal = !this.showModal
}
}
}
</script>
<style>
#app {
font-family: Avenir, Helvetica, Arial, sans-serif;
-webkit-font-smoothing: antialiased;
-moz-osx-font-smoothing: grayscale;
text-align: center;
color: #2c3e50;
margin-top: 60px;
}
h1 {
border-bottom: 1px solid #ddd;
display: inline-block;
padding-bottom: 10px;
}
</style>// Modal.vue - 2
<template>
<div class="backdrop" @click.self="closeModal">
<div class="modal" :class="{ sale: theme === 'sale'}">
<slot>default content</slot>
<div class="actions">
<slot name="links"></slot>
</div>
</div>
</div>
</template>
<script>
export default {
props: ['theme'],
methods: {
closeModal() {
this.$emit('close')
}
}
}
</script>
<style>
.modal {
width: 400px;
padding: 20px;
margin: 100px auto;
background: white;
border-radius: 10px;
}
.backdrop {
top: 0;
position: fixed;
background: rgba(0,0,0,0.5);
width: 100%;
height: 100%;
}
.modal h1 {
color: #03cfb4;
border: none;
padding: 0;
}
.modal p {
font-style: normal;
}
.modal .actions {
text-align: center;
margin: 30px 0 10px 0;
}
.modal .actions a {
color: #333;
padding: 8px;
border: 1px solid #eee;
border-radius: 4px;
text-decoration: none;
margin: 10px;
}
.modal.sale {
background: crimson;
color: white;
}
.modal.sale h1 {
color: white;
}
.modal.sale .actions {
color: white;
}
.modal.sale .actions a {
color: white;
}
</style>// App.vue - 3
<template>
<h1>{{ title }}</h1>
<p>Welcome...</p>
<div v-if="showModal">
<Modal theme="" @close="toggleModal">
<template v-slot:links>
<a href="#">sign up now</a>
<a href="#">more info</a>
</template>
<h1>Ninja Givaway</h1>
<p>Grab your ninja swag for half price!</p>
</Modal>
</div>
<button @click.alt="toggleModal">open modal (alt)</button>
</template>
<script>
import Modal from './components/Modal.vue'
export default {
name: 'App',
components: { Modal },
data() {
return {
title: 'My First Vue App :)',
header: 'Sign up for the Giveway',
text: 'Grab your ninja swag for half price!',
showModal: false
}
},
methods: {
toggleModal() {
this.showModal = !this.showModal
}
}
}
</script>
<style>
#app {
font-family: Avenir, Helvetica, Arial, sans-serif;
-webkit-font-smoothing: antialiased;
-moz-osx-font-smoothing: grayscale;
text-align: center;
color: #2c3e50;
margin-top: 60px;
}
h1 {
border-bottom: 1px solid #ddd;
display: inline-block;
padding-bottom: 10px;
}
</style>// Modal.vue - 3
<template>
<div class="backdrop" @click.self="closeModal">
<div class="modal" :class="{ sale: theme === 'sale'}">
<slot></slot>
<div class="actions">
<slot name="links"></slot>
</div>
</div>
</div>
</template>
<script>
export default {
props: ['theme'],
methods: {
closeModal() {
this.$emit('close')
}
}
}
</script>
<style>
.modal {
width: 400px;
padding: 20px;
margin: 100px auto;
background: white;
border-radius: 10px;
}
.backdrop {
top: 0;
position: fixed;
background: rgba(0,0,0,0.5);
width: 100%;
height: 100%;
}
.modal h1 {
color: #03cfb4;
border: none;
padding: 0;
}
.modal p {
font-style: normal;
}
.modal .actions {
text-align: center;
margin: 30px 0 10px 0;
}
.modal .actions a {
color: #333;
padding: 8px;
border: 1px solid #eee;
border-radius: 4px;
text-decoration: none;
margin: 10px;
}
.modal.sale {
background: crimson;
color: white;
}
.modal.sale h1 {
color: white;
}
.modal.sale .actions {
color: white;
}
.modal.sale .actions a {
color: white;
}
</style>CHALLENGE – Reusing Components
// App.vue

<template>
  <h1>{{ title }}</h1>
  <p>Welcome...</p>
  <div v-if="showModal">
    <Modal  theme="" @close="toggleModal">
      <template v-slot:links>
        <a href="#">sign up now</a>
        <a href="#">more info</a>
      </template>
      <h1>Ninja Givaway</h1>
      <p>Grab your ninja swag for half price!</p>
    </Modal>
  </div>

  <div v-if="showModalTwo">
    <Modal @close="toggleModalTwo">
      <h1>Sign up to the newsletter</h1>
      <p>For updates and promo codes!</p>
    </Modal>
  </div>
  <button @click.alt="toggleModal">open modal (alt)</button>
  <button @click="toggleModalTwo">open modal</button>
</template>

<script>
// challenge
// - create an extra button to poen a different modal
// - use the same modal component but pass in a different template (slot)
// - use a different method (e.g. toggleModalTwo) and data (e.g. showModalTwo)

import Modal from './components/Modal.vue'

export default {
  name: 'App',
  components: { Modal },
  data() {
    return {
      title: 'My First Vue App :)',
      showModal: false,
      showModalTwo: false,
    }
  },
  methods: {
    toggleModal() {
      this.showModal = !this.showModal
    },
    toggleModalTwo() {
      this.showModalTwo = !this.showModalTwo
    }
  }
}
</script>

<style>
#app {
  font-family: Avenir, Helvetica, Arial, sans-serif;
  -webkit-font-smoothing: antialiased;
  -moz-osx-font-smoothing: grayscale;
  text-align: center;
  color: #2c3e50;
  margin-top: 60px;
}
h1 {
  border-bottom: 1px solid #ddd;
  display: inline-block;
  padding-bottom: 10px;
}
</style>
// Modal.vue
<template>
<div class="backdrop" @click.self="closeModal">
<div class="modal" :class="{ sale: theme === 'sale'}">
<slot></slot>
<div class="actions">
<slot name="links"></slot>
</div>
</div>
</div>
</template>
<script>
export default {
props: ['theme'],
methods: {
closeModal() {
this.$emit('close')
}
}
}
</script>
<style>
.modal {
width: 400px;
padding: 20px;
margin: 100px auto;
background: white;
border-radius: 10px;
}
.backdrop {
top: 0;
position: fixed;
background: rgba(0,0,0,0.5);
width: 100%;
height: 100%;
}
.modal h1 {
color: #03cfb4;
border: none;
padding: 0;
}
.modal p {
font-style: normal;
}
.modal .actions {
text-align: center;
margin: 30px 0 10px 0;
}
.modal .actions a {
color: #333;
padding: 8px;
border: 1px solid #eee;
border-radius: 4px;
text-decoration: none;
margin: 10px;
}
.modal.sale {
background: crimson;
color: white;
}
.modal.sale h1 {
color: white;
}
.modal.sale .actions {
color: white;
}
.modal.sale .actions a {
color: white;
}
</style>Using Teleport (new features 新功能)
class, id 都可以使用 e.g. – .modals、#modals
// index.html

<!DOCTYPE html>
<html lang="">
  <head>
    <meta charset="utf-8">
    <meta http-equiv="X-UA-Compatible" content="IE=edge">
    <meta name="viewport" content="width=device-width,initial-scale=1.0">
    <link rel="icon" href="<%= BASE_URL %>favicon.ico">
    <title><%= htmlWebpackPlugin.options.title %></title>
  </head>
  <body>
    <noscript>
      <strong>We're sorry but <%= htmlWebpackPlugin.options.title %> doesn't work properly without JavaScript enabled. Please enable it to continue.</strong>
    </noscript>
    <div id="app"></div>
    <!-- built files will be auto injected -->
    <div class="modals"></div>
  </body>
</html>
// App.vue

<template>
  <h1>{{ title }}</h1>
  <p>Welcome...</p>
  <teleport to=".modals" v-if="showModal">
    <Modal  theme="" @close="toggleModal">
      <template v-slot:links>
        <a href="#">sign up now</a>
        <a href="#">more info</a>
      </template>
      <h1>Ninja Givaway</h1>
      <p>Grab your ninja swag for half price!</p>
    </Modal>
  </teleport>

  <teleport to=".modals" v-if="showModalTwo">
    <Modal @close="toggleModalTwo">
      <h1>Sign up to the newsletter</h1>
      <p>For updates and promo codes!</p>
    </Modal>
  </teleport>

  <button @click.alt="toggleModal">open modal (alt)</button>
  <button @click="toggleModalTwo">open modal</button>
</template>

<script>
// challenge
// - create an extra button to poen a different modal
// - use the same modal component but pass in a different template (slot)
// - use a different method (e.g. toggleModalTwo) and data (e.g. showModalTwo)

import Modal from './components/Modal.vue'

export default {
  name: 'App',
  components: { Modal },
  data() {
    return {
      title: 'My First Vue App :)',
      showModal: false,
      showModalTwo: false,
    }
  },
  methods: {
    toggleModal() {
      this.showModal = !this.showModal
    },
    toggleModalTwo() {
      this.showModalTwo = !this.showModalTwo
    }
  }
}
</script>

<style>
#app, .modals {
  font-family: Avenir, Helvetica, Arial, sans-serif;
  -webkit-font-smoothing: antialiased;
  -moz-osx-font-smoothing: grayscale;
  text-align: center;
  color: #2c3e50;
  margin-top: 60px;
}
h1 {
  border-bottom: 1px solid #ddd;
  display: inline-block;
  padding-bottom: 10px;
}
</style>
第4節:PROJECT BUILD – Reaction Timer
Project 1 Preview & Setup
Reaction Timer Project
- App.vue
- Block.vue
- Results.vue
操作步驟
- 打開終端機
- 移動到要安裝位置
- 輸入指令:vue create reaction-timer
- Please pick a preset: Manually select features
- Check the features needed for your project: Choose Vue version, Babel
- Choose a version of Vue.js that you want to start the project with 3.x
- Where do you prefer placing config for Babel, ESLint, etc.? In dedicated config file
- Save this as a preset for future projects? N
- 移動到檔案位置:cd reaction-timer
- 打開 VSCode:code .
- 移除 HelloWorld.vue 檔案
- 修改 App.vue 檔案、移除不用的內容
- 在 components 資料夾裡新增 Block.vue、Results.vue 檔案
- 打開終端機、執行指令:npm run serve
// App.vue

<template>
  <h1>Ninja Reaction Timer</h1>
</template>

<script>


export default {
  name: 'App',
  components: { }
}
</script>

<style>
#app {
  font-family: Avenir, Helvetica, Arial, sans-serif;
  -webkit-font-smoothing: antialiased;
  -moz-osx-font-smoothing: grayscale;
  text-align: center;
  color: #444;
  margin-top: 60px;
}
</style>
參考文件
Starting a New Game
// App.vue

<template>
  <h1>Ninja Reaction Timer</h1>
  <button @click="start" :disabled="isPlaying">play</button>
  <Block v-if="isPlaying" :delay="delay" />
</template>

<script>
import Block from './components/Block.vue'

export default {
  name: 'App',
  components: { Block },
  data() {
    return {
      isPlaying: false,
      delay: null
    }
  },
  methods: {
    start() {
      this.delay = 2000 + Math.random() * 5000
      this.isPlaying = true
      // console.log(this.delay)
    }
  }
}
</script>

<style>
#app {
  font-family: Avenir, Helvetica, Arial, sans-serif;
  -webkit-font-smoothing: antialiased;
  -moz-osx-font-smoothing: grayscale;
  text-align: center;
  color: #444;
  margin-top: 60px;
}
</style>
- 快速建立 <template>、<script>、<style>,快捷鍵 <vue> with default.vue
// Block.vue

<template>
  <div class="block">
    click me
  </div>
</template>

<script>
export default {
  props: ['delay']
}
</script>

<style>
  .block {
    width: 400px;
    border-radius: 20px;
    background: #0faf87;
    color: white;
    text-align: center;
    padding: 100px 0;
    margin: 40px auto;
  }
</style>
Vetur can’t find tsconfig.json, jsconfig.json in /xxxx/xxxxxx.
Component Lifecycle Hooks (組件生命週期鉤子) 重要!
資源
// Block.vue

<template>
  <div class="block" v-if="showBlock">
    click me
  </div>
</template>

<script>
export default {
  props: ['delay'],
  data() {
    return {
      showBlock: false
    }
  },
  mounted() {
    // console.log('component mounted')
    setTimeout(() => {
      this.showBlock = true
      // console.log(this.delay)
    }, this.delay)
  },
  // updated() {
  //   console.log('component updated')
  // },
  // unmounted() {
  //   console.log('unmounted')
  // }
}
</script>

<style>
  .block {
    width: 400px;
    border-radius: 20px;
    background: #0faf87;
    color: white;
    text-align: center;
    padding: 100px 0;
    margin: 40px auto;
  }
</style>
// App.vue
<template>
<h1>Ninja Reaction Timer</h1>
<button @click="start" :disabled="isPlaying">play</button>
<Block v-if="isPlaying" :delay="delay" />
</template>
<script>
import Block from './components/Block.vue'
export default {
name: 'App',
components: { Block },
data() {
return {
isPlaying: false,
delay: null
}
},
methods: {
start() {
this.delay = 2000 + Math.random() * 5000
this.isPlaying = true
// console.log(this.delay)
}
}
}
</script>
<style>
#app {
font-family: Avenir, Helvetica, Arial, sans-serif;
-webkit-font-smoothing: antialiased;
-moz-osx-font-smoothing: grayscale;
text-align: center;
color: #444;
margin-top: 60px;
}
</style>
Creating the Reaction Timer
// Block.vue

<template>
  <div class="block" v-if="showBlock" @click="stopTimer">
    click me
  </div>
</template>

<script>
export default {
  props: ['delay'],
  data() {
    return {
      showBlock: false,
      timer: null,
      reactionTime: 0
    }
  },
  mounted() {
    setTimeout(() => {
      this.showBlock = true
      this.startTimer()
    }, this.delay)
  },
  methods: {
    startTimer() {
      this.timer = setInterval(() => {
        this.reactionTime += 10
      }, 10)
    },
    stopTimer() {
      clearInterval(this.timer)
      console.log(this.reactionTime)
    }
  }
}
</script>

<style>
  .block {
    width: 400px;
    border-radius: 20px;
    background: #0faf87;
    color: white;
    text-align: center;
    padding: 100px 0;
    margin: 40px auto;
  }
</style>
Emitting Custom Events with Data
// Block.vue

<template>
  <div class="block" v-if="showBlock" @click="stopTimer">
    click me
  </div>
</template>

<script>
export default {
  props: ['delay'],
  data() {
    return {
      showBlock: false,
      timer: null,
      reactionTime: 0
    }
  },
  mounted() {
    setTimeout(() => {
      this.showBlock = true
      this.startTimer()
    }, this.delay)
  },
  methods: {
    startTimer() {
      this.timer = setInterval(() => {
        this.reactionTime += 10
      }, 10)
    },
    stopTimer() {
      clearInterval(this.timer)
      this.$emit('end', this.reactionTime)
    }
  }
}
</script>

<style>
  .block {
    width: 400px;
    border-radius: 20px;
    background: #0faf87;
    color: white;
    text-align: center;
    padding: 100px 0;
    margin: 40px auto;
  }
</style>
// App.vue
<template>
<h1>Ninja Reaction Timer</h1>
<button @click="start" :disabled="isPlaying">play</button>
<Block v-if="isPlaying" :delay="delay" @end="endGame" />
<p v-if="showResults">Reaction time: {{ score }} ms</p>
</template>
<script>
import Block from './components/Block.vue'
export default {
name: 'App',
components: { Block },
data() {
return {
isPlaying: false,
delay: null,
score: null,
showResults: false
}
},
methods: {
start() {
this.delay = 2000 + Math.random() * 5000
this.isPlaying = true
this.showResults = false
},
endGame(reactionTime) {
this.score = reactionTime
this.isPlaying = false
this.showResults = true
}
}
}
</script>
<style>
#app {
font-family: Avenir, Helvetica, Arial, sans-serif;
-webkit-font-smoothing: antialiased;
-moz-osx-font-smoothing: grayscale;
text-align: center;
color: #444;
margin-top: 60px;
}
</style>
CHALLENGE – Showing a Results Component
// App.vue

<template>
  <h1>Ninja Reaction Timer</h1>
  <button @click="start" :disabled="isPlaying">play</button>
  <Block v-if="isPlaying" :delay="delay" @end="endGame" />
  <Results v-if="showResults" :score="score" />
</template>

<script>
// Challenge
// - when the game ends, show the results component
// - output the score inside the results component

import Block from './components/Block.vue'
import Results from './components/Results.vue'

export default {
  name: 'App',
  components: { Block, Results },
  data() {
    return {
      isPlaying: false,
      delay: null,
      score: null,
      showResults: false
    }
  },
  methods: {
    start() {
      this.delay = 2000 + Math.random() * 5000
      this.isPlaying = true
      this.showResults = false
    },
    endGame(reactionTime) {
      this.score = reactionTime
      this.isPlaying = false
      this.showResults = true
    }
  }
}
</script>

<style>
#app {
  font-family: Avenir, Helvetica, Arial, sans-serif;
  -webkit-font-smoothing: antialiased;
  -moz-osx-font-smoothing: grayscale;
  text-align: center;
  color: #444;
  margin-top: 60px;
}
</style>
// Results.vue

<template>
  <p>Reaction time - {{ score }} ms</p>
</template>

<script>
export default {
  props: ['score']
}
</script>

<style>

</style>
Finishing Touches
// Results.vue

<template>
  <p>Reaction time - {{ score }} ms</p>
  <p class="rank">{{ rank }}</p>
</template>

<script>
export default {
  props: ['score'],
  data() {
    return {
      rank: null
    }
  },
  mounted() {
    if (this.score < 250) {
      this.rank = 'Ninja Fingers'
    }
    else if (this.score < 400) {
      this.rank = 'Rapid Reflexes'
    }
    else {
      this.rank = 'Snail pace...'
    }
  }
}
</script>

<style>
  .rank {
    font-size: 1.4em;
    color: #0faf87;
    font-weight: bold;
  }
</style>
// App.vue
<template>
<h1>Ninja Reaction Timer</h1>
<button @click="start" :disabled="isPlaying">play</button>
<Block v-if="isPlaying" :delay="delay" @end="endGame" />
<Results v-if="showResults" :score="score" />
</template>
<script>
// Challenge
// - when the game ends, show the results component
// - output the score inside the results component
import Block from './components/Block.vue'
import Results from './components/Results.vue'
export default {
name: 'App',
components: { Block, Results },
data() {
return {
isPlaying: false,
delay: null,
score: null,
showResults: false
}
},
methods: {
start() {
this.delay = 2000 + Math.random() * 5000
this.isPlaying = true
this.showResults = false
},
endGame(reactionTime) {
this.score = reactionTime
this.isPlaying = false
this.showResults = true
}
}
}
</script>
<style>
#app {
font-family: Avenir, Helvetica, Arial, sans-serif;
-webkit-font-smoothing: antialiased;
-moz-osx-font-smoothing: grayscale;
text-align: center;
color: #444;
margin-top: 60px;
}
button {
background: #0faf87;
color: white;
border: none;
padding: 8px 16px;
border-radius: 4px;
font-size: 16px;
letter-spacing: 1px;
cursor: pointer;
margin: 10px;
}
button[disabled] {
opacity: 0.2;
cursor: not-allowed;
}
</style>
第5節:Forms & Data Binding
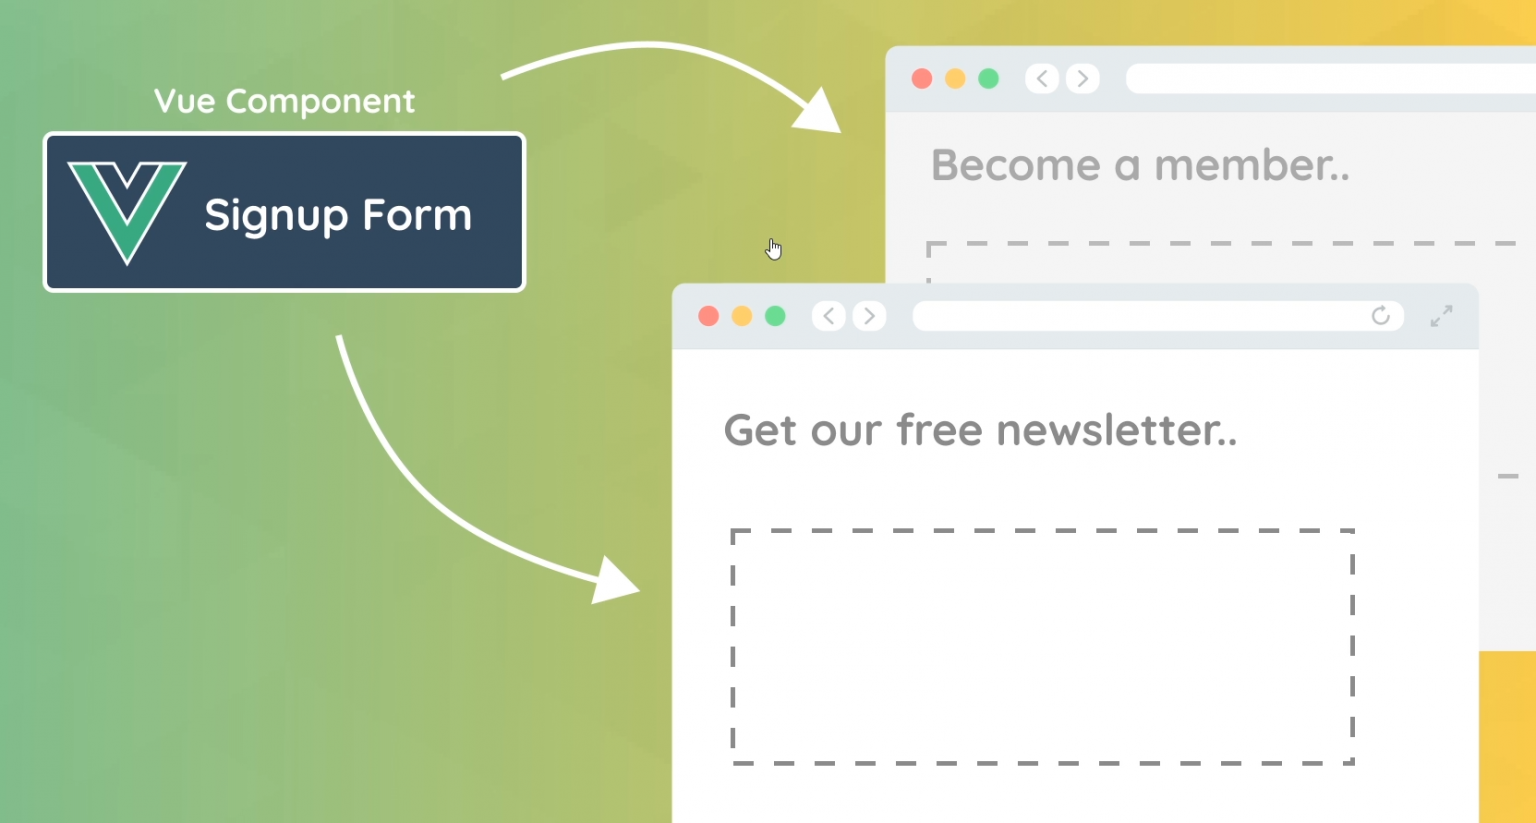
Forms Intro & Setup (表單介紹 & 安裝)
操作步驟
- 打開終端機(Terminal)
- 移動到要安裝專案的位置
- 建立專案、輸入指令 vue create web-form
- Please pick a preset: Manually select features
- Check the features needed for your project: Choose Vue version, Babel
- Choose a version of Vue.js that you want to start the project with 3.x (Preview)
- Where do you prefer placing config for Babel, ESLint, etc.? In dedicated config files
- Save this as a preset for the future projects? N
- 建立完成後、移動到專案位置 cd web-form
- 輸入指令、打開網頁編輯器:code .
- 移除 components/HelloWorld.vue 檔案
- 修改 App.vue 檔案內容
- 新增檔案 SignupForm.vue 在 components 資料夾裡面、新增內容
- 執行指令:npm run serve
- 在這之前要記得在 App.vue 檔案 import SignupForm from ‘./components/SignupForm.vue’
- 在 App.vue 做些內容調整
// App.vue - 1

<template>

</template>

<script>
export default {
  name: 'App',
  components: {}
}
</script>

<style>
#app {
  font-family: Avenir, Helvetica, Arial, sans-serif;
  -webkit-font-smoothing: antialiased;
  -moz-osx-font-smoothing: grayscale;
  text-align: center;
  color: #2c3e50;
  margin-top: 60px;
}
body {
  margin: 0;
  background: #eee;
}
</style>
// SignupForm.vue
<template>
<form>
<label>Email:</label>
<input type="email" required>
</form>
</template>
<script>
export default {
}
</script>
<style>
form {
max-width: 420px;
margin: 30px auto;
background: white;
text-align: left;
padding: 40px;
border-radius: 10px;
}
label {
color: #aaa;
display: inline-block;
margin: 25px 0 15px;
font-size: 0.6em;
text-transform: uppercase;
letter-spacing: 1px;
font-weight: bold;
}
input {
display: block;
padding: 10px 6px;
width: 100%;
box-sizing: border-box;
border: none;
border-bottom: 1px solid #ddd;
color: #555;
}
</style>// App.vue - 2
<template>
<SignupForm />
</template>
<script>
import SignupForm from './components/SignupForm.vue'
export default {
name: 'App',
components: { SignupForm }
}
</script>
<style>
#app {
font-family: Avenir, Helvetica, Arial, sans-serif;
-webkit-font-smoothing: antialiased;
-moz-osx-font-smoothing: grayscale;
text-align: center;
color: #2c3e50;
margin-top: 60px;
}
body {
margin: 0;
background: #eee;
}
</style>Two-way Data Binding (雙向綁定)
// SignupForm.vue

<template>
  <form>
    <label>Email:</label>
    <input type="email" required v-model="email">

    <label>Password:</label>
    <input type="password" required v-model="password">

  </form>
  <p>Email: {{ email }}</p>
  <p>Password: {{ password }}</p>
</template>

<script>
export default {
  data() {
    return {
      email: 'mario',
      password: ''
    }
  }
}
</script>

<style>
  form {
    max-width: 420px;
    margin: 30px auto;
    background: white;
    text-align: left;
    padding: 40px;
    border-radius: 10px;
  }
  label {
    color: #aaa;
    display: inline-block;
    margin: 25px 0 15px;
    font-size: 0.6em;
    text-transform: uppercase;
    letter-spacing: 1px;
    font-weight: bold;
  }
  input {
    display: block;
    padding: 10px 6px;
    width: 100%;
    box-sizing: border-box;
    border: none;
    border-bottom: 1px solid #ddd;
    color: #555;
  }
</style>
Vue.js 文件
Select Fields
// SignupForm.vue

<template>
  <form>
    <label>Email:</label>
    <input type="email" required v-model="email">

    <label>Password:</label>
    <input type="password" required v-model="password">

    <label>Role:</label>
    <select v-model="role">
      <option value="developer">Web Developer</option>
      <option value="designer">Web Designer</option>
    </select>

  </form>
  <p>Email: {{ email }}</p>
  <p>Password: {{ password }}</p>
  <p>Role: {{ role }}</p>
</template>

<script>
export default {
  data() {
    return {
      email: 'mario',
      password: '',
      role: 'designer'
    }
  }
}
</script>

<style>
  form {
    max-width: 420px;
    margin: 30px auto;
    background: white;
    text-align: left;
    padding: 40px;
    border-radius: 10px;
  }
  label {
    color: #aaa;
    display: inline-block;
    margin: 25px 0 15px;
    font-size: 0.6em;
    text-transform: uppercase;
    letter-spacing: 1px;
    font-weight: bold;
  }
  input, select {
    display: block;
    padding: 10px 6px;
    width: 100%;
    box-sizing: border-box;
    border: none;
    border-bottom: 1px solid #ddd;
    color: #555;
  }
</style>
Checkboxes
使用方式
- Boolean (布林值)
- Array (陣列)
// SignupForm.vue

<template>
  <form>
    <label>Email:</label>
    <input type="email" required v-model="email">

    <label>Password:</label>
    <input type="password" required v-model="password">

    <label>Role:</label>
    <select v-model="role">
      <option value="developer">Web Developer</option>
      <option value="designer">Web Designer</option>
    </select>

    <div class="terms">
      <input type="checkbox" v-model="terms" required>
      <label>Accept terms and conditions</label>
    </div>

    <!-- <div>
      <input type="checkbox" value="shaun" v-model="names">
      <label>Shaun</label>
    </div>
    <div>
      <input type="checkbox" value="yoshi" v-model="names">
      <label>Yoshi</label>
    </div>
    <div>
      <input type="checkbox" value="mario" v-model="names">
      <label>Mario</label>
    </div> -->

  </form>
  <p>Email: {{ email }}</p>
  <p>Password: {{ password }}</p>
  <p>Role: {{ role }}</p>
  <p>Terms accepted: {{ terms }}</p>
  <!-- <p>Names: {{ names }}</p> -->
</template>

<script>
export default {
  data() {
    return {
      email: 'mario',
      password: '',
      role: 'designer',
      terms: false,
      // names: []
    }
  }
}
</script>

<style>
  form {
    max-width: 420px;
    margin: 30px auto;
    background: white;
    text-align: left;
    padding: 40px;
    border-radius: 10px;
  }
  label {
    color: #aaa;
    display: inline-block;
    margin: 25px 0 15px;
    font-size: 0.6em;
    text-transform: uppercase;
    letter-spacing: 1px;
    font-weight: bold;
  }
  input, select {
    display: block;
    padding: 10px 6px;
    width: 100%;
    box-sizing: border-box;
    border: none;
    border-bottom: 1px solid #ddd;
    color: #555;
  }
  input[type="checkbox"] {
    display: inline-block;
    width: 16px;
    margin: 0 10px 0 0;
    position: relative;
    top: 2px;
  }
</style>
Keyboard Events & Modifiers
- @keypress
- @keydown
- @keyup
// SignupForm.vue

<template>
  <form>
    <label>Email:</label>
    <input type="email" required v-model="email">

    <label>Password:</label>
    <input type="password" required v-model="password">

    <label>Role:</label>
    <select v-model="role">
      <option value="developer">Web Developer</option>
      <option value="designer">Web Designer</option>
    </select>

    <label>Skills:</label>
    <input type="text" v-model="tempSkill" @keyup.alt="addSkill">
    <div v-for="skill in skills" :key="skill" class="pill">
      {{ skill }}
    </div>

    <div class="terms">
      <input type="checkbox" v-model="terms" required>
      <label>Accept terms and conditions</label>
    </div>

  </form>
  <p>Email: {{ email }}</p>
  <p>Password: {{ password }}</p>
  <p>Role: {{ role }}</p>
  <p>Terms accepted: {{ terms }}</p>
</template>

<script>
export default {
  data() {
    return {
      email: 'mario',
      password: '',
      role: 'designer',
      terms: false,
      tempSkill: '',
      skills: []
    }
  },
  methods: {
    addSkill(e) {
      // console.log(e)
      if (e.key === ',' && this.tempSkill) {
        if (!this.skills.includes(this.tempSkill)) {
          this.skills.push(this.tempSkill)
        }
        this.tempSkill = ''
      }
    }
  }
}
</script>

<style>
  form {
    max-width: 420px;
    margin: 30px auto;
    background: white;
    text-align: left;
    padding: 40px;
    border-radius: 10px;
  }
  label {
    color: #aaa;
    display: inline-block;
    margin: 25px 0 15px;
    font-size: 0.6em;
    text-transform: uppercase;
    letter-spacing: 1px;
    font-weight: bold;
  }
  input, select {
    display: block;
    padding: 10px 6px;
    width: 100%;
    box-sizing: border-box;
    border: none;
    border-bottom: 1px solid #ddd;
    color: #555;
  }
  input[type="checkbox"] {
    display: inline-block;
    width: 16px;
    margin: 0 10px 0 0;
    position: relative;
    top: 2px;
  }
</style>
CHALLENGE – Deleting Skills
// SignupForm.vue

<template>
  <form>
    <label>Email:</label>
    <input type="email" required v-model="email">

    <label>Password:</label>
    <input type="password" required v-model="password">

    <label>Role:</label>
    <select v-model="role">
      <option value="developer">Web Developer</option>
      <option value="designer">Web Designer</option>
    </select>

    <label>Skills:</label>
    <input type="text" v-model="tempSkill" @keyup.alt="addSkill">
    <div v-for="skill in skills" :key="skill" class="pill">
      <span @click="deleteSkill(skill)">{{ skill }}</span>
    </div>

    <div class="terms">
      <input type="checkbox" v-model="terms" required>
      <label>Accept terms and conditions</label>
    </div>

  </form>
  <p>Email: {{ email }}</p>
  <p>Password: {{ password }}</p>
  <p>Role: {{ role }}</p>
  <p>Terms accepted: {{ terms }}</p>
</template>

<script>
// challenge
// - when a user clicks on a skill, delete that skill

export default {
  data() {
    return {
      email: 'mario',
      password: '',
      role: 'designer',
      terms: false,
      tempSkill: '',
      skills: []
    }
  },
  methods: {
    addSkill(e) {
      if (e.key === ',' && this.tempSkill) {
        if (!this.skills.includes(this.tempSkill)) {
          this.skills.push(this.tempSkill)
        }
        this.tempSkill = ''
      }
    },
    deleteSkill(skill) {
      this.skills = this.skills.filter((item) =>{
        return skill !== item
      })
    }
  }
}
</script>

<style>
  form {
    max-width: 420px;
    margin: 30px auto;
    background: white;
    text-align: left;
    padding: 40px;
    border-radius: 10px;
  }
  label {
    color: #aaa;
    display: inline-block;
    margin: 25px 0 15px;
    font-size: 0.6em;
    text-transform: uppercase;
    letter-spacing: 1px;
    font-weight: bold;
  }
  input, select {
    display: block;
    padding: 10px 6px;
    width: 100%;
    box-sizing: border-box;
    border: none;
    border-bottom: 1px solid #ddd;
    color: #555;
  }
  input[type="checkbox"] {
    display: inline-block;
    width: 16px;
    margin: 0 10px 0 0;
    position: relative;
    top: 2px;
  }
  .pill {
    display: inline-block;
    margin: 20px 10px 0 0;
    background: #eee;
    border-radius: 20px;
    font-size: 12px;
    letter-spacing: 1px;
    font-weight: bold;
    color: #777;
    cursor: pointer;
  }
</style>
Submitting the Form
// SignupForm.vue

<template>
  <form @submit.prevent="handleSubmit">
    <label>Email:</label>
    <input type="email" required v-model="email">

    <label>Password:</label>
    <input type="password" required v-model="password">
    <div v-if="passwordError" class="error">{{ passwordError }}</div>

    <label>Role:</label>
    <select v-model="role">
      <option value="developer">Web Developer</option>
      <option value="designer">Web Designer</option>
    </select>

    <label>Skills:</label>
    <input type="text" v-model="tempSkill" @keyup.alt="addSkill">
    <div v-for="skill in skills" :key="skill" class="pill">
      <span @click="deleteSkill(skill)">{{ skill }}</span>
    </div>

    <div class="terms">
      <input type="checkbox" v-model="terms" required>
      <label>Accept terms and conditions</label>
    </div>

    <div class="submit">
      <button>Create an Account</button>
    </div>

  </form>
  <p>Email: {{ email }}</p>
  <p>Password: {{ password }}</p>
  <p>Role: {{ role }}</p>
  <p>Terms accepted: {{ terms }}</p>
</template>

<script>
// challenge
// - when a user clicks on a skill, delete that skill

export default {
  data() {
    return {
      email: '',
      password: '',
      role: 'designer',
      terms: false,
      tempSkill: '',
      skills: [],
      passwordError: ''
    }
  },
  methods: {
    addSkill(e) {
      if (e.key === ',' && this.tempSkill) {
        if (!this.skills.includes(this.tempSkill)) {
          this.skills.push(this.tempSkill)
        }
        this.tempSkill = ''
      }
    },
    deleteSkill(skill) {
      this.skills = this.skills.filter((item) =>{
        return skill !== item
      })
    },
    handleSubmit() {
      // console.log('form submitted')
      // validate password
      this.passwordError = this.password.length > 5 ?
        '' : 'Password must be at least 6 chars long'

      if(!this.passwordError) {
        console.log('email: ', this.email)
        console.log('password: ', this.password)
        console.log('role: ', this.role)
        console.log('skills: ', this.skills)
        console.log('terms accepted: ', this.terms)
      }
    }
  }
}
</script>

<style>
  form {
    max-width: 420px;
    margin: 30px auto;
    background: white;
    text-align: left;
    padding: 40px;
    border-radius: 10px;
  }
  label {
    color: #aaa;
    display: inline-block;
    margin: 25px 0 15px;
    font-size: 0.6em;
    text-transform: uppercase;
    letter-spacing: 1px;
    font-weight: bold;
  }
  input, select {
    display: block;
    padding: 10px 6px;
    width: 100%;
    box-sizing: border-box;
    border: none;
    border-bottom: 1px solid #ddd;
    color: #555;
  }
  input[type="checkbox"] {
    display: inline-block;
    width: 16px;
    margin: 0 10px 0 0;
    position: relative;
    top: 2px;
  }
  .pill {
    display: inline-block;
    margin: 20px 10px 0 0;
    background: #eee;
    border-radius: 20px;
    font-size: 12px;
    letter-spacing: 1px;
    font-weight: bold;
    color: #777;
    cursor: pointer;
  }
  button {
    background: #0b6dff;
    border: 0;
    padding: 10px 20px;
    margin-top: 20px;
    color: white;
    border-radius: 20px;
  }
  .submit {
    text-align: center;
  }
  .error {
    color: #ff0062;
    margin-top: 10px;
    font-size: 0.8em;
    font-weight: bold;
  }
</style>
第6節:Vue Router Basics
Vue 路由可重複觀看、練習。
Why Use the Vue Router?
可重複觀看了解觀念。
The Vue Router (圖片講解)
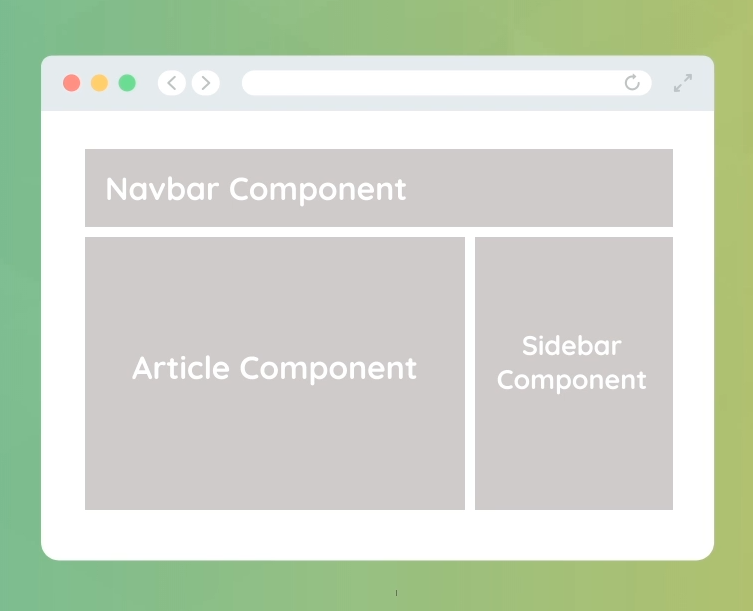
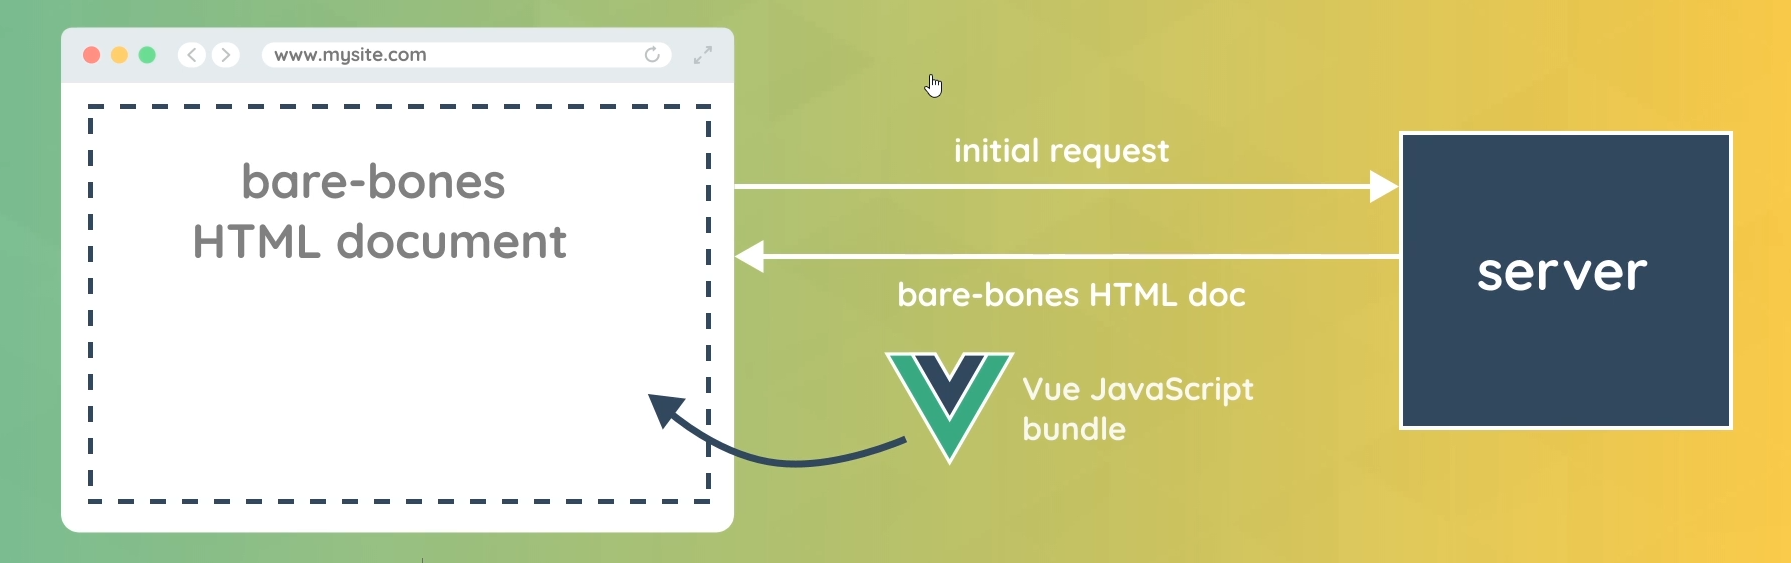
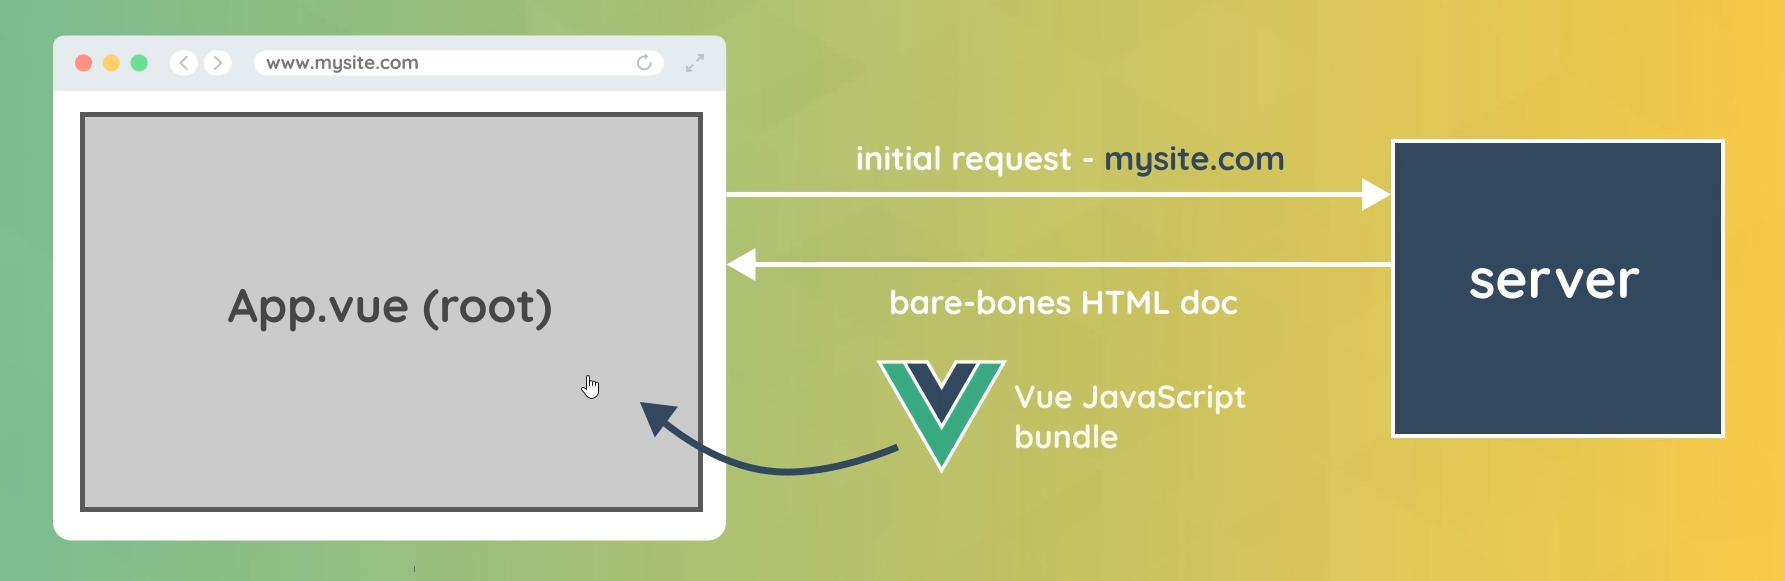
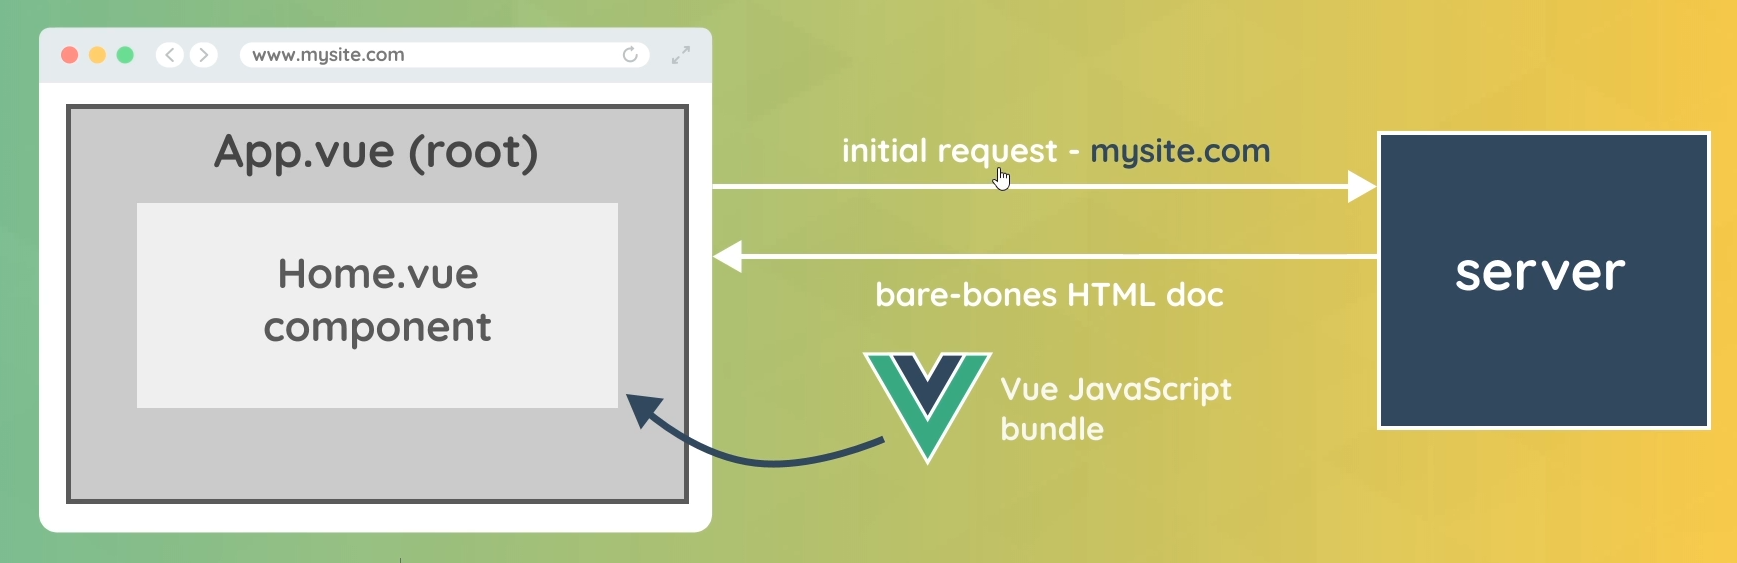
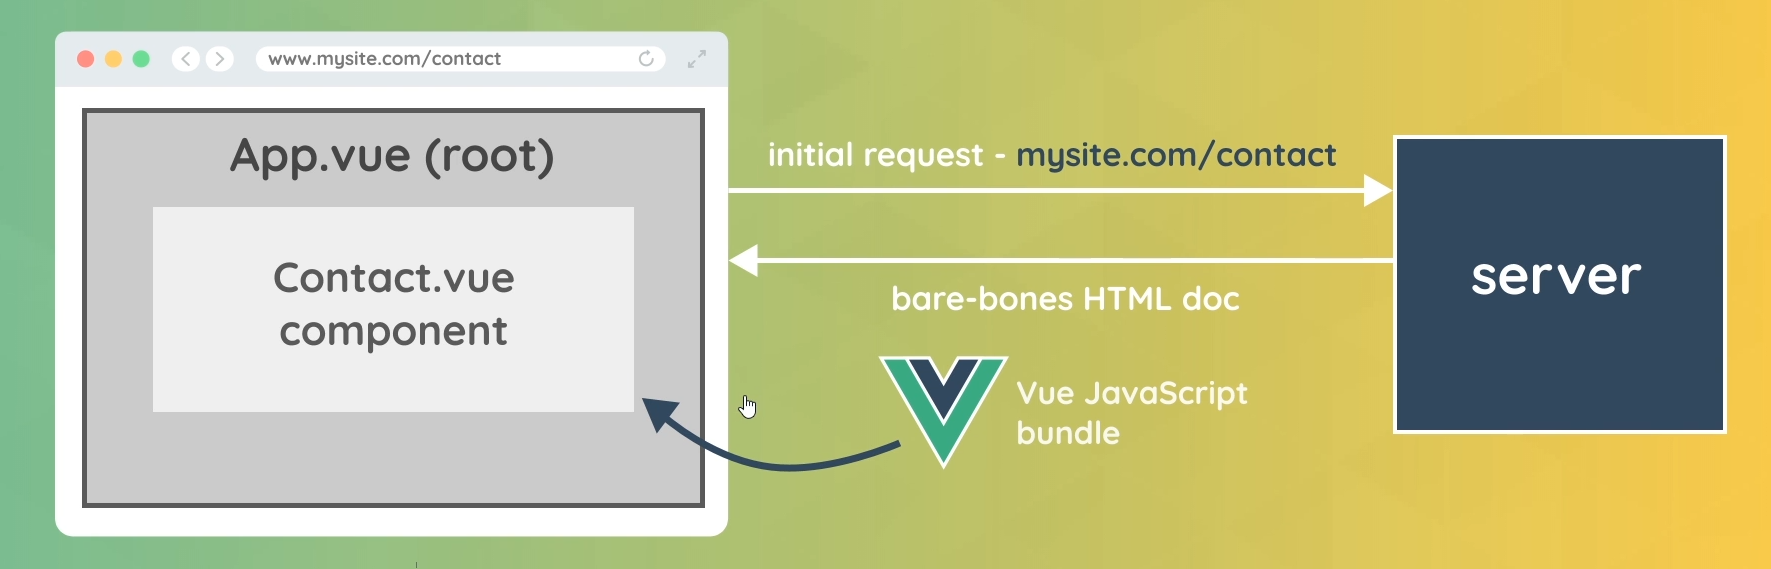
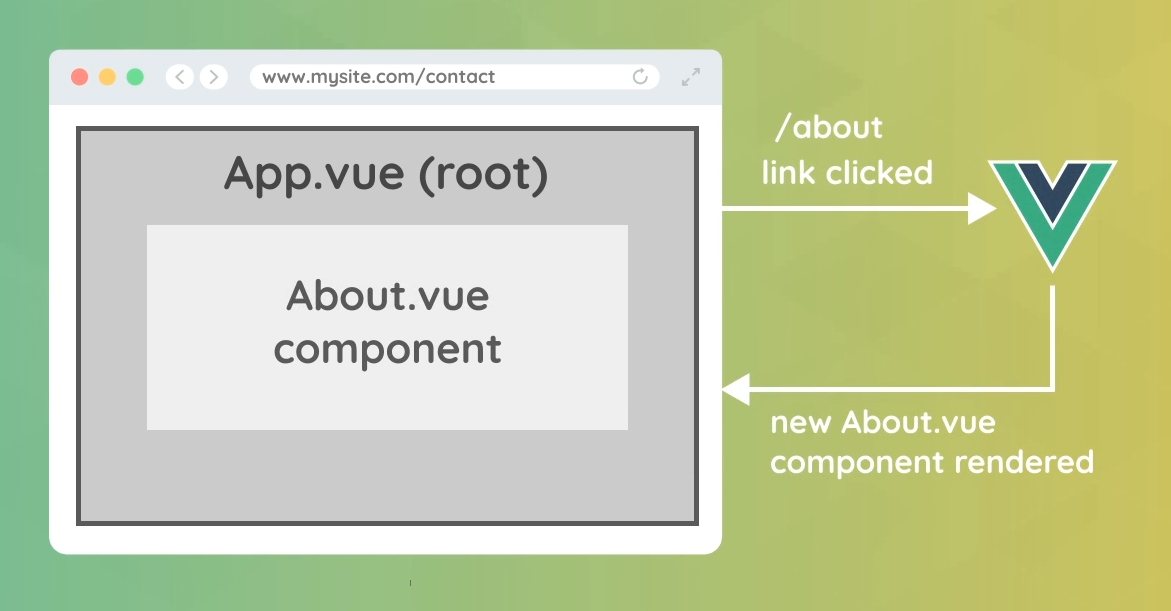
Router Setup for New Projects
很重要,可重複觀看、練習。
操作步驟
- 開啟終端機、移動到要建立專案資料夾的位置、輸入終端機指令 vue create ninja-jobs
- Vue CLI v4.5.8 (我的版本是 Vue CLI v4.5.15)
- Please pick a preset: Manually select feature
- Check the features needed for your project: Choose Vue version, Babel, Router
- Choose a version of Vue.js that you want to start the project with 3.x (Preview)
- Use history mode for router? (Requires proper server setup for index fallback in production) Yes
- Where do you prefer placing config for Babel, ESLint, etc.? In dedicated config files
- Save this as a preset for future projects? n
- 移動到專案資料夾位置 cd ninja-jobs
- 打開 VSCode 輸入指令 code .
- 首先看新的樣板專案在 package.json 檔案,擁有新的 dependency 是 “vue-router”
- 第二個不同的地方在 src 資料夾,有 router 資料夾、裡面有 index.js 檔案,可以看到有 routes 陣列、裡面的物件有 path, name, component 三個屬性
- 在 src/router/index.js 修改 about
- 介紹 src/main.js
- 介紹 App.vue <router-view/>
- 打開終端機,執行指令 npm run serve
- 使用 Ctrl + 滑鼠左鍵打開本地端網頁
// src/router/index.js - 13 修改 about

import { createRouter, createWebHistory } from 'vue-router'
import Home from '../views/Home.vue'
import About from '../views/About.vue'

const routes = [
  {
    path: '/',
    name: 'Home',
    component: Home
  },
  {
    path: '/about',
    name: 'About',
    component: About
  }
]

const router = createRouter({
  history: createWebHistory(process.env.BASE_URL),
  routes
})

export default router
Router Links (路由連結)
可重複觀看、練習。
操作步驟
- 講解 router link 和 a 連結的差別,用 Google Network 說明 router link 並不是向伺服器請求
- App.vue 把 a 連結移除、然後儲存,查看 Google Elements 的 a 連結可以看到類別在變動,把 App.vue 的 #nav a.router-link-exact-active 修改、#nav a 修改
- App.vue router link to 也可以改成 :to 使用,同樣都能運作,並說明使用上的差異,在路徑需要更新上使用 :to 會比較好,因為 name 不用更動
- 移除專案用不到的內容,到 Home.vue 檔案、移除 import HelloWorld、移除 components/HelloWorld.vue 檔案
- 在 About.vue 修改內容
// App.vue - 1

<template>
  <div id="nav">
    <router-link to="/">Home</router-link> |
    <router-link to="/about">About</router-link> |
    <a href="/about">about</a>
  </div>
  <router-view/>
</template>

<style>
#app {
  font-family: Avenir, Helvetica, Arial, sans-serif;
  -webkit-font-smoothing: antialiased;
  -moz-osx-font-smoothing: grayscale;
  text-align: center;
  color: #2c3e50;
}

#nav {
  padding: 30px;
}

#nav a {
  font-weight: bold;
  color: #2c3e50;
}

#nav a.router-link-exact-active {
  color: #42b983;
}
</style>
// App.vue - 2 修改


<template>
  <div id="nav">
    <router-link to="/">Home</router-link> |
    <router-link to="/about">About</router-link>
  </div>
  <router-view/>
</template>

<style>
#app {
  font-family: Avenir, Helvetica, Arial, sans-serif;
  -webkit-font-smoothing: antialiased;
  -moz-osx-font-smoothing: grayscale;
  text-align: center;
  color: #2c3e50;
}

#nav {
  padding: 30px;
}

#nav a {
  font-weight: bold;
  color: #2c3e50;
  text-decoration: none;
  padding: 10px;
  border-radius: 4px;
}

#nav a.router-link-exact-active {
  color: #fff;
  background: crimson;
}
</style>
// App.vue - 3 講解 to 的使用方法

<template>
  <div id="nav">
    <router-link to="/">Home</router-link> |
    <router-link :to="{ name: 'About' }">About</router-link>
  </div>
  <router-view/>
</template>

<style>
#app {
  font-family: Avenir, Helvetica, Arial, sans-serif;
  -webkit-font-smoothing: antialiased;
  -moz-osx-font-smoothing: grayscale;
  text-align: center;
  color: #2c3e50;
}

#nav {
  padding: 30px;
}

#nav a {
  font-weight: bold;
  color: #2c3e50;
  text-decoration: none;
  padding: 10px;
  border-radius: 4px;
}

#nav a.router-link-exact-active {
  color: #fff;
  background: crimson;
}
</style>
// Home.vue - 4 移除 import HelloWorld、修改 <template> 內容、移除 components 裡面的 HelloWorld

<template>
  <div class="home">
    <h1>Homepage</h1>
    <p>Lorem ipsum dolor sit amet consectetur adipisicing elit. Officia incidunt accusantium deserunt praesentium debitis voluptate, ex numquam facere ut sed, odio quasi amet sint quae unde. Porro accusamus nobis eius? Perferendis magnam rem possimus natus ducimus pariatur expedita ad sequi minima. Eum ex vero impedit dolores corporis voluptate architecto, sit commodi, quaerat nihil laborum, repellendus accusamus. Minus quaerat labore soluta error consectetur voluptates placeat eum maiores. Ullam delectus omnis dolorum unde cupiditate officiis repudiandae nostrum? Qui est possimus maiores. Est, nihil deleniti, voluptate tenetur pariatur distinctio, et earum minima quo ullam libero quae atque delectus voluptatum esse ut. Ut, et?</p>
    <p>Lorem ipsum dolor sit amet consectetur adipisicing elit. Officia incidunt accusantium deserunt praesentium debitis voluptate, ex numquam facere ut sed, odio quasi amet sint quae unde. Porro accusamus nobis eius? Perferendis magnam rem possimus natus ducimus pariatur expedita ad sequi minima. Eum ex vero impedit dolores corporis voluptate architecto, sit commodi, quaerat nihil laborum, repellendus accusamus. Minus quaerat labore soluta error consectetur voluptates placeat eum maiores. Ullam delectus omnis dolorum unde cupiditate officiis repudiandae nostrum? Qui est possimus maiores. Est, nihil deleniti, voluptate tenetur pariatur distinctio, et earum minima quo ullam libero quae atque delectus voluptatum esse ut. Ut, et?</p>
  </div>
</template>

<script>
export default {
  name: 'Home',
  components: { }
}
</script>
// About.vue - 5 修改內容

<template>
  <div class="about">
    <h1>This is an about page</h1>
    <p>Lorem ipsum dolor sit amet consectetur, adipisicing elit. Repellat placeat debitis impedit repudiandae adipisci incidunt veritatis sit praesentium nulla. Laudantium numquam eos error. Laborum laudantium necessitatibus fugiat et obcaecati fuga repellendus? Consequatur mollitia eos expedita itaque suscipit corrupti nesciunt ducimus sint odio possimus architecto ipsa debitis, explicabo distinctio amet optio, iure tenetur quas ipsum, cum nam dicta quasi dolore at? Eligendi placeat facere iusto dignissimos delectus fugiat incidunt temporibus, veniam cum. Unde quaerat iste vero deserunt dicta facilis consequatur fugit omnis? Dicta reiciendis a rem culpa iste aliquam porro dolores, laudantium obcaecati veniam tenetur fugiat facilis voluptates eos excepturi quo?</p>
    <p>Lorem ipsum dolor sit amet consectetur, adipisicing elit. Repellat placeat debitis impedit repudiandae adipisci incidunt veritatis sit praesentium nulla. Laudantium numquam eos error. Laborum laudantium necessitatibus fugiat et obcaecati fuga repellendus? Consequatur mollitia eos expedita itaque suscipit corrupti nesciunt ducimus sint odio possimus architecto ipsa debitis, explicabo distinctio amet optio, iure tenetur quas ipsum, cum nam dicta quasi dolore at? Eligendi placeat facere iusto dignissimos delectus fugiat incidunt temporibus, veniam cum. Unde quaerat iste vero deserunt dicta facilis consequatur fugit omnis? Dicta reiciendis a rem culpa iste aliquam porro dolores, laudantium obcaecati veniam tenetur fugiat facilis voluptates eos excepturi quo?</p>
  </div>
</template>
Folder Structure (資料夾結構)
可重複觀看、練習。
操作步驟
- 在 views 資料夾建立 Jobs.vue 檔案、內容,輸入 <vue> 出現下拉提示快捷建立
- 在 src/router/index.js 新增 routes 物件、import Jobs
- 在 App.vue 新增 Jobs 的 <router-link>
- 在 views 資料夾建立 JobDetails.vue 檔案,因為 Jobs.vue 與 JobDetails.vue 同類型的區域,會在 views 資料夾建立 jobs 資料夾、並把 Jobs.vue、JobDetails.vue 移動到 jobs 資料夾裡面,在移動後會產生錯誤,因此在 index.js 檔案要修改 Jobs.vue 位置
// Jobs.vue - 1 新增內容

<template>
  <h1>Jobs</h1>
  <div v-for="job in jobs" :key="job.id">
    <h2>{{ job.title }}</h2>
  </div>
</template>

<script>
export default {
  data() {
    return {
      jobs: [
        { title: 'Ninja UX Designer', id: 1, details: 'lorem'},
        { title: 'Ninja Web Developer', id: 2, details: 'lorem'},
        { title: 'Ninja Vue Developer', id: 3, details: 'lorem'}
      ]
    }
  }
}
</script>

<style>

</style>
// src/router/Jobs.vue - 2 新增 route 物件、import Jobs
import { createRouter, createWebHistory } from 'vue-router'
import Home from '../views/Home.vue'
import About from '../views/About.vue'
import Jobs from '../views/Jobs.vue'
const routes = [
{
path: '/',
name: 'Home',
component: Home
},
{
path: '/about',
name: 'About',
component: About
},
{
path: '/jobs',
name: 'Jobs',
component: Jobs
}
]
const router = createRouter({
history: createWebHistory(process.env.BASE_URL),
routes
})
export default router
// App.vue - 3 新增 Jobs 的 <router-link>

<template>
  <div id="nav">
    <router-link to="/">Home</router-link> |
    <router-link :to="{ name: 'About' }">About</router-link> |
    <router-link :to="{ name: 'Jobs' }">Jobs</router-link>
  </div>
  <router-view/>
</template>

<style>
#app {
  font-family: Avenir, Helvetica, Arial, sans-serif;
  -webkit-font-smoothing: antialiased;
  -moz-osx-font-smoothing: grayscale;
  text-align: center;
  color: #2c3e50;
}

#nav {
  padding: 30px;
}

#nav a {
  font-weight: bold;
  color: #2c3e50;
  text-decoration: none;
  padding: 10px;
  border-radius: 4px;
}

#nav a.router-link-exact-active {
  color: #fff;
  background: crimson;
}
</style>
// index.js - 修改 import Jobs 的位置

import { createRouter, createWebHistory } from 'vue-router'
import Home from '../views/Home.vue'
import About from '../views/About.vue'
import Jobs from '../views/jobs/Jobs.vue'

const routes = [
  {
    path: '/',
    name: 'Home',
    component: Home
  },
  {
    path: '/about',
    name: 'About',
    component: About
  },
  {
    path: '/jobs',
    name: 'Jobs',
    component: Jobs
  }
]

const router = createRouter({
  history: createWebHistory(process.env.BASE_URL),
  routes
})

export default router
Route Parameters (路由參數)
可重複觀看、練習。
操作步驟
- 講解 Route Parameters 觀念
- 在 src/router/index.js 新增 routes 物件、新增 import JobsDetails,然後儲存
- 在 JobDetails.vue 新增內容,然後到網頁連結加上 /1,就會顯示 Job Details Page 頁面,不論 / 後面加上什麼都會顯示 Job Details Page 頁面
- 接著在 JobDetails.vue 新增 p 段落,(:id 的命名可以客製化),然後儲存、到網頁畫面可以看到 p 段落內容會與 /jobs/:id 一起更動
- 在 JobDetails.vue 我們也可以使用 export default 物件,也可以做相同的事情
Route Parameters

// src/router/index.js - 2 新增 routes 物件、新增 import JobDetails

import { createRouter, createWebHistory } from 'vue-router'
import Home from '../views/Home.vue'
import About from '../views/About.vue'
import Jobs from '../views/jobs/Jobs.vue'
import JobDetails from '../views/jobs/JobDetails.vue'

const routes = [
  {
    path: '/',
    name: 'Home',
    component: Home
  },
  {
    path: '/about',
    name: 'About',
    component: About
  },
  {
    path: '/jobs',
    name: 'Jobs',
    component: Jobs
  },
  {
    path: '/jobs/:id',
    name: 'JobDetails',
    component: JobDetails
  }
]

const router = createRouter({
  history: createWebHistory(process.env.BASE_URL),
  routes
})

export default router
// JobDetails.vue - 3 新增內容

<template>
  <h1>Job Details Page</h1>
</template>

<script>
export default {

}
</script>

<style>

</style>
// JobDetails.vue - 4 新增 p 段落
<template>
<h1>Job Details Page</h1>
<p>The job id is {{ $route.params.id }}</p>
</template>
<script>
export default {
}
</script>
<style>
</style>// JobDetails.vue - 5 使用 export default 做相同的事情
<template>
<h1>Job Details Page</h1>
<p>The job id is {{ id }}</p>
</template>
<script>
export default {
data() {
return {
id: this.$route.params.id
}
}
}
</script>
<style>
</style>Dynamic Links (動態連結)
可重複觀看、練習。
操作步驟
- 在 Jobs.vue 把 <h2> 剪下,新增 <router-link>、把 <h2> 貼上,然後增加 :to 屬性
- 到網頁畫面 Google 檢視 Elements 可以看到 <a> href 屬性有 /jobs/1、/jobs/2、/jobs/3
- 在 JobDetails.vue export default 新增 props 屬性
- 在 index.js routes 的 JobDetails 那個物件新增 props 屬性
- 接著 JobDetails.vue export default 的 data() 就可以註解起來
- 到網頁畫面一切的功能仍可運作
- 在 jobs.vue 新增樣式,Jobs 頁面下方連結樣式
// Jobs.vue - 1 新增 <router-link> 修改內容

<template>
  <h1>Jobs</h1>
  <div v-for="job in jobs" :key="job.id">
    <router-link :to="{ name: 'JobDetails', params: { id: job.id } }">
      <h2>{{ job.title }}</h2>
    </router-link>
  </div>
</template>

<script>
export default {
  data() {
    return {
      jobs: [
        { title: 'Ninja UX Designer', id: 1, details: 'lorem'},
        { title: 'Ninja Web Developer', id: 2, details: 'lorem'},
        { title: 'Ninja Vue Developer', id: 3, details: 'lorem'}
      ]
    }
  }
}
</script>

<style>

</style>
// JobDetails.vue - 3 在 export default 新增 props 屬性
<template>
<h1>Job Details Page</h1>
<p>The job id is {{ id }}</p>
</template>
<script>
export default {
props: ['id'],
data() {
return {
id: this.$route.params.id
}
}
}
</script>
<style>
</style>// index.js - 4 在 routes 的 JobDetails 那個物件新增 props 屬性
import { createRouter, createWebHistory } from 'vue-router'
import Home from '../views/Home.vue'
import About from '../views/About.vue'
import Jobs from '../views/jobs/Jobs.vue'
import JobDetails from '../views/jobs/JobDetails.vue'
const routes = [
{
path: '/',
name: 'Home',
component: Home
},
{
path: '/about',
name: 'About',
component: About
},
{
path: '/jobs',
name: 'Jobs',
component: Jobs
},
{
path: '/jobs/:id',
name: 'JobDetails',
component: JobDetails,
props: true
}
]
const router = createRouter({
history: createWebHistory(process.env.BASE_URL),
routes
})
export default router
// JobDetails.vue - 5 data() 註解起來

<template>
  <h1>Job Details Page</h1>
  <p>The job id is {{ id }}</p>
</template>

<script>
export default {
  props: ['id'],
  // data() {
  //   return {
  //     id: this.$route.params.id
  //   }
  // }
}
</script>

<style>

</style>
// jobs.vue - 7 新增 Jobs 下方連結樣式
<template>
<h1>Jobs</h1>
<div v-for="job in jobs" :key="job.id" class="job">
<router-link :to="{ name: 'JobDetails', params: { id: job.id } }">
<h2>{{ job.title }}</h2>
</router-link>
</div>
</template>
<script>
export default {
data() {
return {
jobs: [
{ title: 'Ninja UX Designer', id: 1, details: 'lorem'},
{ title: 'Ninja Web Developer', id: 2, details: 'lorem'},
{ title: 'Ninja Vue Developer', id: 3, details: 'lorem'}
]
}
}
}
</script>
<style>
.job h2 {
background: #f4f4f4;
padding: 20px;
border-radius: 10px;
margin: 10px auto;
max-width: 600px;
cursor: pointer;
color: #444;
}
.job h2:hover {
background: #ddd;
}
.job a {
text-decoration: none;
}
</style>404 Pages & Redirects
可重複觀看、練習。
操作步驟
- 在 index.js 新增 redirect
- 到網頁瀏覽器網址輸入 all-jobs 會重定向到 jobs
- 錯誤的網址輸入會出現錯誤頁面
- 在 views 資料夾建立 NotFound.vue 檔案(也可以客製化名稱),新增樣板內容
- 在 src/router/index 新增 catchall 404 內容,新增 import NotFound
- 到網頁測試錯誤網址是否能出現錯誤畫面
// index.js - 1 新增 redirect

import { createRouter, createWebHistory } from 'vue-router'
import Home from '../views/Home.vue'
import About from '../views/About.vue'
import Jobs from '../views/jobs/Jobs.vue'
import JobDetails from '../views/jobs/JobDetails.vue'

const routes = [
  {
    path: '/',
    name: 'Home',
    component: Home
  },
  {
    path: '/about',
    name: 'About',
    component: About
  },
  {
    path: '/jobs',
    name: 'Jobs',
    component: Jobs
  },
  {
    path: '/jobs/:id',
    name: 'JobDetails',
    component: JobDetails,
    props: true
  },
  // redirect
  {
    path: '/all-jobs',
    redirect: '/jobs'
  }
]

const router = createRouter({
  history: createWebHistory(process.env.BASE_URL),
  routes
})

export default router
// NotFound.vue - 4 新增樣板內容

<template>
  <h2>404</h2>
  <h3>Page not found</h3>
</template>
// index.js - 5 新增 catchall 404 內容、新增 import NotFound
import { createRouter, createWebHistory } from 'vue-router'
import Home from '../views/Home.vue'
import About from '../views/About.vue'
import NotFound from '../views/NotFound.vue'
import Jobs from '../views/jobs/Jobs.vue'
import JobDetails from '../views/jobs/JobDetails.vue'
const routes = [
{
path: '/',
name: 'Home',
component: Home
},
{
path: '/about',
name: 'About',
component: About
},
{
path: '/jobs',
name: 'Jobs',
component: Jobs
},
{
path: '/jobs/:id',
name: 'JobDetails',
component: JobDetails,
props: true
},
// redirect
{
path: '/all-jobs',
redirect: '/jobs'
},
// catchall 404
{
path: '/:catchAll(.*)',
name: 'NotFound',
component: NotFound
}
]
const router = createRouter({
history: createWebHistory(process.env.BASE_URL),
routes
})
export default router
Programmatic Navigation (程序化導航)
可重複觀看、練習。
操作步驟
- 在 App.vue 新增三個按鈕、@click 事件、<script> export default、button 樣式
- 開始撰寫 back() 內容($router 與之前$route 的不同),並測試向前的功能。接著寫 forward() 內容,然後測試向後的功能。接著寫 redirect() 內容,然後測試重定向到 home 頁面的功能。
// App.vue - 1 新增三個按鈕、@click 事件、<script> export default、button 樣式

<template>
  <div id="nav">
    <router-link to="/">Home</router-link> |
    <router-link :to="{ name: 'About' }">About</router-link> |
    <router-link :to="{ name: 'Jobs' }">Jobs</router-link>
  </div>

  <button @click="redirect">Redirect</button>
  <button @click="back">Go back</button>
  <button @click="forward">Go forward</button>

  <router-view/>
</template>

<script>
export default {
  methods: {
    redirect() {},
    back() {},
    forward() {}
  }
}
</script>

<style>
#app {
  font-family: Avenir, Helvetica, Arial, sans-serif;
  -webkit-font-smoothing: antialiased;
  -moz-osx-font-smoothing: grayscale;
  text-align: center;
  color: #2c3e50;
}

#nav {
  padding: 30px;
}

#nav a {
  font-weight: bold;
  color: #2c3e50;
  text-decoration: none;
  padding: 10px;
  border-radius: 4px;
}

#nav a.router-link-exact-active {
  color: #fff;
  background: crimson;
}

button {
  margin: 0 10px;
  padding: 10px;
  border: none;
  border-radius: 4px;
}
</style>
// App.vue - 2 撰寫 back()、forward()、redirect()

<template>
  <div id="nav">
    <router-link to="/">Home</router-link> |
    <router-link :to="{ name: 'About' }">About</router-link> |
    <router-link :to="{ name: 'Jobs' }">Jobs</router-link>
  </div>

  <button @click="redirect">Redirect</button>
  <button @click="back">Go back</button>
  <button @click="forward">Go forward</button>

  <router-view/>
</template>

<script>
export default {
  methods: {
    redirect() {
      this.$router.push({ name: 'Home' })
    },
    back() {
      this.$router.go(-1)
    },
    forward() {
      this.$router.go(1)
    }
  }
}
</script>

<style>
#app {
  font-family: Avenir, Helvetica, Arial, sans-serif;
  -webkit-font-smoothing: antialiased;
  -moz-osx-font-smoothing: grayscale;
  text-align: center;
  color: #2c3e50;
}

#nav {
  padding: 30px;
}

#nav a {
  font-weight: bold;
  color: #2c3e50;
  text-decoration: none;
  padding: 10px;
  border-radius: 4px;
}

#nav a.router-link-exact-active {
  color: #fff;
  background: crimson;
}

button {
  margin: 0 10px;
  padding: 10px;
  border: none;
  border-radius: 4px;
}
</style>
Lazy Loading Components
稍微簡單提及,可重複觀看、練習,查看文件。
資源
操作步驟
- 在 index.js 註解 import About、修改 route 的 About component
// index.js - 1 註解 import About、修改 route 的 About component

import { createRouter, createWebHistory } from 'vue-router'
import Home from '../views/Home.vue'
// import About from '../views/About.vue'
import NotFound from '../views/NotFound.vue'
import Jobs from '../views/jobs/Jobs.vue'
import JobDetails from '../views/jobs/JobDetails.vue'

const routes = [
  {
    path: '/',
    name: 'Home',
    component: Home
  },
  {
    path: '/about',
    name: 'About',
    component: () => import('../views/About.vue')
  },
  {
    path: '/jobs',
    name: 'Jobs',
    component: Jobs
  },
  {
    path: '/jobs/:id',
    name: 'JobDetails',
    component: JobDetails,
    props: true
  },
  // redirect
  {
    path: '/all-jobs',
    redirect: '/jobs'
  },
  // catchall 404
  {
    path: '/:catchAll(.*)',
    name: 'NotFound',
    component: NotFound
  }
]

const router = createRouter({
  history: createWebHistory(process.env.BASE_URL),
  routes
})

export default router